Google+ House Revivals

Friday, December 9, 2011

Honeycomb Ornaments from Vintage Book Pages

Yippee!  I'm finally back on my own computer, so I can share with you the new ornaments I've been working on. I shared in an earlier post that this new design is inspired by a pumpkin, vintage paper ornaments, and some plastic Martha Stewart ornaments sold at Home Depot.


I loved all the darling pumpkins made from fanned out books that were showing up in bloggy world last month.  They were just way too cute.  I also adore vintage Christmas ornaments, and have always drawn lots of inspiration from them.  These honeycomb ornaments from Marie's Etsy shop are really sweet.


When I saw a Martha Stewart plastic honeycomb ornament while walking through Home Depot the other day, the idea formed to try making my own -- from vintage book paper, of course!


These ornaments look great just hanging from a bit of fishing line, but you can get a little fancier and make a glittered wire hanger if you'd like.


Make these little darlings in lots of pretty shapes!


This post is just a teaser -- the full tutorial will be up in a couple of days.  If you're not already a follower, be sure to hit "follow" in my sidebar, so you're sure not to miss it.  Be back soon!

Here is the link to the tutorial for the honeycomb ornaments: Click Here

To see other projects made from vintage book pages, go here, or here.


Monday, November 28, 2011

Felted Wool Mittens

I was looking for a nice way to package gift cards this Christmas.  Gift cards can feel a little impersonal, so I created these felted wool mitten ornaments to slip the cards into.  Long after the cards are spent, the recipients will have these sweet handmade ornaments.


You can string several together to create a homespun Christmas garland to hang across your mantel for Santa to fill.  Or hang it anywhere, for that matter!  Here in the Pacific Northwest, winters at the beach can get a little chilly, so a few warm fuzzy mittens hanging across a beach house porch seems totally appropriate.


These mittens are super easy to make.  Start with some old or thrifted wool sweaters.


The green sweater, above, has already been felted.  To felt your sweaters, just toss them into a hot/cold wash cycle, with a little detergent.  Dry on high.  Repeat until you are happy with the felted material.  Ideally, felted wool will not unravel when you cut into it, making it perfect for crafting and sewing projects.  If your sweater has some pilling, like the green sweater here, just hit it with a soft brush.

Next, you will want to create a mitten pattern.  Here, I just used a magazine insert to sketch out the mitten shape.  Junk mail works great, too!  Why waste good paper, right?  Once you are happy with your mitten shape, cut it out and use it as a template to trace onto your felted wool.  Cut two pieces for each mitten.  I hand stitched mine together using a simple blanket stitch (it takes about 10 minutes to blanket stitch one mitten).  A whip stitch would have looked very charming, and a bit more primitive, and would "whip up" much more quickly.  You can also stitch it on your machine -- or forget stitching altogether, and just use glue :)
Decorate your mittens by gluing or stitching embellishments.  I used a simple lazy daisy stitch for girls' mittens, and glued on some thrifted greenery, yarn, and mini-candy canes.  Slip in a gift card, or other small gift, and you're done! 
Enjoy!
Thanks for stopping by!
Amanda

Sunday, November 27, 2011

New Star Design from Vintage Bookpages

Okay, this isn't a "new design".  I actually made this last Christmas, but never had time to write a post about it during the holidays.  The original idea was to create a kind of "shadow box" and add a nativity silhouette in the center, but on a whim I suspended a pretty ornament in the center, instead.

Basically, this is a star made from rolled vintage book pages.  I used an old pen to roll the pages all the same size, then secured each little roll with a smidgen of tacky glue.  Next, I made a pattern for a five-pointed star, using this method.

Wednesday, November 23, 2011

Mums, Peonies, and More Blog Theft


Most of my projects, lately, have been "house" related, but I recently squeezed in a new singed flower design.

Many of you are familiar with the burned edge poppies...

...and the burned edge peonies that I designed last year. 

Well, I've had it in the back of my mind to do a chrysanthemum for quite a while.  I wanted to see if it had already been done, and did some Google searches for burnt, and burned, and singed flowers, and guess what?  Images from my own tutorials were popping up for another blog.  I'm not talking about when other bloggers feature your project, with a link and a credit.  I'm talking about out and out theft.  I would encourage other bloggers to randomly search for content from their own blogs -- especially popular posts, to see if your own content is being hijacked.

I have begun the long process of watermarking my photos, starting with the woven star tutorial (yes, it's been hijacked by multiple blogs).  This doesn't actually stop the hijackers, but it will at least take away their credibility, right? 

For now, I will just make a quick pass over the most popular posts, and watermark the most important images, but eventually, I will need to watermark everything.  It is going to take months.  Seriously.  Especially with two renovations in progress, and several burnt edge chrysanthemums to finish up for our Thanksgiving place settings :)

Here's a peek at the project:

No pressure.  Just a few handmade fabric mums to whip up between painting some cupboards and preparing for house guests.  Easy peasy, right?  What kinds of projects and dishes are you working on to prepare for Thanksgiving? 


Tuesday, November 15, 2011

Painting the Trimwork Black!


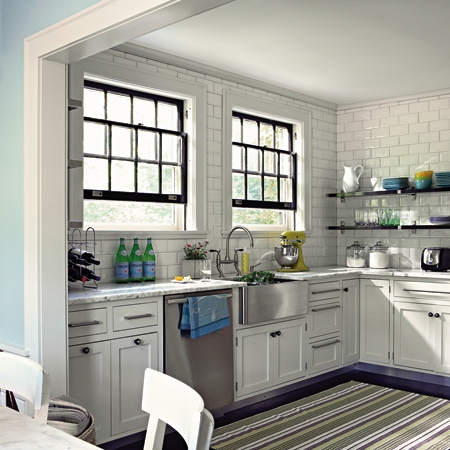
Do you just love the surprise and contrast of black trim work?  I think sometimes we get so used to just painting all our trim white that we forget there are lots of other options, including black.  The black window frames in the kitchen below provide a nice contrast, without overwhelming.  They work because they reference some other dark elements in the room.

The beautiful historic architecture of the space shown here is accentuated by the boldly painted trim work.

Who doesn't love a black door?

This room feels light and airy, but the pops of contrast provided by the dark trim keeps it from being to precious.

The dark painted trim in the traditional room below makes the space feeling elegant.
So, what do you think?  Do you like black trim?  Would you ever try it in your own space?


Friday, November 11, 2011

Thanksgiving Wreaths


Are you just loving Pinterest?    House Revivals has several boards, organized by categories, such as "staircases" and "mudrooms".
I love having an online bulletin board for storing inspiring images, but Pinterest is also great for searching for inspiration.  Today, I had a few moments while waiting for joint compound to dry at the condo renovation.  I could either pay some bills or surf Pinterest....  Well, the bills won't be late for a couple more days, right?

Today, I was totally taken by these fall wreaths.


LOVE the creativity of the book page oak leaves and the bright fall foliage against the blue door.


This yellow yarn wreath is so cheerful and welcoming.

These rolled felt rosettes are too darling.

Be sure and check out Pinterest, if you haven't been there..., but I have to warn you:  It's addictive.


Happy pinning!


Wednesday, November 2, 2011

Stolen Blog Content


It happened to me.  I have discovered that content from House Revivals has been hijacked by one of those "fake" blogs.  As I look around this fake blogger's site, I am finding lots of what appears to be stolen content from other blogs, as well. 

This is the blog that contains the hijacked content:

http://howtomakecraft.blogspot.com/

Has any of your own content been hijacked?  If so, be sure to use blogger's "report abuse form" to submit a complaint. 


Wednesday, October 26, 2011

Unpacking Priceless Artwork

I've been holding out on you guys.  I'll bet you didn't know I had a collection of priceless artwork?  I do!  It's been in storage for over a year and a half.


Little by little, we have been bringing things out of storage, as we begin to settle into the beach house. (And, no, the beach house reno is not completely finished, but the major construction part is done, and we have officially begun moving in).


Imagine our delight when we came across this large portfolio in one of our storage lockers!


Our art collection consists primarily of pieces from three of our favorite artists, two male, and one female.


Each artist is comfortable working in a variety of mediums, from pastels to oils.


We began following the work of these artists more than two decades ago!  It's crazy how the time flies.  We've managed to amass a rather large collection of their work, representative of many different periods in their careers, including this example from the "dark period" of one of the creatives.


That particular artist made a new discovery a short time after the above canvas was completed -- a discovery that brightened his outlook...


He discovered beautiful women, and his outlook on life was forever changed....


His work -- and his world -- was filled with a new kind of promise...


... and, so he began to mature... and he joined the Navy and started doing grown up things, and he put the dark years behind him.


Another of the artists we favor had a remarkable talent for faces, even in her earliest years...


She still does....

One of the three decided not to pursue the visual arts after a time, moving instead into the sciences, so his pieces are particularly rare and treasured.


I know you all want one of his pieces, but I have to tell you, I wouldn't part with this artist's work for any amount of money.


So, there you have it.  Our secret is out.  My husband and I collect priceless art pieces.  We are fairly discerning in the artists we follow, preferring to follow just a few artists throughout their entire careers.

Do you have a favorite artist whose work you collect?


Monday, October 10, 2011

Wild Pants Lamp Gets a Make-Over


Remember the Wild Pants Lamp I shared about here?
Well, the Wild Pants Lamp got another make-over.  Remember Dexter, my one year old side-kick?

Well,  the lamp and the pup had a little collision....

His Mommy tried to fix it with duct tape...

Maybe Gorilla Glue would work better....