Thank you all so much for sharing your Scandinavian stars with me over the last weeks! I am collecting of portfolio of images and stories of these lovely woven stars. I think the best part of this process has been the new friendships that have been forged. I love you gals! As a thank you, I have created a new tutorial inspired by one of your stars.

Readers have shared family heirlooms, antique store finds, Girl Scout craft memories, and stories of weaving stars from paper or straw or wood in the "old country" as children. Please keep your stories and pictures coming!
Today I want to share a star from the private collection of Kristine Leander, executive director of our Swedish Cultural Center. Kristine lived in Norway in the eighties and early nineties. On weekends, she would travel to Sweden, haunting the antique shops there. On one of her trips, she found this lovely antique birch star. You can tell, simply by looking at this picture, that her woven star has seen many winters! I adore the woven details on the star tips -- so very pretty. The fact that it has become a bit warped over the years just adds to its charm. Kristine's star was woven from birch, and held a little light inside. It would have been hung in a window at Christmastime, to welcome family and friends to the warmth and comfort of home. This star held an electric bulb, but earlier Advent stars often held a small oil lamp!
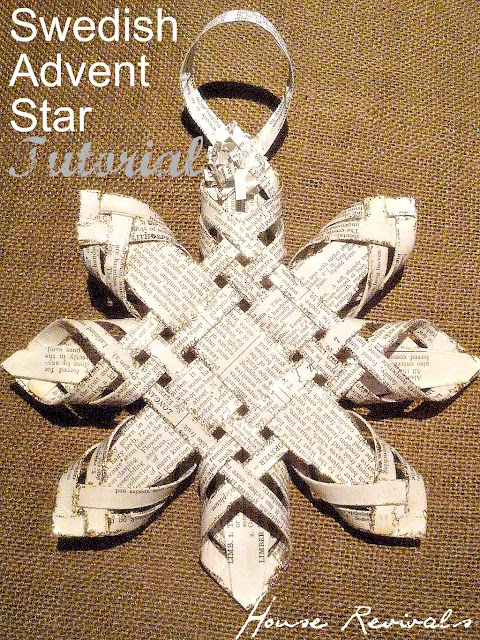
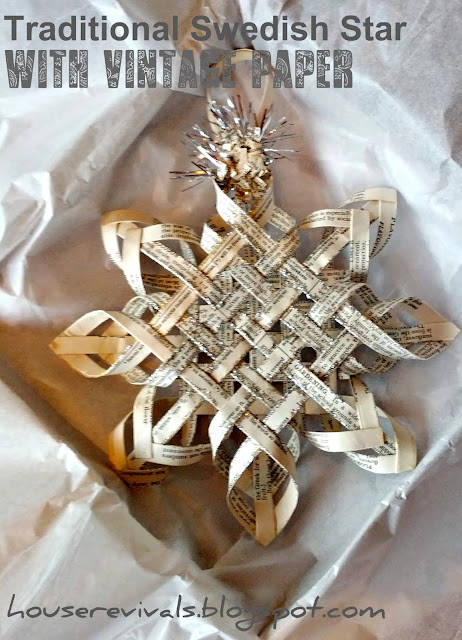
I created a tutorial for making this paper star, inspired by Kristine's antique star. As you all know, I love to work these stars from folded strips of vintage book pages; but you can make them from just about any material you'd like to use. Most of my readers prefer to use heavy scrapbooking paper, cut into strips. Use whatever you like -- and pretty please, share your star with me! I love to see your projects!

You will need twenty strips of your chosen material to make your star. To see how I fold my paper strips, see this post. In this case, Kristine's center strips are very wide, so I made sixteen strips that are approximately one-quarter inch wide by six inches long; and I made four strips that were three-quarter inches long by six inches.
Kristine's star had center veneer strips with tapered ends -- probably because the center strips were so wide, it would have been impossible to form the star tips without narrowing the strips on the end. I tapered mine by folding the corners in and securing with glue, but I would recommend simply trimming the strips with scissors and securing the edges with glue (if you are working with multiple folded layers).
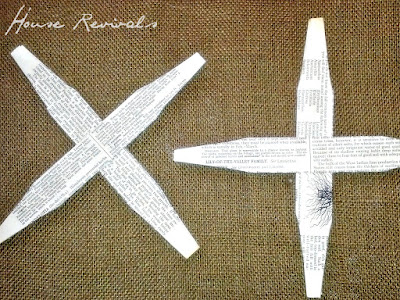
Next, find the center of each fat strip, and glue two pairs together, as shown.

Now, take your skinny strips, and weave together with the fat strips. You will be creating two sides, that will be joined later. Secure each intersection with a dot of glue. (note: I am not sure it is necessary to glue the intersections, but I don't seem to have enough hands to make these without doing so. Plus, by gluing the intersections, I can control the spacing of the strips)
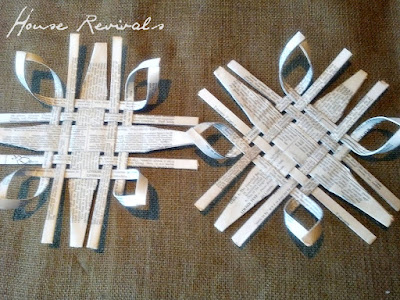
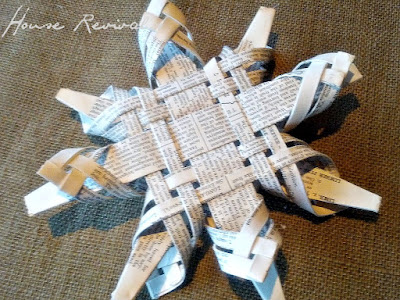
The next step is to glue your star tips together. Begin by taking the adjacent strips and twisting them toward each other and gluing the tips together at right angles, as shown.
Kristine's star had that lovely woven detail on the tips. To get this look, simply take the next adjacent strips and twist them in and weave across before securing.

If the written instructions seem confusing here, simply recreate the pattern shown in the detail picture above.
Next, take one of the sides and join it to the other side. You will need to turn one side by forty-five degrees, so that each star tip joins with a fat center strip.
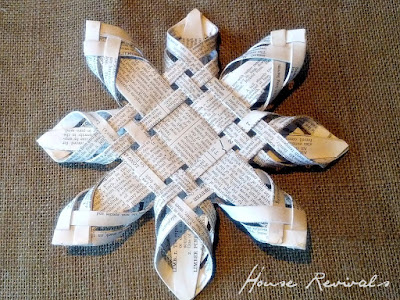
Glue to secure.

Embellish as desired, or leave your star plain -- whatever you do, I promise your result will be beautiful!
I like to add glitter and a hanger made from a strip of paper, but ribbon or twine would work just as well (and it will fit into those little square gift boxes much better without the stiff paper hanger)! Just for fun, I wove some one-eighth inch wide strips through the center. These strips are about four inches long and are secured with dots of glue in a couple of places.
These woven stars are an old traditional craft, and lots of variations exist, but the concept is the same for all of them. If you choose not to make your center strips wider, you will end up with a star that looks something like the star shown below. See that tutorial here.
Happy star weaving! Maybe, if we all get started in January, we will have lots of lovely handcrafted items for Christmas gift giving this year :)
To see more star tutorials inspired by an antique woven star, go here, and here.


Readers have shared family heirlooms, antique store finds, Girl Scout craft memories, and stories of weaving stars from paper or straw or wood in the "old country" as children. Please keep your stories and pictures coming!
 |
| Antique Woven Swedish Advent Star |
Today I want to share a star from the private collection of Kristine Leander, executive director of our Swedish Cultural Center. Kristine lived in Norway in the eighties and early nineties. On weekends, she would travel to Sweden, haunting the antique shops there. On one of her trips, she found this lovely antique birch star. You can tell, simply by looking at this picture, that her woven star has seen many winters! I adore the woven details on the star tips -- so very pretty. The fact that it has become a bit warped over the years just adds to its charm. Kristine's star was woven from birch, and held a little light inside. It would have been hung in a window at Christmastime, to welcome family and friends to the warmth and comfort of home. This star held an electric bulb, but earlier Advent stars often held a small oil lamp!

I created a tutorial for making this paper star, inspired by Kristine's antique star. As you all know, I love to work these stars from folded strips of vintage book pages; but you can make them from just about any material you'd like to use. Most of my readers prefer to use heavy scrapbooking paper, cut into strips. Use whatever you like -- and pretty please, share your star with me! I love to see your projects!

You will need twenty strips of your chosen material to make your star. To see how I fold my paper strips, see this post. In this case, Kristine's center strips are very wide, so I made sixteen strips that are approximately one-quarter inch wide by six inches long; and I made four strips that were three-quarter inches long by six inches.
Kristine's star had center veneer strips with tapered ends -- probably because the center strips were so wide, it would have been impossible to form the star tips without narrowing the strips on the end. I tapered mine by folding the corners in and securing with glue, but I would recommend simply trimming the strips with scissors and securing the edges with glue (if you are working with multiple folded layers).

Next, find the center of each fat strip, and glue two pairs together, as shown.

Now, take your skinny strips, and weave together with the fat strips. You will be creating two sides, that will be joined later. Secure each intersection with a dot of glue. (note: I am not sure it is necessary to glue the intersections, but I don't seem to have enough hands to make these without doing so. Plus, by gluing the intersections, I can control the spacing of the strips)

The next step is to glue your star tips together. Begin by taking the adjacent strips and twisting them toward each other and gluing the tips together at right angles, as shown.

Kristine's star had that lovely woven detail on the tips. To get this look, simply take the next adjacent strips and twist them in and weave across before securing.

If the written instructions seem confusing here, simply recreate the pattern shown in the detail picture above.

Next, take one of the sides and join it to the other side. You will need to turn one side by forty-five degrees, so that each star tip joins with a fat center strip.

Glue to secure.

Embellish as desired, or leave your star plain -- whatever you do, I promise your result will be beautiful!
I like to add glitter and a hanger made from a strip of paper, but ribbon or twine would work just as well (and it will fit into those little square gift boxes much better without the stiff paper hanger)! Just for fun, I wove some one-eighth inch wide strips through the center. These strips are about four inches long and are secured with dots of glue in a couple of places.
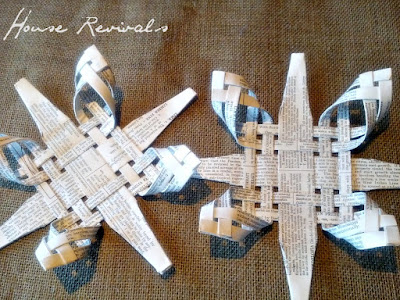
These woven stars are an old traditional craft, and lots of variations exist, but the concept is the same for all of them. If you choose not to make your center strips wider, you will end up with a star that looks something like the star shown below. See that tutorial here.

Notice the tips on this star are not woven like they are on Kristine's star? This technique is easier to do than the woven star tips, but I must admit I'm kind of in love with the idea of weaving the tips from now on :)
Happy star weaving! Maybe, if we all get started in January, we will have lots of lovely handcrafted items for Christmas gift giving this year :)
To see more star tutorials inspired by an antique woven star, go here, and here.


