Google+ House Revivals: March 2010

Thursday, March 25, 2010

J is for Japanning

Japanning typically refers to a technique of lacquering and polishing a piece of furniture or metal ware, wood, or paper mache.

Most popular in the eighteenth and 
nineteenth centuries, Japanned work was created as a way to "knock off" heavily lacquered and decorated pieces being imported from the East -- primarily China, Japan, and India. 

For an informative article on the history of Japan work written by Louise Devenish, click here
photo courtesy 1stdibs website
This secretary is an example of a piece you will see in her article.

A term you will often see associated with 
Japanned goods is chinoiserie.  "Chinoiserie" comes from the French, and refers to European or Western items that have been decorated with fanciful interpretations of Chinese scenes.  

Examples of chinoiserie can be found in painted wall coverings, textiles, applied and structural decorations, and painted accessories and furniture.  
 
photo courtesy Made in the Black Country website
This tilt top table, depicting a stylized "Chinese" scene is an excellent example of Japanned chinoiserie.


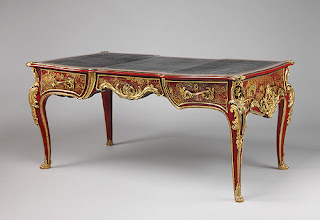
The red Japanned and gilded chinoiserie table shown here is a stunning piece.
 You can learn more about this piece, made for Louis IV, at the Metropolitan Museum of Art website.

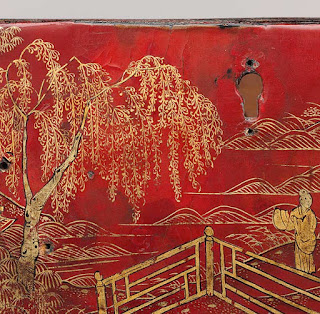
The detail on this drawer front is just incredible.


Although different interpretations of Japanning techniques were developed in other countries, parts of England became especially well known for their Japanned products.
photo courtesy Wolverton Art and Museums website
Of course, not all Japanned articles are furniture, nor was it made only for kings.  The crumb tray and brush shown here, is an example of a utilitarian piece that would have been produced for the rising middle class. Even in the photograph, the visual depth achieved by layering the decorative elements and lacquers is evident.


This paper mache box is another example of a small utilitarian piece.
Photo courtesy Gasoline Alley Antiques
 The decoration depicts a Father Christmas, with Eastern inspired designs on the borders of the box.


The tin tray shown here is an example of Japanning on tin ware, often referred to as tole (not all tole is Japanned, however).
photo courtesy Wolverton Art and Museums website
In this case, the decoration is achieved through one-stroke folk painting techniques rather than by depicting a chinoiserie motif.  The border is painted in a simple, Gothic inspired quatrefoil design.


This teapot stand is another example of a utilitarian piece produced for the middle class.
photo courtesy Made in the Black Country website
An interesting article about the social implications of items as simple as this trivet can be found here, on the Made in the Black Country website.

My favorite piece, however, is this unapologetically non-utilitarian wall plaque.
photo courtesy Wolverton Art and Museums website
First of all, it is not in the least bit pretentious.  It feels like a nice "homey" bit of folk art.  This is definitely "art for the masses" (perhaps we'll see some knock-offs of this piece in a Pottery Barn catalog someday). The faux bois detailing is absolutely charming.  This piece represented "art for art's sake", but pieces like it were accessible to anyone.

Art for art's sake has been important in all levels of society -- whether it be in a king's palace, in the parlor of a member of the rising middle class, or in the living room of a peasant worker.  I think that is why I am drawn to Japanned items -- not only did the inspiration for the technique span continents, but access to Japanned items spanned socioeconomic levels.

This post is being linked to Alphabe-Thursday, at Jenny Matlock's blog, and to Colorado Lady's Vintage Thingie Thursday.

Friday, March 19, 2010

Interior Design and Decorating (and What Do All Those Letters Mean)?

In my work, I am often asked what the difference is between  interior design and interior decoration.  The short answer is "scope of practice and projects"-- but that is way too simplistic --  the long answer involves education, experience, and, in many cases, examination.


Typically, an interior designer will have a minimum of a three or four year degree in interior design, architecture, or a design related field, though that is not always the case.  Often their degree is from a CIDA (formerly FIDER) accredited school, but there are some fabulous schools that are not CIDA accredited. Additionally, many interior designers have degrees in construction management.  Don't be surprised if your interior designer has an advanced degree, as well.


They may have appellations after their name such as IIDA, or ASID.  Strict educational requirements must be met for a designer to join either of these organizations.


They may opt, or in some cases be required by their state, to take the NCIDQ exam (or some other exam specific to their state).  In addition to appellations from professional interior design organizations, they may have kitchen and bath planning credentials from the NKBA, or associations with the AIA.


Most likely, your interior designer will be qualified to make structural changes to a home or small commercial building, but check your state laws to be sure.  In your state, your interior designer may be able to design your house from foundation to roof, draw up the construction documents, pull a building permit, and manage the construction project.  Every state is different, though, so check your state laws and local ordinances to be sure.


Regardless of who you have draw up your plans, if you are planning to build or do a remodel, the time to get your interior designer involved is during the design process (makes sense, right?  designers being involved in design?).


An interior designer may work for an architectural firm, a construction firm, or an interior design firm.  They may work for a design-build firm.  They may work in hotel, or health care, or school design.  They may work in the model home design industry. Sometimes they specialize in hand rendering.... 


.... Or in drafting.  They may even specialize in creating physical or computer generated models -- or at least do these things as part of their scope of practice.  Their educational background will have prepared them to go in any of many different directions with their career.


An interior decorator (or stylist) may or may not have a degree in interior design.  They may be an interior designer who chooses to limit their scope of practice to furniture, textiles, finishes, art, and accessories.  Or they may be untrained in art and design, but have a talent and a passion for creating beautiful interior environments.

Many decorators and stylists are fantastically 
gifted, so don't let the lack of an interior design 
degree keep you for using their artistic services!  

They may hold a certificate from a design or decorating program.  There have been and are some professional decorating organizations, and your decorator may have affiliations with one of these organizations.  Interior decorators usually do not make structural changes to a building.  Because there is not a generally accepted standard for education in the decorating industry, a decorator may or may not have a working knowledge of building codes, fire codes, and ADA guidelines.


A decorator may carry kitchen or bath planning credentials from the NKBA by meeting education, experience, and examination requirements.  In some states, a decorator may use the title of interior designer, which can lead to some confusion.  Decorators may work for decorating firms, interior design firms, furniture stores, or be self employed. They may also work in the home staging industry.


Being a  kitchen and or bath planner does not mean you are an interior designer or an interior decorator, but you may be.  It does mean that you should have a strong working understanding of human anthropometrics, kitchen and bath space planning, appropriate finishes, codes and safety, residential structures, and mechanical and electrical systems.  It is very common to see interior designers and decorators with credentials from the NKBA.  You do not necessarily need to have credentials from the NKBA to be a competent kitchen or bath planner-- many kitchen and bath showrooms will train promising applicants. An interior designer will have the educational background to prepare them to work in kitchen and bath planning, so they may decide additional kitchen and bath credentials are unnecessary.

Have I thoroughly confused you?   Below is an excerpt from the NCIDQ website concerning interior design and interior decorator professions. Click here to see the quote in it's entire context.

"Interior design is the art and science of understanding people's behavior to create functional 
spaces within a building. 
Decoration is the furnishing or adorning of a 
space with fashionable or beautiful things. 
In short, interior designers may decorate, but decorators do not design."


I have to tell you that this was by no means an exhaustive list of "letters" for credentials or accrediting bodies within the design industry, but included were the most commonly seen "letters" in the industry.  Your designer or decorator may have associations with regional, state or provincial organizations, organizations for furniture design, hospitality design, and so on.

So, here's a quick recap of the "letters" discussed in this post, and what they stand for:

ASID (American Society of Interior Designers)
IIDA (International Interior Design Association)
AIA (American Institute of Architects)
CIDA (Council for Interior Design Accreditation)  -- formerly FIDER
FIDER (Foundation for Interior Design Education Research)
ADA (Americans with Disabilities Act)
NKBA (National Kitchen and Bath Association)
NCIDQ (National Council for Interior Design Qualification)

For a list of licensing regulations for your state, click here.  For a list of eligibility requirements to sit for the NCIDQ exam, click here.


This post is being linked to Jenny Matlock's Alphabe-Thursday.

Friday, March 12, 2010

How to Make a Burnt Peony

I've seen lots of gorgeous burnt edge flowers floating around in blog land lately, and felt inspired to create my own version recently.  
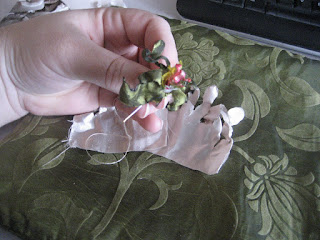
We were invited to a double birthday party for a couple of women we know, and I wanted to bring them something small, but special.

You know how it is when you don't want to bring the same old bottle of wine, but a larger gift isn't really appropriate?   

I thought of all the burnt edge flowers I'd been seeing, and I thought of spring, and so (of course), I thought of peonies!
I love the simple, stylized flowers made from circles (like the ones on Kudzu's blog, here), but I wanted to take advantage of the melting characteristics of the fibers to create something a little more realistically inspired for this project.

To start, I chose three different fabrics for the flower, and two for the foliage.  One of the three fabrics used for the body of the flower is a lot like buckram, but it's polyester.  I used it to give the flowers some "body".  You could also use tulle or regular buckram, but I wouldn't recommend burning the edges on those pieces.  Try to match your thread to your project fabrics.  Since all of our goods are in storage until we find a new house, I needed to buy thread and needles.  We have a fun little Japanese $1.50 store across the street where I was able to find these.

In the spirit of "revival", I used thrifted, repurposed, and vintage fabrics, but you could easily use new fabrics -- you can make two large flowers with three one-third yard pieces plus a few small scraps for the throat of the flower and for the foliage.  While we're discussing fabric, it's important to choose a poly fabric, to get the nicest edge.    

*It's very important not to use acetate or acrylic fabrics (or use them with great care).  These fabrics are very combustible. (This is why you would never choose untreated acetates or acrylics for something like a window treatment-- imagine a candle (or a heater) placed a little too close to the curtain, the flame is drawn toward the fiber or a slight breeze moves the fabric into the flame, and WHOOSH, there is oxygen moving freely around the fabric to feed the flames, fire climbs.... bad news.)

Once you have your poly fabrics, you can decide how big you want your flower to be.
Begin cutting circles out of your fabric (you can freehand this), making each circle progressively smaller.  I used eight circles for each flower, but fewer would have been fine.

Now, light a candle.  Carefully (hot, melted poly can stick to your skin and really burn) pass the edge of the fabric circles through or near the flame.

By passing the fabric near the flame, you have a lot of control over  how much the edge of the fabric will curl.  By passing the fabric through the flame, you can get more of a "burnt" look.
When you have the edge of your circle entirely done, fold the circle in half, and then into thirds.
Then cut "petals" into the fabric.
Quickly pass the "crotches" between the petals back through the flame to seal and shape them.  I found that by doing the petals in this order, I had better control over the fabric, as it was less "floppy".  Repeat the process with all of the circles.


Because some peonies are a little bit "shaggy", I clipped the outside edges on some of the petals and quickly passed them back through the flame.

For the centers of the peonies, cut some small rectangles of your choice of fabrics and snip a "fringe" into one side.  Then pass the fringe over the flame to curl and seal it.  I used five different fabrics for my centers, beginning with a couple of tiny pieces of pink and yellow, then a piece of green, then two of the fabrics that were used on the body of the flower.

For the foliage, I layered two pieces of fabric together and freehanded the shapes.  I then "burnt" the edges of each leaf, and stitched the two layers together with a simple running stitch down the center of each leaf.

Now for the fun part!  You will start from the center of the flower and build out.  First, create your "center".
My first two pieces were only about an inch wide, each.  I rolled the center most piece, then wrapped the next piece around it and stitched them together.
Keep adding to your center, by wrapping the next layer and stitching until you are happy with how it looks.
At this point, trim off the excess fabric that you have been using as a "handle".

Grab the smallest flower petal layer and stitch it to the center, using your needle and thread to manipulate it till you are satisfied with how it looks.

Now, set the center aside, and grab the next two layers from the stack.

Stitch those two layers together, gathering the center slightly, to add dimension.  Now, stitch them to the center of the flower.

Continue in this way until you use up your flower layers, or have the desired flower fullness.
Depending on how much you gather and manipulate during the sewing process, you will have a more compact or more open flower-- the choice is yours.


Next, stitch the foliage to the back of the flower, add a backing if you like, and add pin or a clip.

Wear it on a scarf, or on your t-shirt, or to a formal, or a wedding, or just use it to dress up a handbag!  Smaller versions could dress up a pair of flats. Pin or stitch your flower to a pillow -- or to your curtain tie-backs.  Have fun, adapt the concept, and pass on your ideas!

This post is linking up to the Upcycled Awesome Best of 2010 at The T-Shirt Diaries, DIY Showoff Project ParadeJust Something I Whipped Up Monday, at The Girl Creative, Make Your Monday at Twice Remembered, It's So Very Creative, at It's so Very Cheri, Met Monday at Between Naps on the Porch, Market Yourself Monday at Sumo's Sweet Stuff, and Spring has Sprung at Fun to Craft, and DIY Day at a Soft Place to Land, Favorite Things Friday at A Few of My Favorite Things, and Strut Your Stuff Thursday at Somewhat SimpleHouse of Grace Best of 2010
Photobucket