Google+ House Revivals: dollar store crafts
Showing posts with label dollar store crafts. Show all posts

Thursday, September 6, 2018

How to Pull Supplies Together For a Pretty Card

One thing I've noticed, when my friends are making cards, is that they often feel a little paralyzed by the thought of creating a card without a set of instructions and a materials list.


It's okay to make cards that way, but it's very freeing to know that you can go through supplies you already own, and pull out the things you need to create one of a kind pieces.

Tuesday, September 20, 2016

Easy Pocket Card Tutorial

A few weeks ago, I shared how to upcycle leftover occasion specific note cards into beautiful all-occasion cards. This week, I'm sharing how to use the cards to make pockets cards.


The same technique will work for making pocket cards from scratch or from blank note cards. Pocket cards are a great way to add little surprises to your card -- you can create tags, or add a gift card, or maybe a set of movie tickets.

Wednesday, June 29, 2016

Star Tutorials You Must Try for Fourth Of July!

Are you ready for the Fourth of July?  It's always been one of my favorite holidays. In the sweet little Colorado town where we raised our kiddos, there was a kid's parade and an orchestra performance in a lovely old town park.  In the evening, families would grab their blankets and walk up the hill to the golf course for a great fireworks display. Here in Seattle, the best viewing is from a boat on Lake Union. Folks take their boats out early and anchor. They swim and cook on the grill during the day, then snuggle in for the fireworks at dusk.


If you've read my blog for long, you know I love stars!

Thursday, May 5, 2016

Make This Pillow Box -- Free Print Out!

Mother's Day is just days away! For a special way to package gift cards, homemade cards, or treats, get this free pillow box printable template, below.


What mom wouldn't love one of these sweet hand made gift boxes?

Tuesday, March 15, 2016

Secret Sisters and Book Exchanges and Field Trips, Oh My!

I shared last week about what to expect when you attend a blog conference.  Today, I want to share a little about the "extracurricular" activities at SNAP conference in 2015.


Several weeks before the conference, registrants had the opportunity to sign up for a Secret Sister (or Brother). We were tasked with stalking (in the nicest possible way, of course), our secret pal, by following their blog and their various social media accounts.

Tuesday, February 23, 2016

11 Easy Art Projects Anyone Can Do

Do you ever look at art and think "I could never do that"?  I promise, the ability to do art is not exclusive to people with fancy degrees or exceptional talent. Sometimes all you need is to just. get. started. You don't need fancy or expensive supplies, either. My favorite set of oil pastels came from the $1.50 store!


My tiny travel watercolor set is a child's set. I use Crayola markers and colored pencils in my art journals. Creating art is relaxing and healing, and it's a great way to bridge generations.

Tuesday, January 12, 2016

Most Popular Posts of 2016

Well, I just couldn't do it. I couldn't limit my annual "best of" post to just ten posts, so,since last year was 2015, I decided to do a "top 15" post!

Here they are, in no particular order:

Monday, December 14, 2015

Make Pretty Icicle Ornaments for Pennies!


This article first appeared on House Revivals in December 2014, and is reprinted by request.


Do you love vintage spun cotton ornaments? Me too! The problem with actual vintage ornaments, of course, is that they are difficult to find and they can be expensive.


I loved the look of a Christmas tree that is just dripping with icicles, but I knew I would never be able to find dozens and dozens of spun cotton icicles -- and even if I did, it would be too expensive to buy so many vintage ornaments.

Tuesday, December 1, 2015

Felted Wool Mitten Ornaments

This article was originally published by House Revivals in December of 2011.


What do you get your mother-in-law for Christmas, when she really doesn't need one single thing?  That's what I was wondering when she came out to the beach house for a visit this fall. She happened to bring up some embroidered ornaments I had given her years ago, mentioning that they were her favorites.  Each of the embroidered ornaments had the name and birthday of one of her seven children. An idea formed.


Why not make little "grandchild ornaments" for my mother-in-law for Christmas?   

I had tons of small felted wool scraps leftover from the gift card ornaments I wrote about here.  The scraps were small and I was debating whether to throw them away. 

Tuesday, November 10, 2015

10 Pretty Vintage Book Page Christmas Decorations to Make

You can get a head start on your handmade holiday gifts and decor, and recycle some vintage book pages with these easy tutorials!


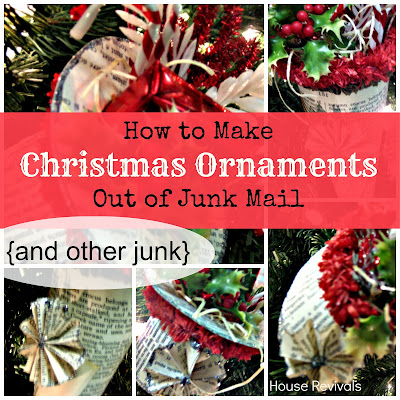
This little slipper, cone, and top hat ornament were fashioned from vintage book pages and junk mail!


This shadowbox star was crafted from rolled from pages from a vintage prayer book.


If you're looking for a super quick project with lots of impact, this Christmas Tree banner might be perfect.  Use washi tape, or use up your paper scraps!


Here is another quick layered garland, using a recycled Christmas card and book page pompoms.


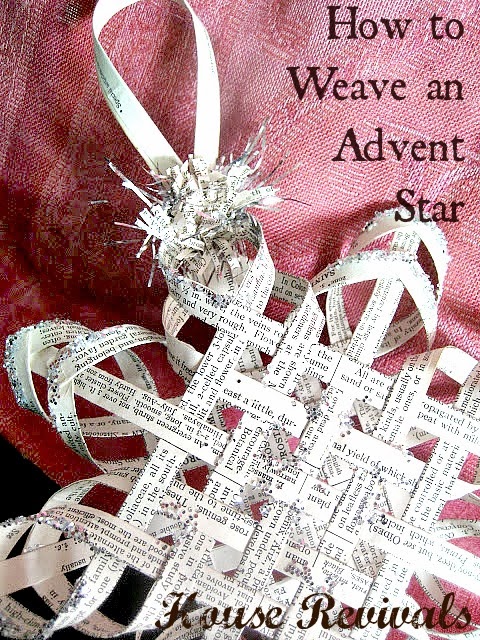
Always a classic, this Scandinavian inspired woven star is made from folded strips of vintage book pages.


These honeycomb ornaments made from encyclopedia pages look lovely hanging from the mantel!


This Celtic inspired star is an adaptation of the popular Scandinavian or Finnish Star.


If you love a good dollar stare project, you might want to give this ornament tutorial a try.


Here is yet another version of the Scandinavian woven star -- originally made from birch veneer, and containing a light inside, these were hung in windows during the holiday season. Children learned to weave the star from paper, as well, to decorate inside their homes.


Strips of vintage book pages and pretty buttons are all you need to make these pretty snowflake ornaments.


If you enjoyed this post, please subscribe to House Revivals in the sidebar, so you won't miss the fun projects we have planned. Find us on Facebook, too, so you can catch all the "in between" stuff, and see what I'm working on daily on Instagram. Feel free to link today's project to your favorite social media sites.

Thanks so much for stopping by!


Tuesday, October 27, 2015

Make a Pretty Garland for Fall

This post originally appeared on House Revivals in 2011, and is being re-published because it is easily adapted to fall decor. While the inspiration was a Japanese Magnolia, this process will lend itself to chrysanthemum inspired projects, as well.

While we remodel our house, we're living in a tiny city apartment with a rooftop garden.  The garden has some beautiful blooming shrubs.  They are really lovely right now and inspired me to create this simple spring garland.


The shrubs look a bit like a Pussy Willow, but the branching pattern is different.  With some research, we discovered they are a variety of Japanese Magnolia.


The buds are velvety soft, and open up for these lovely white flowers to emerge.  Eventually, the entire shrub will be covered in these white blossoms.


The garland interpretation is not literal -- it's just inspired by the simple exuberance of the blooms.


I wanted to keep the form simple, adding interest by layering texture. This was done by using a combination of vintage crepe paper, crinoline, and vintage book paper.  You don't need to use exactly what I used to create a similar effect -- just use what you have on hand.  Maybe you have an old silk blouse, some cheesecloth, and a binder of old hand-written college notes?   You could even use your junk mail!


Begin by cutting your materials into strips and cutting a fringe into both long sides, as shown here.  The size you use will depend on the width and fullness you want for your flower.  I used pieces about seven inches long by about two and one-half to three inches wide, depending on which layer I was cutting.


You can stack your strips, cutting several layers at a time, if you wish.


Then tie each strip into a little bundle, using string or thread or wire.


Layer your bundles as desired and tie them together.  Then fluff and coax your flowers into shape.


I actually added the book page layer last, gluing it to the back perpendicular to the other layers to sort of "fill out" the flowers.  The centers are simply tiny scraps of crepe paper, about three-quarters of an inch square, snipped into fringe and glued down.  You could use bits of fabric, string or yarn -- even a button or bead.


The flowers were glued to lengths of finger crocheted thread to create a garland.  Again, you'll want to use whatever you have on hand for this -- it could be torn strips of fabric, selvages, twine, even wire -- just use what's handy.


I layered my garland with lengths of torn draped crinoline.


On a difficulty scale between one and ten, I'd give this project about a three (owing mostly to having to clean up all the little snippets of string and thread and paper -- I had it all over my clothes, on my desk, and on the carpet before I was finished)!


 This is a fun, forgiving craft.  Imperfectly inspired by nature -- not a perfect imitation of nature.


What inspires you to create?

If you enjoyed this post, please subscribe to House Revivals in the sidebar, so you won't miss the fun projects we have planned. Find us on Facebook, too, so you can catch all the "in between" stuff, and see what I'm working on daily on Instagram. Feel free to link today's project to your favorite social media sites.

Thanks so much for stopping by!

Tuesday, October 20, 2015

Make Your Own Paper Bead Roller!

This article for appeared on House Revivals in May of 2014.

If you love rolling paper beads -- or you just want to give it a try, here is a quick and easy way to make your own bead rolling tool using items you have around the house.


I was rolling my beads using the old school method, and it was seriously cramping my hands. I thought there had to be a better way, but didn't have the willpower to wait two days for a bead roller to come in the mail. 

Thursday, September 3, 2015

Easy Fridge Magnet DIY With Dollar Store Supplies

After making several wire wrapped pendants last year, to give as gifts, I still had quite a few Dollar Tree glass cabochons left over. I decided they would make perfect fridge magnets to give as teacher gifts, or neighbor gifts, or to use as stocking stuffers. In the end, I really liked them, so I kept them for myself!


Fridge magnets aren't just for fridges -- they are great to use on magnetic bulletin boards in your home's command center, or to use on metal filing cabinets in your office.

Thursday, August 13, 2015

{10} Back to School Supplies to Buy at the Dollar Tree

How can it possibly be back to school time already?  Shopping for school supplies can put a pretty big dent in the pocketbook, so when you can find great bargains, you should grab them.


Here are ten back to school supplies to buy at your local Dollar Tree.


Pen pouches. They are light weight, secure, and since they're not bulky, they are easy to slip into an outer pocket of a backpack.


Foam Core and Project Display Boards. It's great to keep a supply of these handy for those projects you don't find out about until the night before they're due.


Poster Board. See above.


Office Supplies.  It's great to have a ready supply of office supplies to keep things organized. You can find everything from  push pins to staples at your Dollar Tree.  *buy your pens somewhere else


Correction Fluid. Older kids will appreciate having some correction fluid for assignments that need to be hand written in pen.


Popular Brand Adhesives. Keep you eyes open for name brand products. A dollar for three tubes of glue is a steal! Skip the off-brands.


Kraft Paper. Kraft paper makes the BEST book covers. Your kids can decorate the paper with markers before covering. It's also great for art projects, or to use as drop paper for messy projects. If you have any left over, use it for holiday gift wrap.


Homework Supply Tubs or Bins. Make a supply bin for each of your kiddos, that they can grab and take to wherever they like to do their homework. Keep each bin stocked with grade appropriate supplies.


Hand Sanitizer. Many teachers ask for donations of hand sanitizer for class use, and older students may want to slip a small bottle of sanitizer in their backpacks.

These are only a few of the great back to school bargains you can find at Dollar Tree. Of course, you will want to check sale flyers for other discount stores, as items are deeply discounted at this time of year. Go where you can get the best value for your money.

Good luck, and happy shopping!


To see how to organize your crafts with Dollar Store supplies, click here.

If you enjoyed this post, please subscribe to House Revivals in the sidebar, so you won't miss the fun projects we have scheduled. Find us on Facebook, too, so you can catch all the "in between" stuff; and see what I'm working on daily on Instagram. Please consider linking today's post to your favorite social media sites to help get the word out about House Revivals.

Thanks so much for stopping by!


Wednesday, July 1, 2015

Make a Fun Smash Journal From Dollar Store Supplies!

Hello friends! You may have noticed that I've decreased the frequency of my posts in the last couple of weeks. Don't worry, I'm still here and I'm still making stuff. I just decided to slow down the pace for a few weeks over the summer, to make more time to hang out with friends and family.


One of the fun things I made recently is a smash journal, using Dollar Store supplies!


I am IN LOVE with the smash journal concept. If you have drawers and boxes full of vintage ephemera, or if you've simply collected an abundance of pretty paper over the years, this is a project you might love, as well! This is a project inspired by a Heidi Swapp video. Heidi made a scrapbook for her daughter using a plastic 12x12 paper holder.


I started by grabbing a few items from the local Dollar Tree, including a plastic document file, some pretty note paper, and a package of  binder dividers. All you really need, however, is a plastic file, and a drawer full of random paper.


Begin by cutting off both fused ends of the file and discarding. You can even up your cuts with a paper cutter afterward, if you need to.


Next, go through your papers and dividers and cut them down to a size that will fit inside your smash journal. I used the plastic divider sheets from the document file as a guide. Get creative here. Fold some pages over, create pockets -- anything goes! As long as your items fit in your book, they do not have to be the same size.


I cut down the pocket divider from the Dollar Store set that I bought. Assemble your pages and bind together. I have an O-ring binder, but if you don't have one, you can take your stack of pages to a printer and they can bind it for you -- or you can punch holes and add rings or cord. I bound my plastic file right into the journal by folding it back on itself and and adding it to the back of the stack before inserting the O-rings.


I LOVE IT! This smash journal was made as a gift, to encourage a friend, but you can be sure I will be making more very soon.


The book is full of pretty things, vintage book pages, hand drawn doodles, pockets, and note pages.


I was planning to do a "flip through" in this post, but it was getting so long, I decided to save it for another post.


Have lots of fun decorating the cover of your smash journal. Since the cover is translucent, I made sure the top page was something pretty, then I added a tiny banner, made from tiny scraps and embroidery floss. The elastic closure was dressed up with fun foam flowers. The recipient's name was added in glittered foam letters.


If you have a stash of fun papers, you'll definitely want to try a version of this project!

If you enjoyed this project, please subscribe to House Revivals in the sidebar, so you won't miss the fun projects we have planned. Find us on Facebook, too, so you won't miss any of the "in between" stuff, and see what I'm working on daily on Instagram. Feel free to link today's project to you favorite social media sites.

Thanks so much for stopping by!