Showing posts with label beach decor. Show all posts
Thursday, November 1, 2018
Free Furniture and Decor for Holiday Entertaining
Thursday, October 4, 2018
More Ways to Furnish Your Home For FREE!
When my husband and I were starting out, we were young and impoverished students. Our first sofa was found, free, from the want ads. My mom helped me re-upholster it from mismatched remnants we found at a local fabric store. It looked amazing.
After reupholstering that sofa, I was hooked on DIY projects. I sewed curtains, painted dressers, made Christmas ornaments, and so on -- stretching our limited dollars while creating a home for our growing family.
Tuesday, July 24, 2018
How to Make a Paper Mache Starfish
I adore paper mache. When it comes to crafting, I would go so far as to say it's my first love. Since we've moved to more humid climes, however, I've found that my projects don't dry quickly (or at all) on their own.
I've learned to compensate by using the oven and putting drying racks over heat vents. Another way I compensate is by finding ways to keep my armature from getting too wet.
Tuesday, February 7, 2017
Valentine Pocket Hangers and Garlands {Upcycled Mixed-Media}
A couple of years ago, I found a great deal on old LP's in a local Goodwill. They were ten cents a piece, so I grabbed a stack of albums that met one of two criteria: good album, or good cover graphics.
We keep an old stereo at the beach house, so LP's get plenty of use, but since not all the vinyl was in good shape, I was looking for album covers that could easily be re-purposed. I found a melted LP, with beach themed graphics and decided to make some Valentine pockets with it.
Tuesday, August 16, 2016
Our New Beach House Cats
We adopted two cats this summer. I was scrolling through our local Nextdoor forum, and noticed that someone was looking for a home for their cats, as they were soon to be moving. I was a little shocked, at first, after all, who leaves their cats when they move? When I clicked on the posting, I understood.
Syd and Leo each weigh over five hundred pounds. They are not easy to move. The owners had moved them several times, but they were getting older, and it was time to find the cats a new family. I called them and made an appointment to meet the cats in their Seattle courtyard.
Tuesday, August 9, 2016
Working on the Beach House Path
It's been quite a while since I posted any beach house updates. We continue to plug along with projects, but we try to balance work weekends with resting weekends and entertaining weekends.
Each year we improve the beach path a little bit more. When we first bought the house, the path was only inches wide, and full of holes and random hidden driftwood logs to trip us up. I think I spent as much time face down in the dune grass, as I did walking down the path!
Tuesday, August 2, 2016
Creating Art With Beach Treasures
If you drag home lots of shells and sand dollars from your beach vacations, here is a project that is fun for both kids or grownups.
We spend a lot of time at the beach on the Pacific Northwest coast, and have collected baskets and baskets of shells and sand dollars. I adore them in their natural state, but also love the idea of using them to create art.
Tuesday, June 7, 2016
Make Your Own Pottery Barn Inspired Faux Coral
This tutorial originally appeared in House Revivals in the summer of 2012, and continues to be one of our most popular posts. Enjoy!
Are you still loving all the faux coral decor we've been seeing at places like Pottery Barn and Horchow? I know I love it!
By using faux coral, you can enjoy the casual beachy feeling of decorating with coral, without worrying about how the coral was harvested. Sometimes that faux coral comes with a pretty steep price tag, so I've come up with a way to create beautiful faux coral using very inexpensive materials.
Thursday, March 3, 2016
Tuesday, November 3, 2015
Tuesday, May 19, 2015
Driftwood Magnifying Glass Handle
First of all, I want to start out by saying I LOVE this idea! Second, it's not my idea.
I saw a tutorial for making a rustic magnifying glass handle, using a stick, by my friend Gina at Shabby Creek Cottage.
Tuesday, March 31, 2015
DIY Rope Lampshades
New lampshades can cost a fortune, so whenever we can update the ones we already own, I'm all for it. Here is a DIY rope lampshade project I actually did last year, but in the craziness of life, it never quite made it onto the blog.
Our old house was a Queen Anne bungalow, and not all of the furnishings and accessories work in our contemporary rustic beach house.
Thursday, February 26, 2015
Cool Stuff You Find When You Clean Out the Attic
It's kind of hard to go wrong! When I left off last week, we'd just spent one weekend unboxing and getting rid of stuff, and two weekends building and placing shelves and caulking all the places where the wind came in.
Saturday, February 21, 2015
Getting Shelves In the Studio Attic!
We've been hard at work on the Attic of Shame. My husband and I spent an entire weekend assembling shelves, then we did it again last weekend.
For each shelving unit, I had to go into the attic and clear the space for that unit, so all the heavy things were lifted and moved from the taller side of the room to the short side of the room, a bit at a time. Then, when it was time to put up shelves on the short side of the room, all the heavy things were moved back to the taller side of the room.
Thursday, February 19, 2015
Adventures in Cleaning out the Attic and Creating a Studio
This post is about my attic of shame. Most people have a closet of shame, or a drawer of shame, but I have an entire attic of shame. Plus some closets and drawers.
When we finally moved our boxes out of storage and into our beach house THREE years ago, we were in a huge hurry and still doing major remodel work, so all of the things that we didn't know what to do with, and didn't want to deal with, got shoved into a tiny attic space adjacent to the sleeping loft. Along with all the random stuff, all my studio supplies got shoved into the attic as well.
And there it sat. For THREE years! Sometimes, in frenzied bursts of creative energy, I would tear into some boxes to find a certain supply I was sure I had. Sometimes I found what I was looking for, but mostly not. We had THE WORST movers, and nothing was properly labeled. The attic was a huge mess that made me want to cry. On top of that, since we must spend the work week in the city, and only get to go to our beach house on weekends, we found ourselves not wanting to spend precious beach time hanging out in an attic. Basically, when faced with a choice between a bonfire and an unboxing session, we tended to choose the bonfire. Which is great. Except when you choose the bonfire for THREE years.
Well, my Word of the Year is Intention, and one of the ways I want to be intentional is to spend more time at the beach creating. I had a long talk with my husband about "going down to the sea" intentionally to create for several days out of each month. Not too many days. My husband and I love each other, and like to be together, so I won't be deserting him; but I can often work from the beach house as easily as from the city condo.
So, I have been cleaning out the attic. Believe it or not, the pictures here were taken AFTER I spent a Saturday unboxing and getting rid of stuff! The attic is going to become a "studio-attic". Of course, it also happens to be the only windowless room in the entire house, and contains only one light bulb and one outlet. But mostly, it contains NO VIEW. So, while this space will house studio storage, machines, and a large worktable for bigger projects, smaller projects will still be carried to the dining table, or my drafting table, where there is a view of crashing surf. Because, you just don't go down to the sea to hang out all day in an attic.
The first time we saw the beach house, I knew the loft above the living room would be a perfect studio. It was one of the reasons I chose this house (plus, there was the VIEW). Sigh... Changing job commitments have changed the way we use the house. Now, we use the house for business entertaining about one weekend in four, and the loft has to function as a secondary seating area for games and socializing. I have a small drafting table against that far wall, next to the door, but my dreams for a huge loft studio have been dashed. Le sigh....
Okay, seriously, folks, don't feel sorry for me. I'm a pragmatist, and I understand the house has to earn it's keep. Plus, I still get an ENTIRE ATTIC! Which is more than I've ever had before. And did I mention that this attic is at the beach? After three years (four since we bought the house and started renovations), I'm still pinching myself.
As I was unboxing all that STUFF, that first Saturday, I realized my actions would be futile until I actually had a place to put everything, so I stopped working and curled up in front of the fireplace with my husband and put "buy lots of cheap pine shelving" on my mental to do list. Then, a couple of weeks ago, I went every Fred Meyer within thirty miles of our condo buying ALL THE SHELVES. The sixty inch high units are perfect for the "tall" side of the attic, and the thirty inch high units are perfect for the "short" side.
Do you have a dedicated studio? I could lose myself in Pinterest pictures of gorgeous studios. Mine won't be beautiful right away -- I will feel like I've won the lottery just to have it functional for now! Beauty will come in time.
If you enjoyed this post, be sure to subscribe to House Revivals, so you won't miss any of the fun projects we have planned. Please "like" and subscribe to us on Facebook, so you won't miss any of the stuff that happens between blog posts.., like this cow picture. Who doesn't love a great cow picture?
To find out how we met and fell in love with our beach house, read this post.
As always, thanks for stopping by!
When we finally moved our boxes out of storage and into our beach house THREE years ago, we were in a huge hurry and still doing major remodel work, so all of the things that we didn't know what to do with, and didn't want to deal with, got shoved into a tiny attic space adjacent to the sleeping loft. Along with all the random stuff, all my studio supplies got shoved into the attic as well.
And there it sat. For THREE years! Sometimes, in frenzied bursts of creative energy, I would tear into some boxes to find a certain supply I was sure I had. Sometimes I found what I was looking for, but mostly not. We had THE WORST movers, and nothing was properly labeled. The attic was a huge mess that made me want to cry. On top of that, since we must spend the work week in the city, and only get to go to our beach house on weekends, we found ourselves not wanting to spend precious beach time hanging out in an attic. Basically, when faced with a choice between a bonfire and an unboxing session, we tended to choose the bonfire. Which is great. Except when you choose the bonfire for THREE years.
Well, my Word of the Year is Intention, and one of the ways I want to be intentional is to spend more time at the beach creating. I had a long talk with my husband about "going down to the sea" intentionally to create for several days out of each month. Not too many days. My husband and I love each other, and like to be together, so I won't be deserting him; but I can often work from the beach house as easily as from the city condo.
So, I have been cleaning out the attic. Believe it or not, the pictures here were taken AFTER I spent a Saturday unboxing and getting rid of stuff! The attic is going to become a "studio-attic". Of course, it also happens to be the only windowless room in the entire house, and contains only one light bulb and one outlet. But mostly, it contains NO VIEW. So, while this space will house studio storage, machines, and a large worktable for bigger projects, smaller projects will still be carried to the dining table, or my drafting table, where there is a view of crashing surf. Because, you just don't go down to the sea to hang out all day in an attic.
The first time we saw the beach house, I knew the loft above the living room would be a perfect studio. It was one of the reasons I chose this house (plus, there was the VIEW). Sigh... Changing job commitments have changed the way we use the house. Now, we use the house for business entertaining about one weekend in four, and the loft has to function as a secondary seating area for games and socializing. I have a small drafting table against that far wall, next to the door, but my dreams for a huge loft studio have been dashed. Le sigh....
Okay, seriously, folks, don't feel sorry for me. I'm a pragmatist, and I understand the house has to earn it's keep. Plus, I still get an ENTIRE ATTIC! Which is more than I've ever had before. And did I mention that this attic is at the beach? After three years (four since we bought the house and started renovations), I'm still pinching myself.
As I was unboxing all that STUFF, that first Saturday, I realized my actions would be futile until I actually had a place to put everything, so I stopped working and curled up in front of the fireplace with my husband and put "buy lots of cheap pine shelving" on my mental to do list. Then, a couple of weeks ago, I went every Fred Meyer within thirty miles of our condo buying ALL THE SHELVES. The sixty inch high units are perfect for the "tall" side of the attic, and the thirty inch high units are perfect for the "short" side.
Do you have a dedicated studio? I could lose myself in Pinterest pictures of gorgeous studios. Mine won't be beautiful right away -- I will feel like I've won the lottery just to have it functional for now! Beauty will come in time.
If you enjoyed this post, be sure to subscribe to House Revivals, so you won't miss any of the fun projects we have planned. Please "like" and subscribe to us on Facebook, so you won't miss any of the stuff that happens between blog posts.., like this cow picture. Who doesn't love a great cow picture?
To find out how we met and fell in love with our beach house, read this post.
As always, thanks for stopping by!

Sunday, November 23, 2014
Why I Bought an Artificial Christmas Tree
Last weekend I took advantage of the 50% off sale at Hobby Lobby and bought an artificial Christmas tree. I think I'm going to love it!
This tree is for the beach house, and I chose one that is pre-lit, with pine cones and berries and a tiny dusting of snow. Before you think, "that's not very beachy", I should mention that this is the Pacific Northwest, where pine cones and beach and sea and salt spray and snow live together in the most unsettlingly lovely way.
Growing up, we always used an artificial tree -- until we lost most of our possessions in a house fire. The next year, we had a real tree, covered in homemade decorations that our mom made with us kids (all our family ornaments had been lost in the fire). It was lovely to my child's eye. The next year, my father was in a terrible accident and was unable to work for many months. We lived in the Phoenix area, so you couldn't just go out and cut down a tree. We had little extra money for a tree that year, so my creative mother gathered up some tumbleweeds and we formed those into a Christmas tree! True story. I adored that tree! We put the homemade ornaments on our tumbleweed tree and and strung lots of popcorn garland and had a happy Christmas.
The next year my mom found an artificial tree at the Salvation Army store, and that is what we used for the rest of my years at home. When I got married and started my own little family, I vowed to always buy a real tree -- until we realized that our oldest son had severe allergies and could not be in the same house with a real tree. Sad, but true. Apparently all sorts of allergens can hitchhike into your home via a real tree. That year, I went to Ace Hardware for their 50% off Christmas trees sale, and that was the Christmas tree our kiddos grew up with.... until our dog got old.
For some reason, when our dog started getting old (he lived to be seventeen), he decided it was okay to pee on our tree. Seriously. The artificial tree had to be thrown away. By this time, allergy boy had grown up and moved out, so we went back to using a real tree for a while.
The problem with that has been that we live in two places these days. During the week, we are in a city crash pad, for work. On weekends, we go home to our beach house. We can't put up a real tree at our house until the last possible moment, since we aren't around to keep it watered. This has been super stressful for me, as it meant I would be madly trimming the tree a day or two before Christmas, all while prepping the house for guests, wrapping gifts, and cooking. Something had to give. I wanted to get an artificial tree, but my husband resisted. My husband loves tradition, and we have a new after Christmas tradition of having a Christmas tree bonfire on the beach. Okay, it's not that he loves tradition -- he just loves having a really big beach fire. Christmas tree fires burn high and hot and it is frighteningly beautiful.
He finally capitulated when we made plans for our daughter and little granddaughter to come out for a visit in early December.
We've told little Summer we would have a Christmas party for her, and for a Christmas party you must have a Christmas tree, right? If we put up a real tree in our beach house in early December, we would need to replace it before Christmas because it would dry out too much to be safe, since we're not there to water it during the week.
I was really impressed with the artificial trees available this year! I think Summer Rose will like our tree, with it's red berries and pine cones. I have some bird's nest ornaments that I will be sure to place at her eye level! It's funny how having a grandchild changes your entire perspective. You start to see things "close up" again, and remember that the world is full of wonder and sweetness.
My husband has said he still reserves the right to buy a real tree, in addition to the "fake" one, and that's okay. Beach bonfires are lots of fun, after all.
This tree is for the beach house, and I chose one that is pre-lit, with pine cones and berries and a tiny dusting of snow. Before you think, "that's not very beachy", I should mention that this is the Pacific Northwest, where pine cones and beach and sea and salt spray and snow live together in the most unsettlingly lovely way.
Growing up, we always used an artificial tree -- until we lost most of our possessions in a house fire. The next year, we had a real tree, covered in homemade decorations that our mom made with us kids (all our family ornaments had been lost in the fire). It was lovely to my child's eye. The next year, my father was in a terrible accident and was unable to work for many months. We lived in the Phoenix area, so you couldn't just go out and cut down a tree. We had little extra money for a tree that year, so my creative mother gathered up some tumbleweeds and we formed those into a Christmas tree! True story. I adored that tree! We put the homemade ornaments on our tumbleweed tree and and strung lots of popcorn garland and had a happy Christmas.
The next year my mom found an artificial tree at the Salvation Army store, and that is what we used for the rest of my years at home. When I got married and started my own little family, I vowed to always buy a real tree -- until we realized that our oldest son had severe allergies and could not be in the same house with a real tree. Sad, but true. Apparently all sorts of allergens can hitchhike into your home via a real tree. That year, I went to Ace Hardware for their 50% off Christmas trees sale, and that was the Christmas tree our kiddos grew up with.... until our dog got old.
For some reason, when our dog started getting old (he lived to be seventeen), he decided it was okay to pee on our tree. Seriously. The artificial tree had to be thrown away. By this time, allergy boy had grown up and moved out, so we went back to using a real tree for a while.
The problem with that has been that we live in two places these days. During the week, we are in a city crash pad, for work. On weekends, we go home to our beach house. We can't put up a real tree at our house until the last possible moment, since we aren't around to keep it watered. This has been super stressful for me, as it meant I would be madly trimming the tree a day or two before Christmas, all while prepping the house for guests, wrapping gifts, and cooking. Something had to give. I wanted to get an artificial tree, but my husband resisted. My husband loves tradition, and we have a new after Christmas tradition of having a Christmas tree bonfire on the beach. Okay, it's not that he loves tradition -- he just loves having a really big beach fire. Christmas tree fires burn high and hot and it is frighteningly beautiful.
He finally capitulated when we made plans for our daughter and little granddaughter to come out for a visit in early December.
(Summer Rose's parents won't let anyone share photos of her on social media, so I drew her for you!)
We've told little Summer we would have a Christmas party for her, and for a Christmas party you must have a Christmas tree, right? If we put up a real tree in our beach house in early December, we would need to replace it before Christmas because it would dry out too much to be safe, since we're not there to water it during the week.
I was really impressed with the artificial trees available this year! I think Summer Rose will like our tree, with it's red berries and pine cones. I have some bird's nest ornaments that I will be sure to place at her eye level! It's funny how having a grandchild changes your entire perspective. You start to see things "close up" again, and remember that the world is full of wonder and sweetness.
tree images via Hobby Lobby website
My husband has said he still reserves the right to buy a real tree, in addition to the "fake" one, and that's okay. Beach bonfires are lots of fun, after all.
Thursday, July 24, 2014
Renovating a Beach House: The Deck Edition
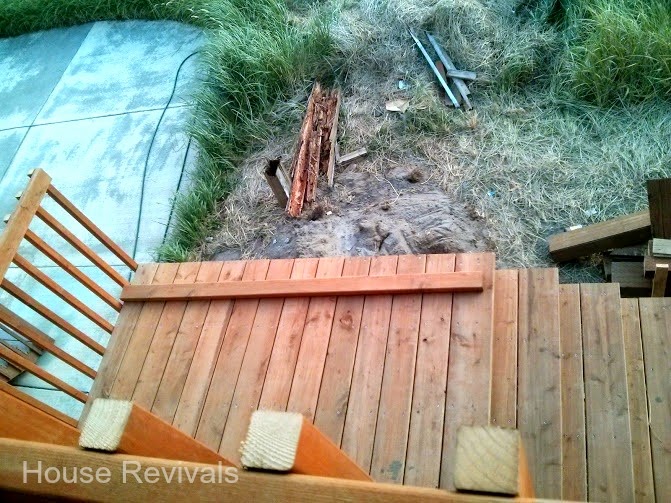
It's been a long time coming. We purchased this beach house nearly four years ago, and are FINALLY wrapping up the last deck renovation! Actually, other than some landscape work, this deck is the last really big project.
During most of June and part of July, our contractors stayed at the house and rebuilt our dilapidated old deck. This was supposed to be a rot replacement project, but as we got deeper and deeper into it, we realized every single board needed replaced! Apparently, the only thing holding this deck up was hope.
Every one of our joist hangers also needed replacing! The ocean climate is hard on structures. After looking at our existing deck, and the decks of some of our neighbors, we knew we did not want to use galvanized metal hangers-- it is simply no match for our damp salt air. Our next door neighbor's deck is only three years old, and they already have major rust and corrosion issues.
We decided to have stainless steel hangers fabricated. It added to the cost and to the timeline, but it will be well worth it in the long run. Our contractors also special ordered stainless steel deck screws. Again, this added to the cost, but in the long run it will be worth it.
The contractors just wrapped up the work and are in the clean-up stage. We asked them to set aside plenty of non-pressure treated, non-painted wood for our beach bonfires. We already burned quite a bit on the Fourth of July, but there is plenty left!
These pictures were taken on our last visit -- it will be a few more days before we can get away from the city to see the finished product. I'm pretty excited about it! It's going to be uh-maze-ing to sit out there in the morning and just chill with a cup of tea -- or a bloody mary....
We had the contractors build a gate at the top to keep pets and toddlers from wandering off, too. We love to have friends and family out, and kids and pets are always invited!
During most of June and part of July, our contractors stayed at the house and rebuilt our dilapidated old deck. This was supposed to be a rot replacement project, but as we got deeper and deeper into it, we realized every single board needed replaced! Apparently, the only thing holding this deck up was hope.
Every one of our joist hangers also needed replacing! The ocean climate is hard on structures. After looking at our existing deck, and the decks of some of our neighbors, we knew we did not want to use galvanized metal hangers-- it is simply no match for our damp salt air. Our next door neighbor's deck is only three years old, and they already have major rust and corrosion issues.
We decided to have stainless steel hangers fabricated. It added to the cost and to the timeline, but it will be well worth it in the long run. Our contractors also special ordered stainless steel deck screws. Again, this added to the cost, but in the long run it will be worth it.
The contractors just wrapped up the work and are in the clean-up stage. We asked them to set aside plenty of non-pressure treated, non-painted wood for our beach bonfires. We already burned quite a bit on the Fourth of July, but there is plenty left!
These pictures were taken on our last visit -- it will be a few more days before we can get away from the city to see the finished product. I'm pretty excited about it! It's going to be uh-maze-ing to sit out there in the morning and just chill with a cup of tea -- or a bloody mary....
We had the contractors build a gate at the top to keep pets and toddlers from wandering off, too. We love to have friends and family out, and kids and pets are always invited!
I'll try to get more pictures of the finished deck up soon!
Tuesday, July 15, 2014
10 Pretty Seashell Projects!
I adore seashells. As a little girl, my mother taught me the joy of wandering quietly on the beach in search of the perfect shell or sand dollar. That love of beachcombing followed me into adulthood. I now have bowls and baskets of shells -- keepsakes from the many beaches my family has visited. For years, I was able to keep the collection in check, but then we bought the beach house, and things got out. of. control.
My husband has suggested we don't actually need three ginormous baskets of shells in our living room (please, nobody tell him about the ones stashed in various closets).
Thursday, July 3, 2014
10 Awesome Driftwood Decorations!
Last week a good friend from Colorado came to visit at our beach house. I love when she come to visit, because she is content to wonder on the beach for hours, looking for a certain kind of shell, or size of driftwood.
Needless to say, we always end up hiking back to the house with bags of heavy wet driftwood!
Friday, June 6, 2014
11 Creative Ways to Hang Your Towels
We are gearing up for new round of guests at the beach house pretty soon, so I have been exploring new way to hang towels. The original builder grade towel rods fell off the wall of the main guest bath within the first six months, and I am just SO TIRED of rehanging them.
Here are some super creative ideas I've found around the web for hanging towels -- maybe one of these solutions will be perfect for you (or me)!
Not Just A Housewife uses lovely old crystal doorknobs!
I love this idea from Martha Stewart! Simply wooden pegs spaced evenly along a rail. Something like this would be great at the b each house, where we sometimes need to hang a dozen or so different towels!
No time for a DIY project? No problem! Find darling handmade towel holders with built-in canning jar toothbrush holder on Etsy.
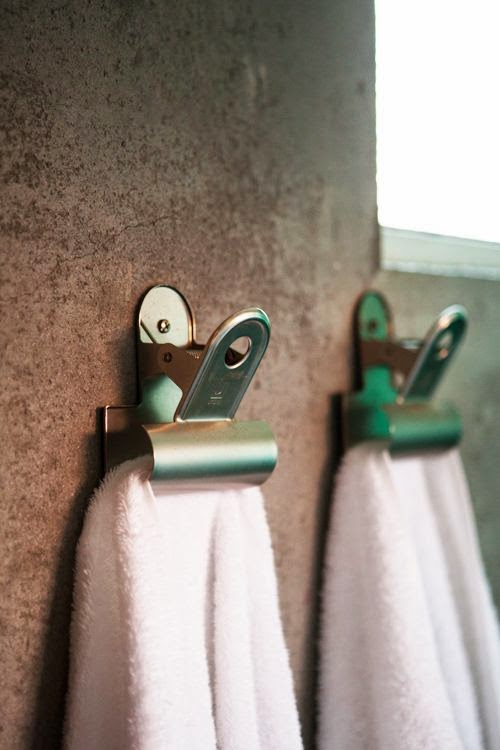
I think this idea for using vintage office clips at Life by Lufe is pure genius!
I am Momma Hear Me Roar created this cute surfboard towel hanger!
These towel hangers from The Polka Dot Closet is sooooooo sweet! What a great idea to use re-purposed drawer pulls attached to a piece of architectural salvage!
Stephanie Lynn used round hand towel holders attached to a rail.
What a great idea to use picture frames with vintage hardware! I found this idea at Worthing Court Blog.
Donna, at Funky Junk Interiors always has such creative ideas!
Check out these towel racks (or coat racks) made from crocheted granny squares! To cute!
I found this fun idea at Itsy Bits and Pieces blog. What a clever reuse of a vintage wooden dress hanger!
Do your builder grade towel rods give you headaches? They drive me cuh-razy! All this great ideas have inspired me to think outside the box when it comes to hanging towels -- how about you?
Here are some super creative ideas I've found around the web for hanging towels -- maybe one of these solutions will be perfect for you (or me)!
Not Just A Housewife uses lovely old crystal doorknobs!
I love this idea from Martha Stewart! Simply wooden pegs spaced evenly along a rail. Something like this would be great at the b each house, where we sometimes need to hang a dozen or so different towels!
No time for a DIY project? No problem! Find darling handmade towel holders with built-in canning jar toothbrush holder on Etsy.
I think this idea for using vintage office clips at Life by Lufe is pure genius!
I am Momma Hear Me Roar created this cute surfboard towel hanger!
These towel hangers from The Polka Dot Closet is sooooooo sweet! What a great idea to use re-purposed drawer pulls attached to a piece of architectural salvage!
Stephanie Lynn used round hand towel holders attached to a rail.
What a great idea to use picture frames with vintage hardware! I found this idea at Worthing Court Blog.
Donna, at Funky Junk Interiors always has such creative ideas!
Check out these towel racks (or coat racks) made from crocheted granny squares! To cute!
I found this fun idea at Itsy Bits and Pieces blog. What a clever reuse of a vintage wooden dress hanger!
Do your builder grade towel rods give you headaches? They drive me cuh-razy! All this great ideas have inspired me to think outside the box when it comes to hanging towels -- how about you?
Subscribe to:
Posts (Atom)


.jpg)