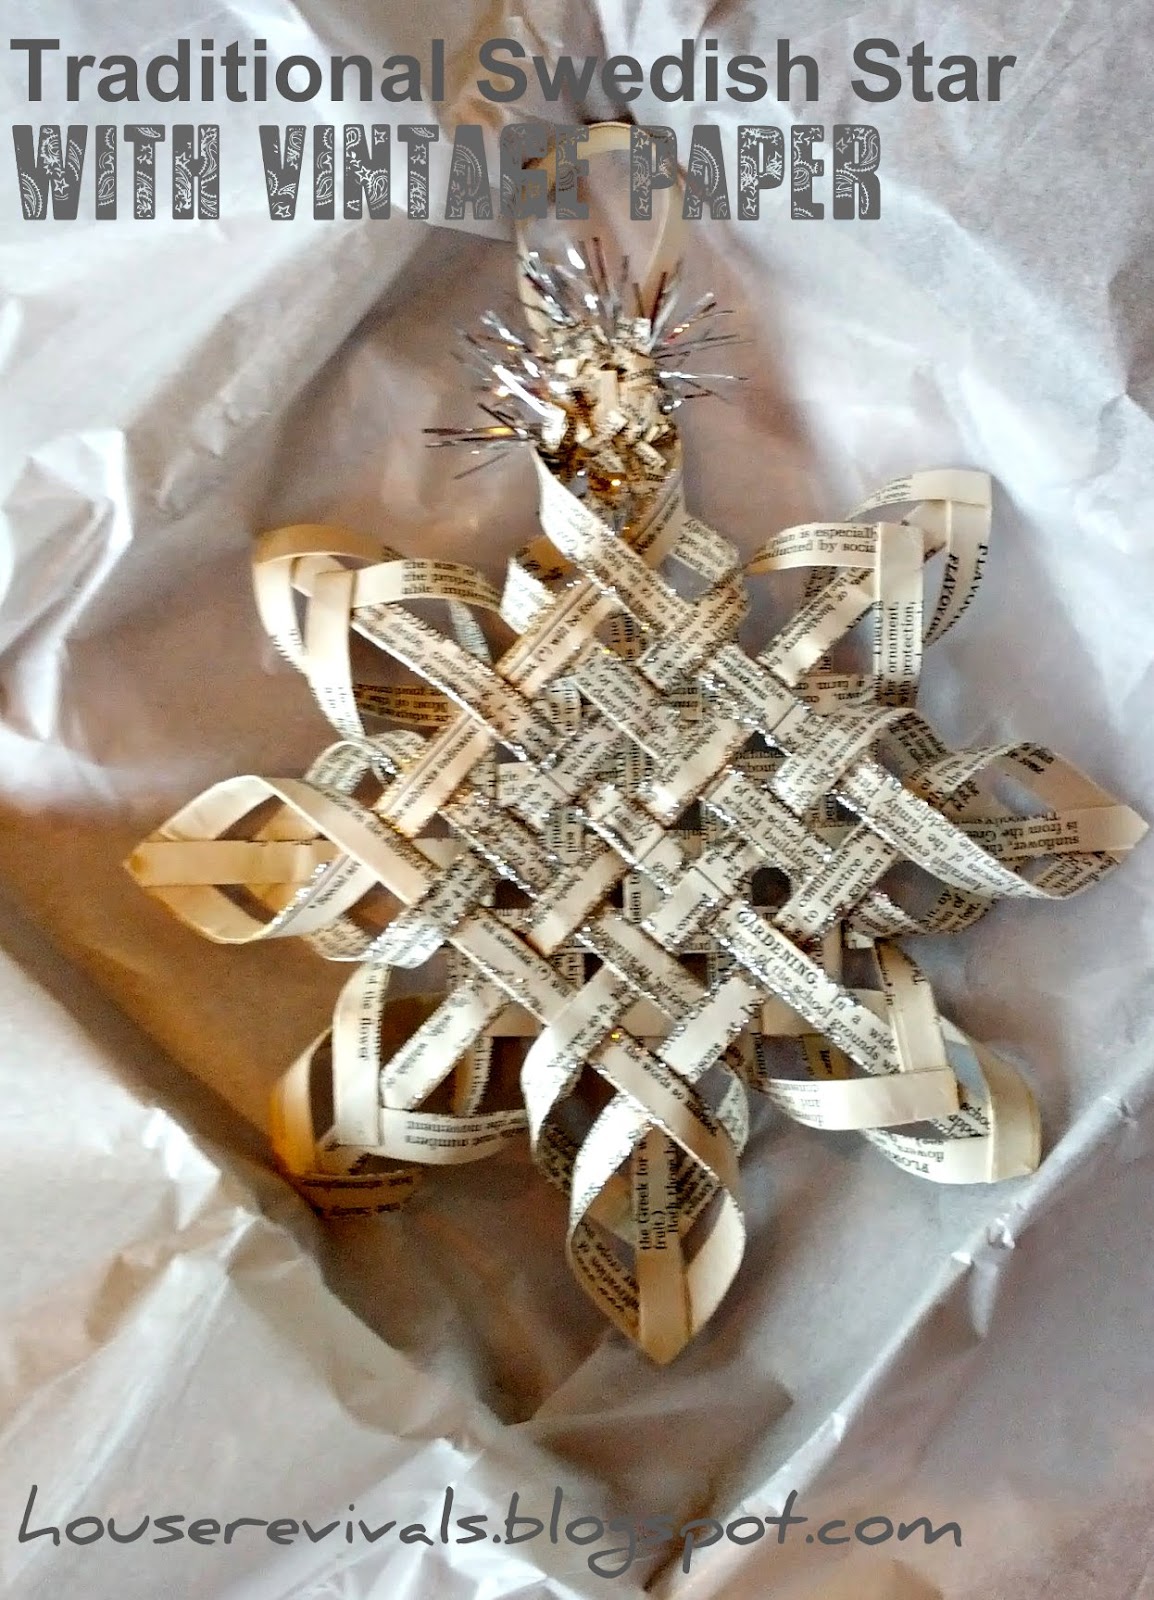
Folks, this is not the woven star tutorial I was planning on posting this week, but I just could not resist the urge to create a star woven from vintage paper based on the lovely antique Swedish star my good friend Tina has had in her family for nearly one hundred years! According to my friend, variations of these stars are very commonly seen hanging in windows at Christmastime. Here is my star inspired by this family's treasured heirloom.

Here is the beautiful inspiration star -- isn't it fabulous? This particular star belonged to Tina's beloved Farmor, and is a treasure to her family. Be sure to check out my friend's blog, Life is Good (Livet är härligt?)-- she often shares sweet little stories and vignettes of her childhood in Sweden.

Here is how to make my version of Tina's heirloom woven star:
I like to work with folded strips of vintage book paper. (you can find instructions for how I create my folded paper strips here) I love the softness of the folded edges, the lovely yellowing of the paper, and the vintage typography and graphics. Making the strips this way is definitely time consuming (as in turn on a movie, and start folding -- when the movie is over you will probably have enough strips to make a half-dozen stars). You can save LOTS of time by using a different material, such as heavy scrapbook paper (cut into strips with your handy dandy paper cutter). Seriously, you can use metal, plastic, reed -- whatever inspires YOU!
 To create this eight-pointed woven star, gather strips of whatever you will be using -- in this case, I used folded vintage book pages. You will need twenty strips to create your star. Since the inspiration star has slightly wider strips forming the center cross, I folded four strips approximately one-half inch wide, and sixteen strips one-quarter inch wide. Each strip is approximately six inches long. I used the size of the book page to determine the length and width of my strips, to reduce waste and to save time.
So, to repeat, you need twenty strips, in my case, four were one-half inch wide and sixteen were one-quarter inch wide. Of course, you don't have to make your center strips that wide -- that's just what I did, based on the inspiration. If you leave all the strips the same width, you will end up with a star that looks like this star:
 You can see that it is virtually identical in concept to the star we are doing today!

Begin by finding the center of your two pairs of fat center strips, and gluing them together at right angles. Use a clear drying glue. Tacky glues are great for this project.

Next, weave the remaining strips as shown, securing intersections with a tiny dab of glue.

Glue the adjacent corner pieces together to create star points. This is just a bit tricky, as each piece needs to be twisted over toward the other piece before securing.

Now glue the second set of perpendicular corner pieces together.
 Make two identical sides.
Now, flip one side on top of the other side, as shown. Basically, one side needs to be offset from the other by forty-five degrees.

Now secure the center strips to the star points. You can tuck them inside the star points, as I have done, or you can glue them to the outside of the star points, as in the antique inspiration star. Trim the ends.

Embellish and add a hanger made from a looped strip of folded paper, if you like -- or simply tie on a length of ribbon or twine to hang it by.

Mine is embellished with glitter and vintage tinsel, but it would have been very sweet left plain. Make your own star in whatever way inspires you.
If you would like to know more about Swedish culture, and possibly even learn to say a few words in Swedish, be sure to check out this series that Tina wrote for her last A to Z Challenge!

Give Tina a visit, then come back, make some hot cocoa, and weave your own traditional star!
Edit: To see yet another variation of Tina's antique star, see this post:

Enjoy!

This post is being linked to the following lovely places:
Funky Junk Interiors
Feathered Nest Friday
504 Main
My Romantic Home
Shabby Creek Cottage
Whatever Goes Wednesday
Hookin' Up with HoH
Yesterday on Tuesday

Here is the beautiful inspiration star -- isn't it fabulous? This particular star belonged to Tina's beloved Farmor, and is a treasure to her family. Be sure to check out my friend's blog, Life is Good (Livet är härligt?)-- she often shares sweet little stories and vignettes of her childhood in Sweden.

If you have photos of an heirloom woven star that you would like to share, feel free to leave a link in the comments section or to send me an email. I would love to hear your stories!
Here is how to make my version of Tina's heirloom woven star:
I like to work with folded strips of vintage book paper. (you can find instructions for how I create my folded paper strips here) I love the softness of the folded edges, the lovely yellowing of the paper, and the vintage typography and graphics. Making the strips this way is definitely time consuming (as in turn on a movie, and start folding -- when the movie is over you will probably have enough strips to make a half-dozen stars). You can save LOTS of time by using a different material, such as heavy scrapbook paper (cut into strips with your handy dandy paper cutter). Seriously, you can use metal, plastic, reed -- whatever inspires YOU!

So, to repeat, you need twenty strips, in my case, four were one-half inch wide and sixteen were one-quarter inch wide. Of course, you don't have to make your center strips that wide -- that's just what I did, based on the inspiration. If you leave all the strips the same width, you will end up with a star that looks like this star:

Begin by finding the center of your two pairs of fat center strips, and gluing them together at right angles. Use a clear drying glue. Tacky glues are great for this project.

Next, weave the remaining strips as shown, securing intersections with a tiny dab of glue.

Glue the adjacent corner pieces together to create star points. This is just a bit tricky, as each piece needs to be twisted over toward the other piece before securing.

Now glue the second set of perpendicular corner pieces together.

Now, flip one side on top of the other side, as shown. Basically, one side needs to be offset from the other by forty-five degrees.

Now secure the center strips to the star points. You can tuck them inside the star points, as I have done, or you can glue them to the outside of the star points, as in the antique inspiration star. Trim the ends.

Embellish and add a hanger made from a looped strip of folded paper, if you like -- or simply tie on a length of ribbon or twine to hang it by.

Mine is embellished with glitter and vintage tinsel, but it would have been very sweet left plain. Make your own star in whatever way inspires you.
If you would like to know more about Swedish culture, and possibly even learn to say a few words in Swedish, be sure to check out this series that Tina wrote for her last A to Z Challenge!
Give Tina a visit, then come back, make some hot cocoa, and weave your own traditional star!
Edit: To see yet another variation of Tina's antique star, see this post:
Enjoy!
This post is being linked to the following lovely places:
Funky Junk Interiors
Feathered Nest Friday
504 Main
My Romantic Home
Shabby Creek Cottage
Whatever Goes Wednesday
Hookin' Up with HoH
Yesterday on Tuesday