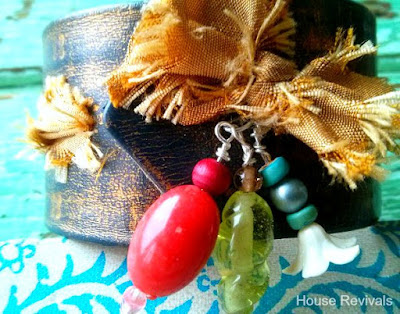
If you love a good upcycling project, love thrifting, and love unique handmade jewelry, this post is for you! Here is a simple belt upcycling project that doesn't require any special punches or grommets. You will end up with a lovely bangle style bracelet that is easy to take on and off.
Start with a thrifted leather belt.
I recommend finding real leather, as it has a look and feel that cannot be duplicated, and it is extremely durable.
Most bracelets made from upcycled belts use the center part of the belt -- the part without the holes, but this bangle uses the holes as a decorative feature and as well as a structural feature.
Begin by measuring around your hand to determine the circumference your bangle should be. Cut your belt about two inches longer than this measurement, to allow for overlap. Next thread some ribbon or a bias strip of fabric or some fibers of your choice through the belt holes. I used the end of a pen cap to push my bias strip through the holes.
When you are almost to the end on both sides, close your bangle, overlapping about two holes.
Continue threading your fiber through the overlapped holes and tie the ends together in a knot or bow to secure.
If desired, add some charms (check out your jewelry box for orphan earrings -- these are a great source for charms and doodads). I used wire to secure my charms, but you could just as easily use a length of fiber to secure them.
That's all there is to it!
This is such a quick and easy project. If you get tired of your new bangle, you can easily swap out the fiber for something different.
Because it's a "bangle", it is easy to take on and off, and would make a perfect gift for friends and family members who suffer from arthritis or other motor issues.
To see another upcycled leather jewelry tutorial, click here.
If you enjoyed this project, please subscribe to House Revivals in the sidebar, so you won't miss the fun projects we have planned. Find us on Facebook, too, so you can catch all the "in between" stuff, and see what I'm working on daily on Instagram. Feel free to link today's project to you favorite social media sites.
Thanks so much for stopping by!


