Google+ House Revivals: June 2018

Thursday, June 28, 2018

The Art of Meenakshi Temple {a tutorial}

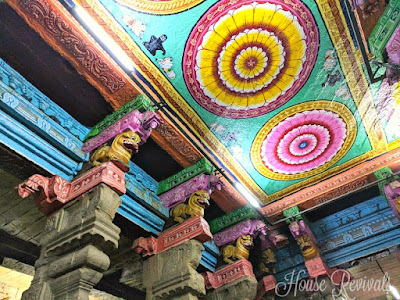
On our recent trip to India, we visited Meenakshi Ammon Temple, in Madurai, Tamil Nadu. Meenakshi Temple is beautiful, with a central pool, intricate carvings, ceiling murals, and Kolam designs on the floor.


The temple is an amazing example of Dravidian architecture, with it's towers encrusted with carvings of gods and goddesses.


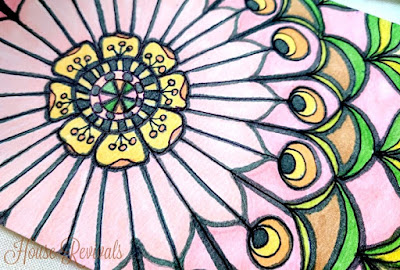
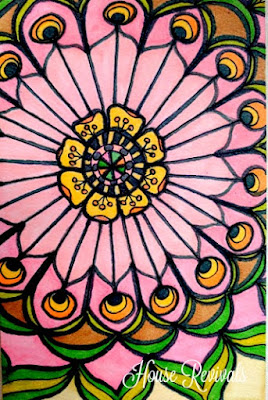
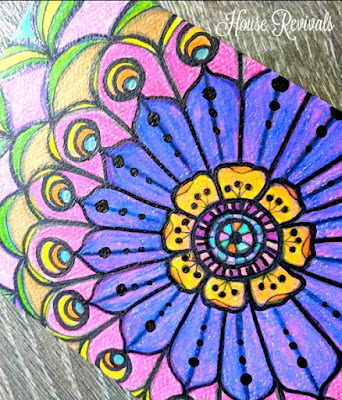
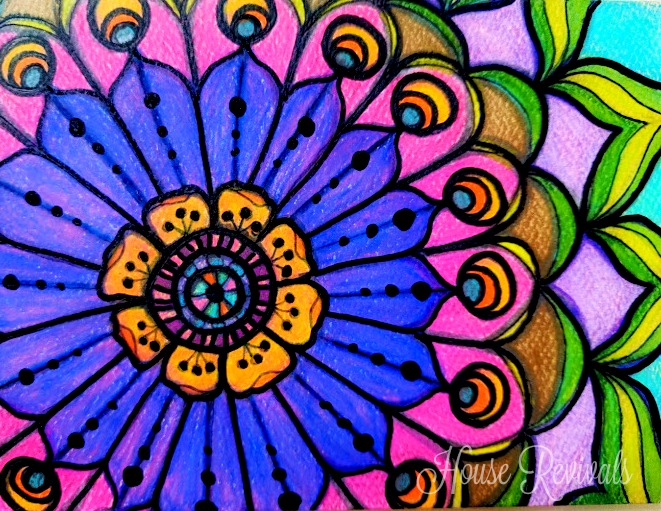
I was most enamored with the colorful ceiling medallions. Each medallion is unique and brightly painted.


You can't help but be cheered by the abundant use of joyous color at Meenakshi Temple.


Much as I would have loved to sit down with a sketchbook to record what I saw, I had to satisfy myself with snapping a few pictures at the time.


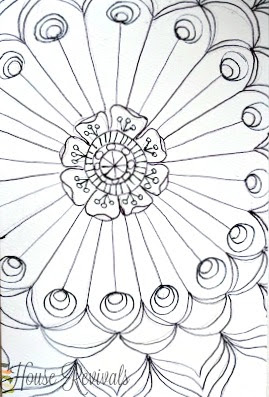
I've always enjoyed doodling medallions or mandalas, but after the Meenakshi Temple visit, these doodles bring fond memories of a very special time and remind me of the exuberantly painted ceilings we'd admired.

I like to start a doodle using a mechanical pencil with a white eraser. White erasers don't smudge like the red ones do. To create a medallion, I start by creating circles -- these can be freehand or made with templates like lids and cups and bowls. Next, I divide the circles into four segments, then eight segments, and so on. I don't worry about perfection, because, it's just a doodle. Doodling is a creative way to relax, and I don't find seeking perfection to be relaxing. I usually doodle medallions without a plan, making petals or leaves or feathers in concentric patterns.


After I've sketched the medallion with pencil, I go over my lines with a smear proof pen and erase the pencil lines (sometimes -- other times I leave the pencil lines, because of that perfection thing).


The piece is then colored in layers. In this case, I started out by lightly laying on a base of color with Spectrum Noir markers.


Then more layers were added, to build up color. I changed my mind about the color direction along the way, but didn't stress over it, since the point was to play.


Next, I added some colored pencil on top of the marker layers. That turned out pretty, but I didn't like the texture, so I took the Spectrum Noir blending pen and blended the color out. I was pleasantly surprised by how well this worked, as not all alcohol markers play well on top of colored pencil. My Chartpaks cause waxy colored pencil marks to get gummy and weird.


I hope you try your hand at doodling. I love it, because it's not intimidating -- you don't need any drawing skills or knowledge of perspective or shading (although you may want to try shading to add dimension to your pieces at some point). If you can trace around a bowl, you can draw a decorative medallion.

You might also enjoy this post about India's colorful trucks.


You might also enjoy this post about how to draw a spring tulip.

If you enjoyed this tutorial, please subscribe to House Revivals in the sidebar, so you won't miss the fun projects we have scheduled. Find us on Facebook, too, so you can catch all the "in between" stuff, and see what I'm working on daily on Instagram. Feel free to link today's post to your favorite social media sites.

Thanks so much for stopping by!
~Amanda


Tuesday, June 26, 2018

Upcycle Clothing Tags into Unique Gift Tags!

This is a fun little project where the hard work is already done for you, so all you need to do is the fun stuff? Don't you love projects like that?


I find myself hanging on to nicer quality clothing tags. Some of them already have rivets and twine or ribbon or acetate layers, etc.

Thursday, June 21, 2018

Create One of a Kind Card Stock {Masterboard} From Scraps

What do you do with all your creative paper scraps? Those bits left over after punching or die cutting or trimming your paper? Those intricate die cuts that didn't quite work out? Embossed papers that cracked or tore? Stuff that really isn't useful, but it's still really pretty?


Every so often, I will gather up a collection of bits and pieces that I've been hoarding, and use it to create a masterboard. A masterboard is simply a decorated sheet that can be cut apart and used in other projects. To create a masterboard, you need a substrate. Your choice of substrate will depend on the finished purpose of your masterboard.


For instance, if you are creating a masterboard for scrapbooking, you may want to keep your materials archival. If you are making cards or crafts, archival qualities might not be important. My favorite substrates include cereal box sides, ugly scrapbook paper, packaging, mailing cardboard, and junk mail.


I've even used those heavy card stock weight handwriting strips that teachers use.


How you decorate your sheets will also depend on how you want to use the piece. You can layer materials, paint, stamp, or doodle. I usually do a little of all those things.


This is also a great way to use up small amounts of leftover paint. My favorite way to add paint is by spreading it with an old gift card or a stiff piece of cardboard.


Since I like to layer scraps on my masterboard, I use all-purpose white glue. It's inexpensive and can be purchased by the gallon. I have a smaller glue bottle that I refill from my gallon jug. The glue can be spread with an old gift card. Your choice of adhesive may depend on your finished application.


Glue all your layers down really well, then use a brayer, if you have one, to flatten it out and get good adhesion. To protect my brayer and to get good contact, I sometimes use an old sheet of fun foam over my masterboard while using the brayer.


I keep layering collaged items, paint, and ink until I'm happy with the finished piece. I do not seal the top of the piece.


I've used heavier masterboards to cut up and use for business cards. If you cut them out after the glue is mostly dry, but the paper is still cool to the touch, you can run the pieces through your embossing machine for beautiful results that are very sturdy. Or run them through the machine between your shimmed plates to flatten them out perfectly. Embossed pieces can be lightly inked on the raised areas for very pretty effects.


Lighter weight masterboard is perfect for cards or tags. The possibilities are limitless. I know of an artist who creates his own masterboard from found ephemera, presses it perfectly flat, then screen prints over it! His pieces are beautiful.


If you enjoyed this post, please subscribe to House Revivals in the sidebar, so you won't miss the fun projects we have planned. Find us on Facebook, too, so you can catch all the "in between" stuff, and see what I'm working on throughout week on Instagram. Feel free to link today's project to your favorite social media sites.

Thanks so much for stopping by!
~Amanda

Tuesday, June 19, 2018

Make a Sweet Fairy Cutaway Card

My sweet granddaughter will be getting a new baby brother pretty soon, and I wanted to make her a card to remind her how special she is to us. She is still at the age where she adores anything with pink or with flowers or with ribbon.


She also loves the Rainbow Magic Fairy books. They are sweet little books at just the right reading level.

Thursday, June 14, 2018

Make a Framed Filigree Card

The thing I love best about card making, is that you can create something beautiful in a short amount of time. We are all busy, but we want to be creative.


You can easily create this card while the kids are napping, or in the evening after work. To make this card, you will need a frame die, and a filigree die. You can see that my frame die had a fancy shape.

Tuesday, June 12, 2018

How to Draw a Spiral Rose

There are lots of ways to draw a stylized rose. Here is a fun little rose that anyone can draw -- even if you don't know how to draw.


Start by drawing a spiral, lightly, in pencil. Now, attach the bowl of the flower to the spiral -- basically, sketch a "U" shape that flares out at the top, where it connects to the spiral.

Thursday, June 7, 2018

My Dear Friend's Junk Journal

Last week, I shared a tutorial on how to make a junk journal, using an O-ring binding machine. This week, I am sharing a flip through of the journal my friend made during that same creative session.


We were both using the same supplies, and the same binding system, but our books turned out very different.

Tuesday, June 5, 2018

How to Create the Look of Delft Tile for Card Making

I love the look of deft tile. When my daughter was young, she had a piano teacher who had been a missionary and had traveled a great deal. Each time they flew one of the dutch airlines, they were each given a keepsake tile. 


With all their travel, they collected quite a stack of of these beautiful tiles, and when they settled into their retirement home, the used their delft tile for the fireplace surround.