Google+ House Revivals: 2012

Monday, December 31, 2012

Happy New Year and a Sneak Peek!

Wishing you all a Happy and Joyous New Year!

Here is a sneak peek of yet another traditional Scandinavian woven star.  My friend Kristine found a lovely old window star in an antique store in Sweden back in the eighties and I was inspired to make this version of the star using (of course) vintage book pages.


Like the last inspiration star I shared from my dear friend Tina, Kristine's star is an eight-pointed star with a woven center.  Her star is fragile, and is definitely showing it's age.  I'm loving all these antique stars -- keep them coming!  Kristine's star has the loveliest woven detail on the star tips!


I can't wait to share Kristine's star with you all, and to share the tutorial for how to make your own star inspired by Kristine's antique Swedish star.

Stay tuned!


Saturday, December 22, 2012

Another Traditional Woven Star Variation

Hello dear readers!  Do you have time for one more craft before Christmas?


A few days ago I introduced you to my good friend, Tina, who blogs over at Life is GoodI created a woven star from vintage book pages inspired by her family's heirloom woven star.


Well, 
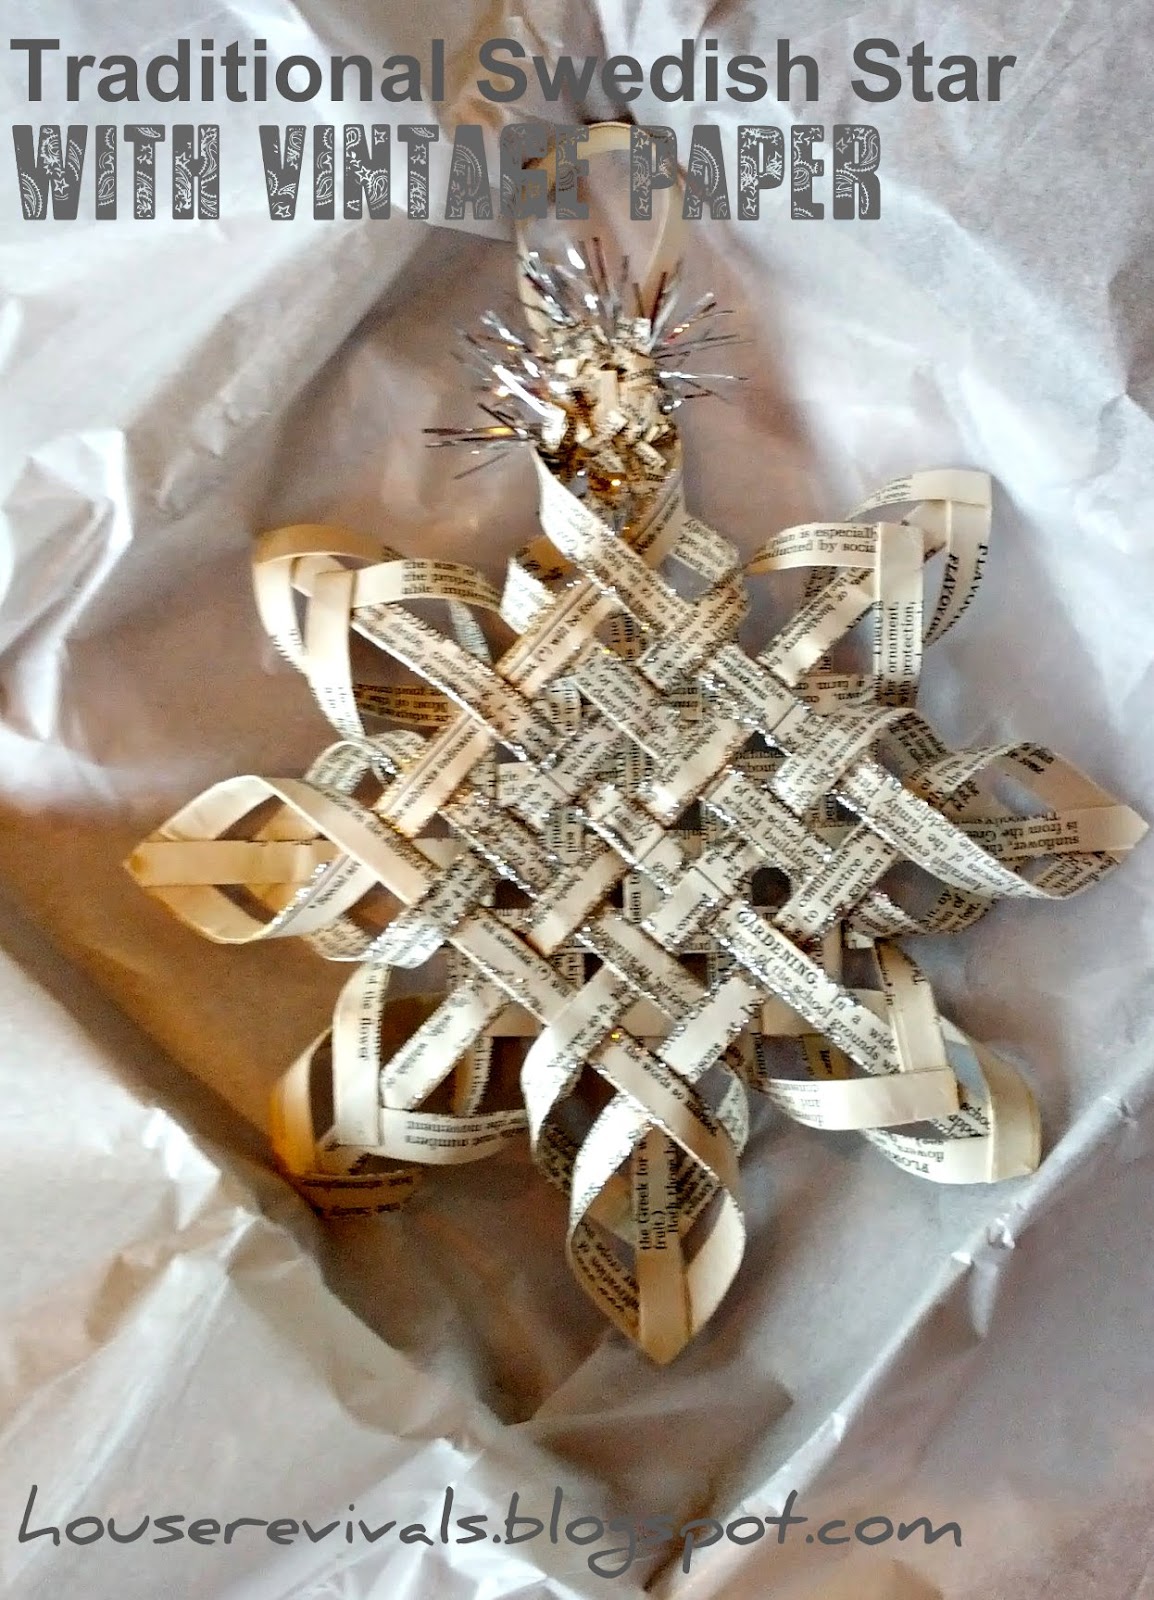
today I have a tutorial for another star that was inspired by Tina's antique Scandinavian Star! According to Tina, variations of these beautiful stars hang in windows all over Sweden at Christmastime.

Here is the star I shared a few days ago:
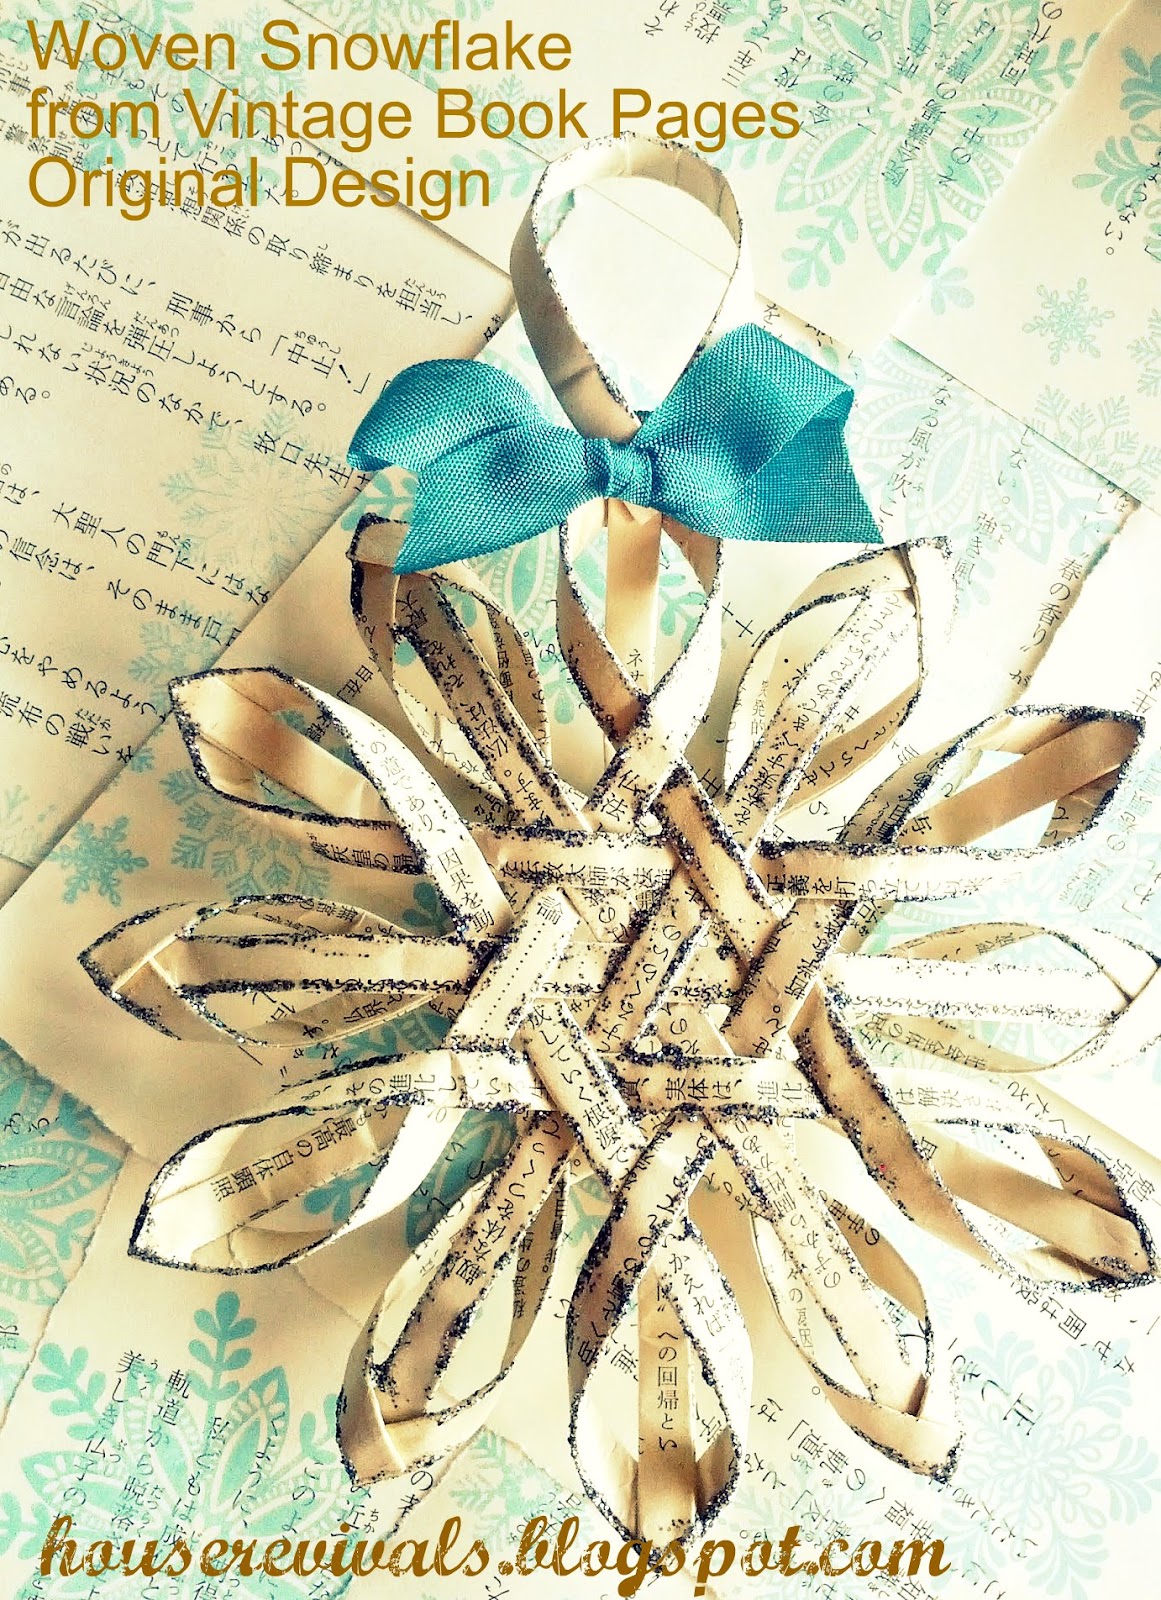
To make today's version of the Swedish Window Star, you will need twelve folded strips of vintage paper. I share how I fold my book pages in this post.   Of course, you can use any material that inspires you.  Folding strips of paper is time consuming, so cutting strips of scrapbook paper might be a better choice, time-wise.  When I choose a vintage book for crafting, I look for one with really good paper that is not brittle.  We work so hard on our projects -- why add a level of frustration with a paper that breaks and tears easily?  I also find that I need my folded strips to be eight layers thick.  This makes them thin enough to be flexible, but thick enough to hold their shape. 

Because the inspiration star has slightly wider strips forming the center cross, four of my strips are one-half inch wide and eight of the strips are one-quarter inch wide.  My strips are approximately six inches long.

Begin by finding the center of each of the four fat strips and gluing them together at right angles, as shown.


Now weave your narrow strips, as shown.  Secure each intersection with a dot of clear drying glue.


Next, glue adjacent corner strips together.  This is a tiny bit tricky, as you must twist the ends up and toward each other.  Glue to secure.


Now, turn one side over and place on top of the other side.  The top side should be rotated forty-five degrees from the bottom piece.


Secure sides together with glue.  If desired, you may tuck the ends underneath your star points before gluing, as I have done -- or you may leave them on top of the star points, depending on the look you are going for.


 Trim the ends, if desired.  Embellish with glitter and tinsel if you want, and add a hanger.


I used a loop of folded vintage paper, but a piece of ribbon or twine would work just as well.  Now, you can call things done right now.... or, you can do one more step!


Fold four strips of paper that are one-eighth inch wide and about four inches long.  Weave these skinny strips through the center of the star, on a diagonal angle from the original strips. Glue to secure and add more glitter to the edges, if desired.


We are having lots of friends out to our house this week, so variations of these stars will be going home with each of our guests.

Wednesday, December 19, 2012

New Woven Star Tutorial for 2012

Folks, this is not the woven star tutorial I was planning on posting this week, but I just could not resist the urge to create a star woven from vintage paper based on the lovely antique Swedish star my good friend Tina has had in her family for nearly one hundred years!  According to my friend, variations of these stars are very commonly seen hanging in windows at Christmastime.  Here is my star inspired by this family's treasured heirloom.

Here is the beautiful inspiration star -- isn't it fabulous? This particular star belonged to Tina's beloved Farmor, and is a treasure to her family.  Be sure to check out my friend's blog, Life is Good (Livet är härligt?)-- she often shares sweet little stories and vignettes of her childhood in Sweden.
If you have photos of an heirloom woven star that you would like to share, feel free to leave a link in the comments section or to send me an email.  I would love to hear your stories!

Here is how to make my version of Tina's heirloom woven star:

I like to work with folded strips of vintage book paper. (you can find instructions for how I create my folded paper strips here)  I love the softness of the folded edges, the lovely yellowing of the paper, and the vintage typography and graphics.  Making the strips this way is definitely time consuming (as in turn on a movie, and start folding -- when the movie is over you will probably have enough strips to make a half-dozen stars).  You can save LOTS of time by using a different material, such as heavy scrapbook paper (cut into strips with your handy dandy paper cutter).   Seriously, you can use metal, plastic, reed -- whatever inspires YOU!

To create this eight-pointed woven star, gather strips of whatever you will be using -- in this case, I used folded vintage book pages.  You will need twenty strips to create your star.  Since the inspiration star has slightly wider strips forming the center cross, I folded four strips approximately one-half inch wide,  and sixteen strips one-quarter inch wide.  Each strip is approximately six inches long.  I used the size of the book page to determine the length and width of my strips, to reduce waste and to save time.

So, to repeat, you need twenty strips, in my case, four were one-half inch wide and sixteen were one-quarter inch wide.  Of course, you don't have to make your center strips that wide -- that's just what I did, based on the inspiration.  If you leave all the strips the same width, you will end up with a star that looks like this star:

You can see that it is virtually identical in concept to the star we are doing today!

Begin by finding the center of your two pairs of fat center strips, and gluing them together at right angles.  Use a clear drying glue.  Tacky glues are great for this project.

Next, weave the remaining strips as shown, securing intersections with a tiny dab of glue.

Glue the adjacent corner pieces together to create star points. This is just a bit tricky, as each piece needs to be twisted over toward the other piece before securing.

Now glue the second set of perpendicular corner pieces together.
Make two identical sides.

Now, flip one side on top of the other side, as shown. Basically, one side needs to be offset from the other by forty-five degrees.

Now secure the center strips to the star points.  You can tuck them inside the star points, as I have done, or you can glue them to the outside of the star points, as in the antique inspiration star.  Trim the ends.

Embellish and add a hanger made from a looped strip of folded paper, if you like -- or simply tie on a length of ribbon or twine to hang it by.

Mine is embellished with glitter and vintage tinsel, but it would have been very sweet left plain.  Make your own star in whatever way inspires you.


If you would like to know more about Swedish culture, and possibly even learn to say a few words in Swedish, be sure to check out this series that Tina wrote for her last A to Z Challenge!

Grab your graduation prize!


Give Tina a visit, then come back, make some hot cocoa, and weave your own traditional star!

Edit: To see yet another variation of Tina's antique star, see this post:

 Enjoy!

This post is being linked to the following lovely places:
Funky Junk Interiors
Feathered Nest Friday
504 Main
My Romantic Home
Shabby Creek Cottage
 Whatever Goes Wednesday
Hookin' Up with HoH 
Yesterday on Tuesday

Monday, December 17, 2012

Make a Snowman Ornament from a Recycled Lightbulb

This is a fun craft idea I ran across several years ago.  I'm not sure where I first saw it, but it was just too cute not to give it a try ( and you know I love to recycle stuff)! edit:  Here is where I found the inspiration.


This snowman ornament is made from recycled light bulbs!

  • Start with a burned standard light bulb.  Clean the bulb well with a cotton ball and some rubbing alcohol.Next, prime the light bulb with gesso.  Do several coats of gesso, letting it dry between coats.  Use an old paint brush and really get messy, adding texture to look like packed snow.
  • Now add a topcoat of paint.  I used an off white to give my snowman some patina, but you can use a brighter white if you like.
  • The snowman hats are made from orphan socks.  Simply cut off the cuff of a sock, fringe the top, and tie the top just under the fringe using a narrow strip of the sock fabric. Use hot glue to secure the hat to the snowman's head -- hiding the screw threads.  The mufflers are simply made from a rectangle of the sock fabric that has the edges folded under and is rolled and hot glued into place.
  • Glue on some stick arms, and cut a scarf from a scrap of fabric.
  • Embellish with buttons if you'd like.
  • Give your little guys a face using a sharpie pen, and, if you'd like, brush on some powdered blush to give their cheeks a rosy glow.

Easy peasy, I promise!  This would be a fun project to do with the kids, instead of baking (is your family completely "over" sweet treats this holiday season?)  -- and it's calorie free!


Friday, December 14, 2012

Make a Pretty Hostess Gift from Upcycled Coasters

Do you always see sets of old coasters at the thrift store?  My local Goodwill has them all the time -- dated, and a bit worse for wear.  I decided to to grab some the other day to up-cycle into pretty hostess gifts.


This is such a simple project, you probably don't need instructions, but here is how I transformed a set of sad old eighties era coasters into a unique and personal gift.


Begin by cleaning and sanding your coasters. You need to rough up the glossy coating on the coaster surface.


Next, prime the coasters so the pattern won't show through your decorative paper.


Use a coaster as a template and cut out some decorative paper -- I used vintage book pages.


Decoupage your paper to the top of the coasters.


Gild the edges with some gold craft paint.   Here's a tip to achieve really rich looking gilding:  Always paint a layer of red paint under your gold paint or gilding -- your gold will have a richness and depth like you see on the edges of a fine old book, or an antique frame.


And there you have it!  A simple project to give your holiday hostess!


Wednesday, December 12, 2012

Traditional Scandinavian Woven Star

Hello, dear readers!  Are you all absolutely crazy busy?  If you are anything like me, you decide to take on a few big home improvement projects right before Christmas.  I feel like I've been neglecting the blog, not because I am not doing anything, but rather because I am so busy doing, I don't have time to write about it!  Does this happen to you?

I still have these woven stars I need to show you how to make!  I actually have the tutorial photographed -- just haven't had two minutes to type out the instructions.  Yikes!

Also, I've been doing a bit of research on the inspiration stars, and their history.  If you haven't seen the tutorials I did for these stars a couple of years ago, you can find the first one here. 


They are an old traditional design.  Of course, we all knew that, right?  Several people told me they looked like an old Scandinavian design.  Indeed, they were right!  This type of woven star ornament is definitely an old traditional design and is a part of our cultural heritage.


Here is a version that some of my Swedish friends hang in their window. This woven star is thought to be about one hundred years old!  Isn't it stunning?  This gorgeous ornament is a priceless family heirloom!   A sweet reminder of a beloved Farmor.

I've seen them called Finnish Stars, Scandinavian Stars, and Swedish Stars, among other names.  Some just call them window stars. Whatever the name, variations of these stars are part of a lovely Christmas tradition for many families.

Which is why it is so sad that right now, at Christmastime, some people are being threatened with legal action for sharing these stars, and for sharing how to make them.  Just ordinary people like you and me, who have figured out how to make versions of these lovely window stars, and have photographed and written their own expression of how they make them.  If you are one of those people, remember please that your own expression, as you publish in your own blog, is copyrighted by you.  It belongs to YOU.  No one has the right to bully you, or misuse their own copyright to force you to remove your own expression of an idea.  You have worked hard on your projects, and you deserve to be able to share them.  One of my favorite things about blogging is sharing ideas.  And did you know that ideas are not copyrightable? It's true.  Here is a link to the US Government copyright website  where I learned that. I also learned that processes are not copyrightable. 

I am not a lawyer, and nothing I have written should be construed as legal advice.  This is simply information that I have gathered, and a link to my source.  If you are one of the many people being intimidated into removing your own material, regardless of  whether it is a project like this one or something completely different, I would encourage you to know your rights and to seek the advice of an attorney.


this article is being linked to the following lovely places: