While doing some random internet research, a few weeks ago, I found some gorgeous paper spheres at the lovely blog Hattifant. The editor of Hattifant also found the form while searching the internet, and suspects it is of Scandinavian origin. I was immediately intrigued by the form, and decided to play around with some paper and figure out how to draft my own templates.

After some trial and error, I figured out the math to make these little paper spheres, first making them from vintage book pages. I shared them on my Instagram account, at the time, but I couldn't get the concept out of my mind. I decided to transfer the measurements into CAD, so that I could print out very accurate templates, and experiment with coloring designs.
This turned out to be so much fun, that I decided to create a free printable template for my readers to enjoy! I will share a link to the template at the bottom of this tutorial.

Start by printing your coloring sheet template onto good quality card stock. You can actually make these spheres from ordinary copy paper, but they will be easily crushed and they are a bit more fidgety to make. I highly recommend using good card stock. I used Neenah brand card stock, found here (affiliate link).

Color your template using whatever media you prefer. I used a combination of markers and colored pencils. These Azure markers are my new favorite. You can find them here (affiliate links), and here.

I like to apply a base coat using alcohol markers, then go over them with colored pencils. Here, I used Prismacolor pencils, found here (affiliate link). Don't color the glue tabs, as that might interfere with glue adhesion later on.

After coloring the sheet, cut out the three strips, along the heavy black lines.

Next, you need to carefully score along the dotted gray lines. Pay close attention, as it's important to score along the correct line to make the geometry work. You can use a stylus or a bone folder, or a dried up ball point pen to score your lines. Practice on a piece of scrap card stock before scoring the strip you spent so much time coloring. This way you will know how hard to press to get a nice indentation without tearing the paper. I find it works best to put stiff foam or a pad of paper underneath the card stock as I score.

Score all three strips, and gently fold along the curved, scored line, to "train" the paper. Then flatten them back out again, as well as you can, as shown above.

Next, form loops from two of the strips, gluing at the glue tabs, to secure.

Place one loop inside the other, crossed, as shown. Note the position of the scored, half-moon sections.

Next, you will thread the last strip through the crossed loops, as shown.

When both ends of the last strip are threaded through, and around, the other loops, as shown above, glue the ends together, using the glue tab.

You will then need to gently coax the last loop around, so that the scored half-moon side is exposed.

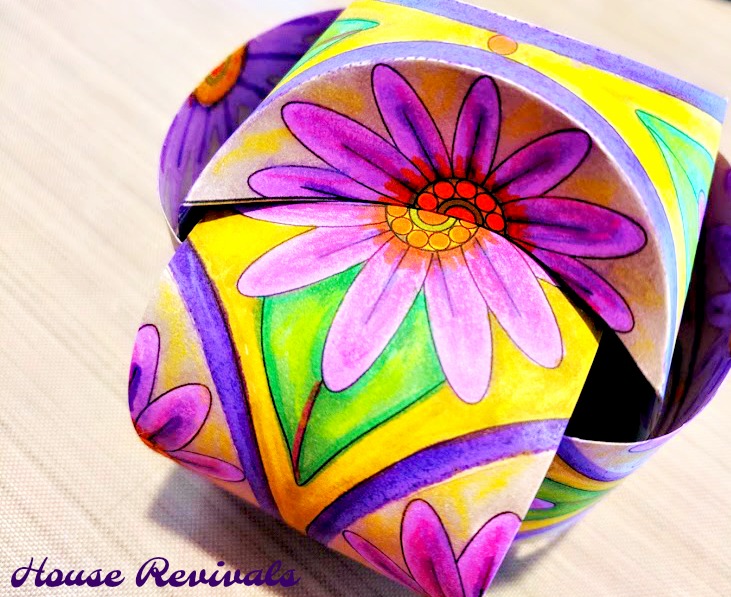
When all three strips are oriented so that the scored half moons are showing, you may notice that you have formed a loose cube. That's the secret to this impossible sphere! It's not actually a sphere -- it's a cube, with fancy sides.

Begin gently folding in the paper, along the curved score lines, taking care to line up the intersections/ corners.

Do this to all six sides, then sit back and admire your work.

This project was so addicting, I made several coloring templates, so be watching for them in the coming weeks.

These would make darling Christmas ornaments -- or add them to a mobile! Use them as decor balls, and fill a large bowl with your colored spheres. The possibilities are endless.

To print out your FREE impossible sphere template, click here!


After some trial and error, I figured out the math to make these little paper spheres, first making them from vintage book pages. I shared them on my Instagram account, at the time, but I couldn't get the concept out of my mind. I decided to transfer the measurements into CAD, so that I could print out very accurate templates, and experiment with coloring designs.
This turned out to be so much fun, that I decided to create a free printable template for my readers to enjoy! I will share a link to the template at the bottom of this tutorial.

Start by printing your coloring sheet template onto good quality card stock. You can actually make these spheres from ordinary copy paper, but they will be easily crushed and they are a bit more fidgety to make. I highly recommend using good card stock. I used Neenah brand card stock, found here (affiliate link).

Color your template using whatever media you prefer. I used a combination of markers and colored pencils. These Azure markers are my new favorite. You can find them here (affiliate links), and here.

I like to apply a base coat using alcohol markers, then go over them with colored pencils. Here, I used Prismacolor pencils, found here (affiliate link). Don't color the glue tabs, as that might interfere with glue adhesion later on.

After coloring the sheet, cut out the three strips, along the heavy black lines.

Next, you need to carefully score along the dotted gray lines. Pay close attention, as it's important to score along the correct line to make the geometry work. You can use a stylus or a bone folder, or a dried up ball point pen to score your lines. Practice on a piece of scrap card stock before scoring the strip you spent so much time coloring. This way you will know how hard to press to get a nice indentation without tearing the paper. I find it works best to put stiff foam or a pad of paper underneath the card stock as I score.

Score all three strips, and gently fold along the curved, scored line, to "train" the paper. Then flatten them back out again, as well as you can, as shown above.

Next, form loops from two of the strips, gluing at the glue tabs, to secure.

Place one loop inside the other, crossed, as shown. Note the position of the scored, half-moon sections.

Next, you will thread the last strip through the crossed loops, as shown.

When both ends of the last strip are threaded through, and around, the other loops, as shown above, glue the ends together, using the glue tab.

You will then need to gently coax the last loop around, so that the scored half-moon side is exposed.

When all three strips are oriented so that the scored half moons are showing, you may notice that you have formed a loose cube. That's the secret to this impossible sphere! It's not actually a sphere -- it's a cube, with fancy sides.

Begin gently folding in the paper, along the curved score lines, taking care to line up the intersections/ corners.
Do this to all six sides, then sit back and admire your work.

This project was so addicting, I made several coloring templates, so be watching for them in the coming weeks.

These would make darling Christmas ornaments -- or add them to a mobile! Use them as decor balls, and fill a large bowl with your colored spheres. The possibilities are endless.

To print out your FREE impossible sphere template, click here!
You might also like this article on how to make a wire armature starfish.
If you enjoyed this post, please subscribe to House Revivals in the sidebar, so you won't miss the fun projects we have planned. Find us on Facebook, too, so you can catch all the "in between" stuff, and see what I'm working on throughout week on Instagram. Feel free to link today's post to all your favorite social media sites.
Thanks for stopping by!
Amanda
Thanks for stopping by!
Amanda