If you are looking for an easy project for gift giving this holiday season, look no further! These sweet little book pendants are the perfect project for the book lover in your life.

I decided to figure out how to make them when my friend Cheryl from the Amber Waves Band reached out to me looking for a product to sell at concerts that supported their new Storyteller CD (by the way, if you don't have your copy already, you can buy it via CD Baby here). This is not a sponsored post, I just love this band and their music.
After a bit of brainstorming, the idea of Storyteller Necklaces emerged.

We talked about which materials would be best, and settled on sustainable reclaimed leather, and reclaimed vintage book pages. A quick trip to my closet yielded several old purses and belts that were perfect for this project. Score!

Start by cutting out your books pages. I used a paper cutter and was able to cut several thicknesses at one time. The tiny book pages shown here are about one inch high by about two inches wide. The sizes of your leather pieces may determine the size of your little books. Basically, cut your little pages twice as wide as you want your finished pages to be, because you will be folding them in half.

Once you have cut out your little pages, you will fold the pages in half to create "signatures" just like a regular book has, except these will not be sewn (unless you really, really, really want to sew them). Instead, they will be glued.

Simply run a very thin bead of glue down the center of each fold line to glue the sheets together. The thin bead of glue shown in the picture above is actually a bit too much glue.

I found that four or five sheets was enough to make a believable signature. Fold up each signature as you go, so they will dry in the right shape.You can trim them up as you go, or just leave the signature edges a bit organic, as I did.

Next run a very thin bead of glue along the top of the folded edge of the signatures to glue them together. Each little book will probably consist of between three and five signatures.

Next, you will lay your stack of glued together signatures onto the piece of leather you have chosen for the book cover.

Determine to what size you need to trim your leather, so that it wraps around the spine of the book and is slightly larger than the pages. Cut out the leather with a pair of sharp scissors.

Using any clear drying glue, adhere the insides of the book to the inside of the book cover.
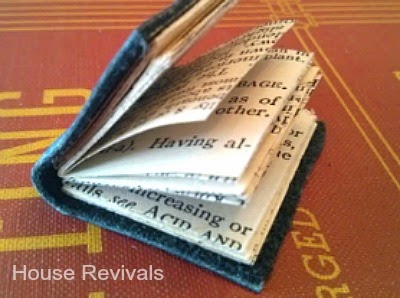
The book will want to splay open, so weight it down while the glue dries. I found that my coffee cup worked well for this.

When the glue has dried, you should have a perfectly lovely perfect little mini-book -- too perfect, actually. Using the edge of an old pair of scissors, rough up the edges of the pages and the leather. You don't have to do this, if it hurts your heart to damage something so perfect, but it gives the little tomes a lovely patina.

You can create single book pendants, like this little blue book. We added another layer of interest to it by wrapping it in a contrasting strip of leather. Use a sharp awl and a wood block to pierce the leather at the top of the spine to add a jump ring to attach the pendant to a necklace.

Another wonderful option is to stack two or three little books together to create a pendant. For the pendant shown here, each book was pierced with a sharp awl, using a wooden block to protect my table. Then, a pin head wire finding was inserted through all three books and a jump ring was then attached.

This is what the bottom of the pendant looks like.
Wouldn't this be a fun gift to make or receive?


Thanks so much for stopping by!
I decided to figure out how to make them when my friend Cheryl from the Amber Waves Band reached out to me looking for a product to sell at concerts that supported their new Storyteller CD (by the way, if you don't have your copy already, you can buy it via CD Baby here). This is not a sponsored post, I just love this band and their music.
After a bit of brainstorming, the idea of Storyteller Necklaces emerged.
We talked about which materials would be best, and settled on sustainable reclaimed leather, and reclaimed vintage book pages. A quick trip to my closet yielded several old purses and belts that were perfect for this project. Score!
Start by cutting out your books pages. I used a paper cutter and was able to cut several thicknesses at one time. The tiny book pages shown here are about one inch high by about two inches wide. The sizes of your leather pieces may determine the size of your little books. Basically, cut your little pages twice as wide as you want your finished pages to be, because you will be folding them in half.
Once you have cut out your little pages, you will fold the pages in half to create "signatures" just like a regular book has, except these will not be sewn (unless you really, really, really want to sew them). Instead, they will be glued.
Simply run a very thin bead of glue down the center of each fold line to glue the sheets together. The thin bead of glue shown in the picture above is actually a bit too much glue.
I found that four or five sheets was enough to make a believable signature. Fold up each signature as you go, so they will dry in the right shape.You can trim them up as you go, or just leave the signature edges a bit organic, as I did.
Next run a very thin bead of glue along the top of the folded edge of the signatures to glue them together. Each little book will probably consist of between three and five signatures.
Next, you will lay your stack of glued together signatures onto the piece of leather you have chosen for the book cover.
Determine to what size you need to trim your leather, so that it wraps around the spine of the book and is slightly larger than the pages. Cut out the leather with a pair of sharp scissors.
Using any clear drying glue, adhere the insides of the book to the inside of the book cover.
The book will want to splay open, so weight it down while the glue dries. I found that my coffee cup worked well for this.
When the glue has dried, you should have a perfectly lovely perfect little mini-book -- too perfect, actually. Using the edge of an old pair of scissors, rough up the edges of the pages and the leather. You don't have to do this, if it hurts your heart to damage something so perfect, but it gives the little tomes a lovely patina.
You can create single book pendants, like this little blue book. We added another layer of interest to it by wrapping it in a contrasting strip of leather. Use a sharp awl and a wood block to pierce the leather at the top of the spine to add a jump ring to attach the pendant to a necklace.
Another wonderful option is to stack two or three little books together to create a pendant. For the pendant shown here, each book was pierced with a sharp awl, using a wooden block to protect my table. Then, a pin head wire finding was inserted through all three books and a jump ring was then attached.
This is what the bottom of the pendant looks like.
Wouldn't this be a fun gift to make or receive?
If you love working with vintage book paper, you might like this post about making mixed media flowers.
If you enjoyed this post, please subscribe to House Revivals in the sidebar, so you won't miss the fun projects we have planned. Find us on Facebook, too, so you can catch all the "in between" stuff, and see what I'm working on throughout week on Instagram. Feel free to link today's project to your favorite social media sites.
Thanks so much for stopping by!
~Amanda