I have a confession to make: I may be an Altoids tin hoarder. I love them so much. I use them to organize jewelry when I travel, to keep art supplies handy, to make sewing kits and first aid kits and so on.
The date on my Creme de Menthe mints said 2009 -- I told you I was a hoarder! I remember buying the mints because I really liked the green color of the tin. I recently altered this tin to create a watercolor kit for art journaling on the go. Are you an art journaler?

Here is a simple way to alter an Altoid tin. Start by creating a pattern for the top of the tin, by making a pencil rubbing.

I did not want to wait for paint to dry, or to worry about paint chipping, so I kept the original green color and used alcohol based markers to age the metal and to cover the white areas that I thought might peek through after I decorated the top. Alcohol based markers and inks work really well on metal. You have a little bit of work time, for blending, but it dries fairly fast.

Next, I adhered some scraps of patterned paper to the top, using the rubbing I made as a pattern.

Another, smaller piece of decorative paper was glued on top of the first piece, then the whole thing was sanded and distressed, and got a bit more "antiquing" with my alcohol markers.

The bottom of the tin got some decorative paper, as well. Hint: rubbing alcohol will remove the date stamps.

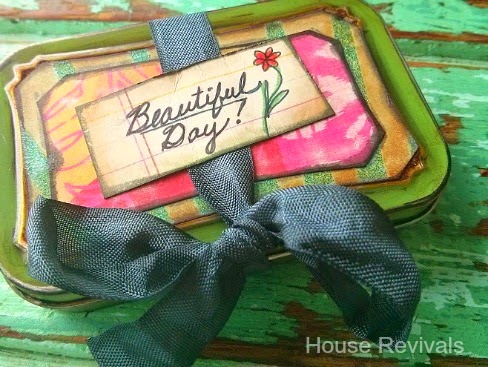
I adhered a piece of hem tape to the tin to create a pretty tie -- if I ever drop my tin, I would hate for its contents to fly all over the place.

Add a cheery note over the hem tape, to secure it well.
You're done! This is such a simple way to alter a tin -- you can make them to give as gifts, filled with treats or anything you can think of!

The date on my Creme de Menthe mints said 2009 -- I told you I was a hoarder! I remember buying the mints because I really liked the green color of the tin. I recently altered this tin to create a watercolor kit for art journaling on the go. Are you an art journaler?
Here is a simple way to alter an Altoid tin. Start by creating a pattern for the top of the tin, by making a pencil rubbing.
I did not want to wait for paint to dry, or to worry about paint chipping, so I kept the original green color and used alcohol based markers to age the metal and to cover the white areas that I thought might peek through after I decorated the top. Alcohol based markers and inks work really well on metal. You have a little bit of work time, for blending, but it dries fairly fast.
Next, I adhered some scraps of patterned paper to the top, using the rubbing I made as a pattern.
Another, smaller piece of decorative paper was glued on top of the first piece, then the whole thing was sanded and distressed, and got a bit more "antiquing" with my alcohol markers.
The bottom of the tin got some decorative paper, as well. Hint: rubbing alcohol will remove the date stamps.
I adhered a piece of hem tape to the tin to create a pretty tie -- if I ever drop my tin, I would hate for its contents to fly all over the place.
Add a cheery note over the hem tape, to secure it well.
You're done! This is such a simple way to alter a tin -- you can make them to give as gifts, filled with treats or anything you can think of!