Google+ House Revivals

Tuesday, November 27, 2012

Vanity Bench Makeover Trash to Treasure

Have you ever had one of those embarrassing moments where you have house guests at the house you've been remodeling for nearly two years, and you realize you are using the same cardboard boxes for tables and TV stands that you were using when they visited a year earlier?  Yikes!  This happened to me a few weeks ago, and I realized it was time to start furnishing the beach house properly.


One of my problems is that the furniture that worked beautifully in my old Queen Anne Bungalow doesn't really work in my contemporary rustic beach house.  The other problem is that my budget will not allow a big new furniture shopping spree :)


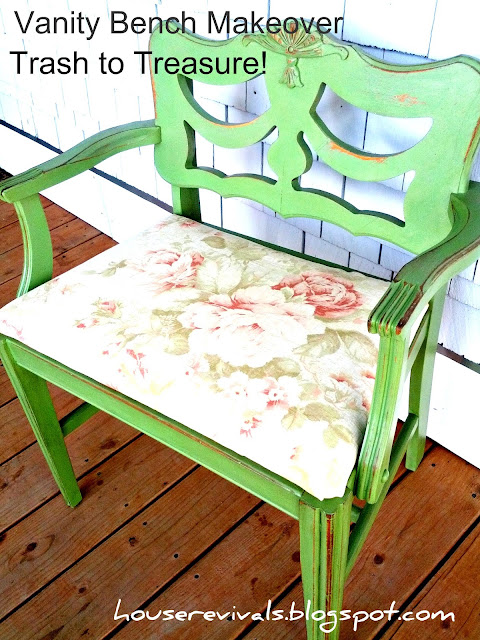
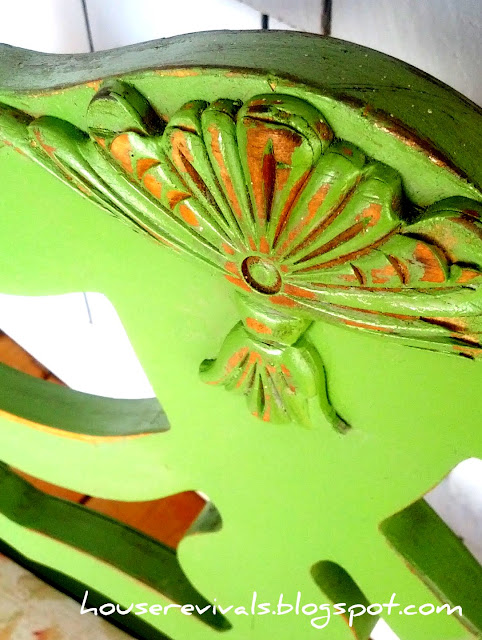
So, I've had to get creative.  This vanity bench is one I've had for years -- it goes with a vintage bedroom set I have, but it has been relegated to basements and closets, because it was in such terrible condition.  Although the piece is very sturdy, the maple veneer was in bad shape, and the carved medallion was missing some pieces, so refinishing in a natural finish just wasn't going to be practical.  My husband wanted to throw the bench away, but I made him keep it, and we dragged it across the country when we moved, then stored it for two years! Do you have any idea how much husbands LOVE to pay money to store broken furniture?  Ha!


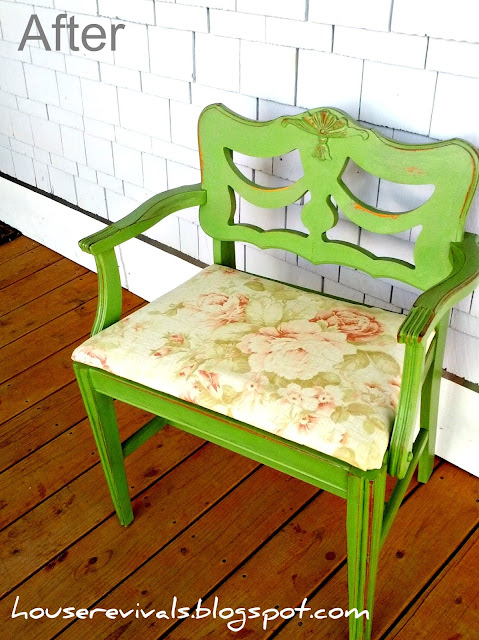
Well, I am glad we saved it.  We gave it a couple of quick coats of green paint (leftover from another project), then we distressed the edges with sandpaper.  The carving got hit with a little sandpaper, then the exposed wood and low points got hit with a little bit of walnut stain.  I'm loving the beachy distressed look!  The "antiquing" keeps it from looking too precious.


I was literally tearing open boxes in the attic, trying to find fabric to reupholster the seat, and grabbed the first piece I found that was heavy enough and big enough -- I got pretty lucky, I think! 


This is one of EIGHT furniture rehabs I've done in the last three weeks.  Plus, I have two pieces in progress, and several pieces waiting in the wings (we've got to get this place furnished, so my guest see some progress has been made between their visits)!   I'm guessing you will be seeing a few more of these furniture posts over the next several weeks :)

What projects are you working on to get your house "guest ready"?


 This post is being linked to the following lovely places:
Miss Mustard Seed 
504 Main Tickled Pink 
Funky Junk Interiors


Monday, November 19, 2012

Recycling Old Sweaters and Old Memories

A couple of years ago, I was planning our annual Parade of Lights Christmas party.  We lived in a historic neighborhood, within walking distance of a charming little downtown area.  Every year, our town held a Parade of Lights, complete with Girl Scout troops and Cub Scouts, local firetrucks, school marching bands, and of course, Santa!


Our party would meet at our home for hot drinks, then bundle up and walk down to Main Street.  We have so many great memories of those days. When we started, our kids were, well...., KIDS.  Then, through the years, we watched them grow up.  In their high school years, they sometimes wanted to go to the parade with their own friends, but by college, they were back, with boyfriends and girlfriends.  They enjoyed sharing the story of our little tradition with their current loves, as we shivered and huddled close together and waved at the parade participants.


Now, in our household, parties are planned months in advance -- even years.  After our last Parade of Lights Party, I decided to package a pair of mittens with everyone's party invitation the following year.  I hit the thrift stores and bought lots of old wool sweaters, brought them home, felted them in the washing machine, made a mitten template, and made a million pairs of mittens!  Okay, maybe a million is a *slight* exaggeration :)


I stitched them together on my sewing machine, and made coordinating felted wool flowers for the ladies' cuffs, using scraps leftover from the project.  Then they were packed away to be sent out with invitations the following year.


Little did I know, at the time, that we had hosted our last Parade of Lights Party.  The new year brought big changes to our family -- job changes, a renovation (the first of three in a row-- including this beach house), a long distance marriage, a home sale, an engagement, graduations, a major move and the packing into storage lockers of all our worldly goods.  The mittens were forgotten.  Three Christmases came and went, and the mittens, along with everything else we owned, stayed in storage.

It was a bittersweet moment to find them recently.   I still love them, and they brought back some really great memories of times shared with family and good friends.  What shall I do with them?  Last year we started a new tradition -- an annual Christmas tree bonfire on the beach.  Although our summers are sunny and warm, our winters at the beach house are c-c-c-coooooold, so maybe we can box mittens up with an invitation to a post-Christmas bonfire? 


Instructions:
To make your own recycled mittens, first gather and felt an assortment of 100% wool sweaters.  Trace around your hand to create a template -- add a little extra "wiggle room" and add a seam allowance. Next, lay your template on a sweater, using the waistband as a cuff.  You should be able to get two adult mittens from one adult sweater. Cut out and stitch together, using your longest stitch length.  Embellish, as desired.  I am still trying to decide if I want to add a blanket stitch to mine, similar to these mitten ornaments I made last year.  


What do you think?  Blanket stitch, or no blanket stitch?


Saturday, November 3, 2012

Beach House Before and After Concepts

We had guests visiting our beach house last weekend, and we were showing them pictures of the renovation, and how the beach house looked when we first found it.


Needless to say, our guest were shocked at how bad it looked when we originally fell in love with it!  I realized, as we were skimming back through old blog posts, that our concept pictures were scattered all over the place.  Although I'm pretty positive my guests all want to watch me search through millions of posts to find what I'm looking for, I'm pulling several of the beach house concept before and after pictures together into one post -- just in case they actually don't want to sit and watch me search through millions of posts.

 Loft level window seat.
The loft level window seat came about when we discovered one of our decks was leaking into an interior wall, causing lots of damage.  We realized that, due to our very rainy winters, even if we fixed everything, we would have to do it all again in a few years.  The wind was forcing the water into the wall before it had a chance to drain.  So, we enclosed the deck, and were left with this funny little space. What to do with it?  The seat is still unbuilt, and we decided to carpet the loft level for warmth, comfort, and noise reduction, instead of hardwood floors. Now, we're looking for a new carpenter....

Guest Bedroom (formerly a badly converted garage)

Sleeping Loft Bedroom (formerly part of the badly converted garage)


Beach House Kitchen. 
This layout actually changed when a neighbor added another floor to their house -- we lost part of our view to the south, so we removed one window and switched the sink and stove around.


View of the House from the Beach.
This is the last major part of the renovation still to be completed -- although the house has been raised, the beach facing deck has not been rebuilt yet.

The Street View.
The street view concept has gone through many changes.  Between our structural engineer's earthquake and wind requirements, our city codes, our budget, and the fact that our neighbor painted their house almost exactly the colors we had planned to use, our street view plans have been pretty open.

Courtyard Concept.
Okay, our courtyard only looks slightly better than that first picture right now!  This concept is still changing.  My husband was leaning toward a fire pit in the center, and I was leaning toward a fireplace.  He wanted concrete flooring; I wanted pavers....  We're working on it :)

It's good to see these before pics -- it reminds me how far we've come... and it's good to see the concept drawings, as well -- it reminds us where we're going!

Tuesday, October 23, 2012

Woven Snowflake from Vintage Book Pages

Here is a brand new woven snowflake/ star design I created this year.


Here is a "before" picture:


I'm pretty happy with the transformation :)

The new design is inspired by the woven star I did a couple of years ago. This is the first of three completely original designs I've created this year.  Tutorials are in the works! 

Are you getting ready for Christmas, yet?


Sunday, October 21, 2012

Vintage Book Page Woven Stars

I've been getting a head start on Holiday gift making.  Remember the woven paper star tutorials I did a couple of years ago?  Well, I've made a few more -- and I'm working on an updated tutorial.


I found some lovely vintage books at the GW the other day and thought they would make beautiful woven stars to give as gifts.

Watch for the updated tutorial!


Thursday, October 18, 2012

Rustic Jewelry Organizer

I recently ran across this cute little potted plant shelf at our local GW Outlet.


If you're not familiar with Goodwill Outlets, they are a "last stop" for many items before they are bailed up and turned into mops, or sent to landfills and recycling centers.  I thought this piece could be used to help organize jewelry, so I snatched it up (for about 49 cents)!


This plant shelf was kind of wonky and wobbly, so it got some scraps of  wood nailed to the back to add rigidity. To add patina to the shelf, I tried wiping on a little vinegar.  The vinegar did darken the wood somewhat, but I ended up adding a little stain to the piece to get it a bit darker. Oh well, the vinegar probably killed any lingering germs, right?


Remember my Anthropology inspired cabinet knobs?


I thought they would be perfect to hang necklaces from.  I love the contrast between "fancy" and rustic!  The little shelf holds a basket of baubles, and pins and broaches. 

This post is being linked to the following lovely places:

Wednesday, October 17, 2012

Mod Podge Rocks Feature!


Amy, over at Mod Podge Rocks, is featuring my Anthro inspired lace filigree cabinet knobs today!


Be sure to check out the feature, and while you're there, check out all the other cool projects!


Friday, September 28, 2012

Make Ordinary Flooring Look Like Reclaimed Lumber

Are you IN LOVE with the reclaimed wood projects we are seeing everywhere?  I posted about using reclaimed wood for paneling a few weeks ago, and shared that I want to do a similar finish in my tiny "pied-a-terre".

 via Design Sponge
The person who had our little condo before us tried to remodel and flip it, but failed.  He did every. single. thing. wrong. And never finished. And the condo went into foreclosure. And then sat on the market. Forever. Because it didn't have any bathroom fixtures. And it was a mess.  So, of course, we bought it.


Who wouldn't want all this loveliness?


Well, the condo came with a giant box full of old boards and old wood flooring.  The old wood flooring was nothing special -- just bits and pieces of oak that the flipper had been using to patch the existing floors.


I guess, technically, the wood in the box was reclaimed, but it didn't look like "hip and stylish" reclaimed wood, and it didn't look like "charming" reclaimed wood.  It was just "blah" reclaimed wood.  I want to use old flooring on the back of our kitchen peninsula, but I don't want it to look like someone "just kept going" when they were installing the floor.  Our local building salvage yard has some really cool reclaimed wood.  Beautiful, chippy old stuff, with lovely scuffs and dings and loads of character -- and they want loads of money for it.


A light bulb went on... what if I sand and paint and stain and hammer and glaze and gouge and scratch and scrape my ordinary boards to make them look like the lovely (and expensive) old boards at the architectural salvage yard?  And so it began.


Here is how to take ordinary wood flooring and make it look like it has a charming history.  Start by sanding and prepping the boards. I used liquid sander on boards I was planning to paint, but I used a good old sanding block on boards I was only planning on staining.  No need to use smelly strippers -- you're not "refinishing" the boards, you're just "adding character".  Just sand them enough for the new stain to have something to "grab onto", focusing on the edges and ends.


Next, paint the boards you will be painting, and set aside the boards you plan to only stain.


Now, for the fun part:  gather up some "implements of destruction".  I like to use a hammer and a screwdriver, and a little grater.  Another favorite tool is an old metal meat mallet (not pictured).  Next, gouge and scrape and grate and pound.  And then sand it all.  Distress all your boards, painted and unpainted.


The next step is to add "patina".  Use any stain or antiquing medium you have on hand.  Wipe the stain on, getting it into all those gouges and scrapes and scratches, then wipe it right back off.


Do this on both the painted and unpainted boards.


Before you know it, you will have a giant collection of charming, chippy, vintage reclaimed flooring!  By staining some and painting some in different colors, the boards look like they were salvaged from a variety of buildings.  I am doing my boards a little at a time -- as my schedule allows, and I already have about about two-thirds of what we need for my project.  I can't wait to share more as the project progresses!


This post is being linked to the following lovely places:

Saturday, September 22, 2012

How to Layer Rugs

Maybe it's the cooler temperatures, but I have been thinking a lot about rugs lately.  Rugs are a great way to add warmth, texture and acoustic comfort to a room. 


From a space planner's perspective, we use rugs to anchor, "pull together", and define a space, as well. Rugs are definitely workhorses!  Lately, I've been thinking quite a bit about layering rugs --  *LOVE* the look!

Wednesday, September 19, 2012

Fireplace Hearth Ideas

We've been playing with fireplace ideas at our little pied-a-terre, the marina condo in the city.  The "failed flipper" who had this place before us, and before the bank foreclosed, ripped out the hearth and removed the fireplace surround.  For safety reasons, we need to replace the hearth tile as soon as possible.


We brought some travertine tile scraps from our beach house, to see if they will work for a new hearth.


Maybe?  Of course, it wouldn't need to extend quite this far -- our building codes will allow for a sixteen inch hearth, since the fireplace opening is less than six square feet.

We used huge rectangular pieces of travertine in our bathroom renovation, so using travertine for the hearth will help create unity in the overall design. Plus, I think we may have just enough tile.  :)

It's always nice when you can do a project using leftover supplies.  Now, if we can only remember who we loaned our tile saw to....

Have you done any fireplace make-overs?  I would love to see your projects!  Please feel free to link your own fireplace in the comments section :)