Google+ House Revivals

Monday, December 19, 2011

Honeycomb Ornament Tutorial

It's taken a bit longer to pull together the tutorial for the honeycomb ornaments made from vintage book pages than I expected.

I was hoping to retake some photos, but my camera is on the fritz.   I'm freaking out just a little tiny bit, as I always have projects in the works, and it's Christmas time, and I need my camera!


Start by choosing the paper you want to use to create your ornaments.  I used pages from the same book used to create my woven stars.  These are nice big sheets that can be used whole, quartered, halved, or cut into thirds to create the desired size and shape of ornament. 


Here, I quartered the pages to create the size of paper that was needed.


The quartered sheets were then folded in half -- I folded several at a time.


Next, a pretty profile shape was drawn to create a template, and that template was used to trace the cutting pattern onto the folded paper -- again, I would cut out several at one time.


The folded shapes were then glued together, placing the leaves "back to back"....


...until I had a a stack of about two dozen pieces.  You really need at least that many pieces to create a successful honeycomb.  A few of mine were made with only eighteen pieces, and they are not as pretty as the ones created with a minimum of twenty-four pieces.  For very large ornaments, you will need even more pieces.  It is also important to have an even number of pieces.


When the glue has dried on your stack of folded leaves, bring the front and back leaves together to form your basic shape.  I clipped mine in place while the glue dried.


These ornaments look beautiful in their simple fan shape!


Seriously.  You could stop. right. here. and have a stunning display!


Or, you could create your honeycomb.  The more leaves you've used, the more detailed your honeycomb pattern can be.


Add some glitter, and add a pretty hanger, if you like, and you have these beautiful recycled ornaments.


They make lovely gifts, individually packaged in pretty gift boxes, or hang them all together from your mantel.


Be prepared for lots of oooohs and ahhhhhs, as these little ornaments are show stoppers!


Mine are displayed on my Christmas mantel, along with some mercury glass balls, and vintage frames.... wish I could show you all.  Hopefully the camera issues will be resolved in a few days:)


Love mixed media? You might like this post on how to make mixed media flowers.  Or click here for several easy art tutorials.


If you enjoyed this post, please subscribe to House Revivals in the sidebar, so you won't miss the fun projects we have planned. Find us on Facebook, too, so you can catch all the "in between" stuff, and see what I'm working on throughout week on Instagram. Feel free to link today's project to your favorite social media sites.

Thanks so much for stopping by!
~Amanda

Saturday, December 17, 2011

Mini Felted Wool Mitten Ornament Gifts

What do you get your mother-in-law for Christmas, when she really doesn't need one single thing?  That's what I was wondering when she came out to the beach house for a visit this fall. She happened to bring up some embroidered ornaments I had given her years ago, mentioning that they were her favorites.   An idea formed.


Why not make little "grandchild ornaments" for my mother-in-law for Christmas?   

I had tons of small felted wool scraps leftover from the gift card ornaments I wrote about here.  The scraps were small and I was debating whether to throw them away.  Why not make a smaller version of the gift card ornaments, using the leftover materials, for my mother-in-law's gift?


I love how they turned out -- about twenty in all, plus a couple of extras "just in case".  Filled with festive goodies, they will look so sweet hanging on a tree or a garland!


These were super easy to make -- not nearly as time-consuming as those embroidered ornaments I made years ago.
  • Create a mitten template (mine was about two and a half inches from fingertip to cuff edge)
  • Cut out two pieces of felted wool for each mitten.  
  • Blanket-stitch (or glue) the two sides together 
  • Add little embroidered embellishments, if you'd like, such as sweet little lazy daisies (or you could glue on some embellishments)


The cuffs and hangers are simply narrow strips of wool scraps that were glued in place.  Glue some goodies (I used bits and pieces rescued from old Christmas decorations) inside the top of the mittens.  Add a little name banner to each mitten and you're done!

This sweet little set of gift ornaments cost virtually nothing to make. The embroidery took a little time (about fifteen minutes of stitching per mitten), but my mother-in-law is worth it.  The parts that were glued together were done "assembly line" style in one evening.

Edit:  My mother-in-law LOVED her gift! 

Friday, December 16, 2011

Are You Ready to Get Your (Tangerine) Tango On? Color of the Year...

Do you have plans to implement Tangerine Tango, Pantone's 2012 Color of the year, into your projects?  As we saw with 2011's Honeysuckle Pink, we don't always interpret color trends literally, choosing instead to use a more subdued version of a hue.
Pieter Estersohn
 
And, then again, sometimes we punch it up a notch or two!
Thibault Jeanson 

So, what are your plans?  Maybe you have already been incorporating the orange color family into your designs?
Eric Piasecki

Maybe you plan to use pops of coral, orange, or tangerine?
Victoria Pearson

Maybe you will use it in your entry to set the tone for your space?
Jonny Valiant 

I would love to see what you are planning to do with this color!  Do you love it? Hate it? Never want to see it again? Want to surround yourself with it?  Let me know what you think.


Friday, December 9, 2011

Honeycomb Ornaments from Vintage Book Pages

Yippee!  I'm finally back on my own computer, so I can share with you the new ornaments I've been working on. I shared in an earlier post that this new design is inspired by a pumpkin, vintage paper ornaments, and some plastic Martha Stewart ornaments sold at Home Depot.


I loved all the darling pumpkins made from fanned out books that were showing up in bloggy world last month.  They were just way too cute.  I also adore vintage Christmas ornaments, and have always drawn lots of inspiration from them.  These honeycomb ornaments from Marie's Etsy shop are really sweet.


When I saw a Martha Stewart plastic honeycomb ornament while walking through Home Depot the other day, the idea formed to try making my own -- from vintage book paper, of course!


These ornaments look great just hanging from a bit of fishing line, but you can get a little fancier and make a glittered wire hanger if you'd like.


Make these little darlings in lots of pretty shapes!


This post is just a teaser -- the full tutorial will be up in a couple of days.  If you're not already a follower, be sure to hit "follow" in my sidebar, so you're sure not to miss it.  Be back soon!

Here is the link to the tutorial for the honeycomb ornaments: Click Here

To see other projects made from vintage book pages, go here, or here.


Monday, November 28, 2011

Felted Wool Mittens

I was looking for a nice way to package gift cards this Christmas.  Gift cards can feel a little impersonal, so I created these felted wool mitten ornaments to slip the cards into.  Long after the cards are spent, the recipients will have these sweet handmade ornaments.


You can string several together to create a homespun Christmas garland to hang across your mantel for Santa to fill.  Or hang it anywhere, for that matter!  Here in the Pacific Northwest, winters at the beach can get a little chilly, so a few warm fuzzy mittens hanging across a beach house porch seems totally appropriate.


These mittens are super easy to make.  Start with some old or thrifted wool sweaters.


The green sweater, above, has already been felted.  To felt your sweaters, just toss them into a hot/cold wash cycle, with a little detergent.  Dry on high.  Repeat until you are happy with the felted material.  Ideally, felted wool will not unravel when you cut into it, making it perfect for crafting and sewing projects.  If your sweater has some pilling, like the green sweater here, just hit it with a soft brush.

Next, you will want to create a mitten pattern.  Here, I just used a magazine insert to sketch out the mitten shape.  Junk mail works great, too!  Why waste good paper, right?  Once you are happy with your mitten shape, cut it out and use it as a template to trace onto your felted wool.  Cut two pieces for each mitten.  I hand stitched mine together using a simple blanket stitch (it takes about 10 minutes to blanket stitch one mitten).  A whip stitch would have looked very charming, and a bit more primitive, and would "whip up" much more quickly.  You can also stitch it on your machine -- or forget stitching altogether, and just use glue :)
Decorate your mittens by gluing or stitching embellishments.  I used a simple lazy daisy stitch for girls' mittens, and glued on some thrifted greenery, yarn, and mini-candy canes.  Slip in a gift card, or other small gift, and you're done! 
Enjoy!
Thanks for stopping by!
Amanda

Sunday, November 27, 2011

New Star Design from Vintage Bookpages

Okay, this isn't a "new design".  I actually made this last Christmas, but never had time to write a post about it during the holidays.  The original idea was to create a kind of "shadow box" and add a nativity silhouette in the center, but on a whim I suspended a pretty ornament in the center, instead.

Basically, this is a star made from rolled vintage book pages.  I used an old pen to roll the pages all the same size, then secured each little roll with a smidgen of tacky glue.  Next, I made a pattern for a five-pointed star, using this method.

Wednesday, November 23, 2011

Mums, Peonies, and More Blog Theft


Most of my projects, lately, have been "house" related, but I recently squeezed in a new singed flower design.

Many of you are familiar with the burned edge poppies...

...and the burned edge peonies that I designed last year. 

Well, I've had it in the back of my mind to do a chrysanthemum for quite a while.  I wanted to see if it had already been done, and did some Google searches for burnt, and burned, and singed flowers, and guess what?  Images from my own tutorials were popping up for another blog.  I'm not talking about when other bloggers feature your project, with a link and a credit.  I'm talking about out and out theft.  I would encourage other bloggers to randomly search for content from their own blogs -- especially popular posts, to see if your own content is being hijacked.

I have begun the long process of watermarking my photos, starting with the woven star tutorial (yes, it's been hijacked by multiple blogs).  This doesn't actually stop the hijackers, but it will at least take away their credibility, right? 

For now, I will just make a quick pass over the most popular posts, and watermark the most important images, but eventually, I will need to watermark everything.  It is going to take months.  Seriously.  Especially with two renovations in progress, and several burnt edge chrysanthemums to finish up for our Thanksgiving place settings :)

Here's a peek at the project:

No pressure.  Just a few handmade fabric mums to whip up between painting some cupboards and preparing for house guests.  Easy peasy, right?  What kinds of projects and dishes are you working on to prepare for Thanksgiving? 


Tuesday, November 15, 2011

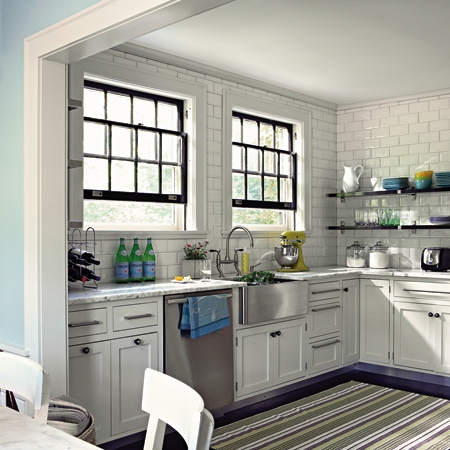
Painting the Trimwork Black!


Do you just love the surprise and contrast of black trim work?  I think sometimes we get so used to just painting all our trim white that we forget there are lots of other options, including black.  The black window frames in the kitchen below provide a nice contrast, without overwhelming.  They work because they reference some other dark elements in the room.

The beautiful historic architecture of the space shown here is accentuated by the boldly painted trim work.

Who doesn't love a black door?

This room feels light and airy, but the pops of contrast provided by the dark trim keeps it from being to precious.

The dark painted trim in the traditional room below makes the space feeling elegant.
So, what do you think?  Do you like black trim?  Would you ever try it in your own space?


Friday, November 11, 2011

Thanksgiving Wreaths


Are you just loving Pinterest?    House Revivals has several boards, organized by categories, such as "staircases" and "mudrooms".
I love having an online bulletin board for storing inspiring images, but Pinterest is also great for searching for inspiration.  Today, I had a few moments while waiting for joint compound to dry at the condo renovation.  I could either pay some bills or surf Pinterest....  Well, the bills won't be late for a couple more days, right?

Today, I was totally taken by these fall wreaths.


LOVE the creativity of the book page oak leaves and the bright fall foliage against the blue door.


This yellow yarn wreath is so cheerful and welcoming.

These rolled felt rosettes are too darling.

Be sure and check out Pinterest, if you haven't been there..., but I have to warn you:  It's addictive.


Happy pinning!


Wednesday, November 2, 2011

Stolen Blog Content


It happened to me.  I have discovered that content from House Revivals has been hijacked by one of those "fake" blogs.  As I look around this fake blogger's site, I am finding lots of what appears to be stolen content from other blogs, as well. 

This is the blog that contains the hijacked content:

http://howtomakecraft.blogspot.com/

Has any of your own content been hijacked?  If so, be sure to use blogger's "report abuse form" to submit a complaint.