One thing I've noticed, when my friends are making cards, is that they often feel a little paralyzed by the thought of creating a card without a set of instructions and a materials list.

It's okay to make cards that way, but it's very freeing to know that you can go through supplies you already own, and pull out the things you need to create one of a kind pieces.

To pull together a successful card, without instructions or a plan, start with one thing that you will build everything else around. In this case, I chose a floral scrap of card stock. Next, I found the gray polka dot card base. Since gray is a cool neutral, I knew it would look great against the black background of the floral card stock. The white dots also echoed the tiny white flowers on the card stock. I also found some felt adhesive backed trim from Daiso (the Japanese $1.50 store), and an Anna Griffin premade sentiment (from the clearance section of a craft store). When you pile all your pieces together, if they look good, they will work together on the same card. I grabbed a scrap of lightweight paper that looked nice with the floral card stock, and used that to line the envelope.


I hope this post encourages you to try designing your own cards, using the bits and pieces already in your stash.


If you enjoyed this post, please subscribe to House Revivals in the sidebar, so you won't miss the fun projects we have planned. Find us on Facebook, too, so you can catch all the "in between" stuff, and see what I'm working on throughout week on Instagram. Feel free to link today's project to all your favorite social media sites.
Thanks for stopping by!
Amanda

It's okay to make cards that way, but it's very freeing to know that you can go through supplies you already own, and pull out the things you need to create one of a kind pieces.

To pull together a successful card, without instructions or a plan, start with one thing that you will build everything else around. In this case, I chose a floral scrap of card stock. Next, I found the gray polka dot card base. Since gray is a cool neutral, I knew it would look great against the black background of the floral card stock. The white dots also echoed the tiny white flowers on the card stock. I also found some felt adhesive backed trim from Daiso (the Japanese $1.50 store), and an Anna Griffin premade sentiment (from the clearance section of a craft store). When you pile all your pieces together, if they look good, they will work together on the same card. I grabbed a scrap of lightweight paper that looked nice with the floral card stock, and used that to line the envelope.
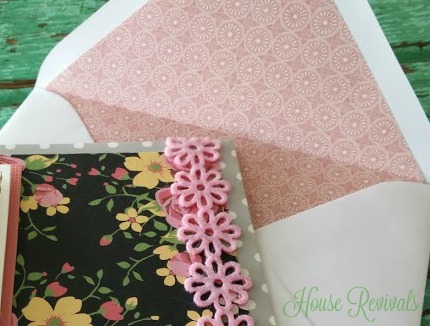
Next, I matted the card base with the floral card stock.

Then, I added the sentiment and the felt trim.

This card could not have been simpler to make. It works, because all the components were chosen to go with the floral paper.

I hope this post encourages you to try designing your own cards, using the bits and pieces already in your stash.
You might also like this post about using premade card bases.
If you like easy card making ideas, you might love this easel card tutorial.
If you enjoyed this post, please subscribe to House Revivals in the sidebar, so you won't miss the fun projects we have planned. Find us on Facebook, too, so you can catch all the "in between" stuff, and see what I'm working on throughout week on Instagram. Feel free to link today's project to all your favorite social media sites.
Thanks for stopping by!
Amanda