Google+ House Revivals: February 2015

Saturday, February 28, 2015

How to Decorate With Zinc

Don't you just love an old-fashioned kitchen work table with a zinc top? Zinc can feel charming or industrial -- or even a little bit of both!


You may feel like zinc is out of your price range, but you can add zinc accents to your space on any budget.

For a big splurge, you might use this vintage architect's table as a kitchen island. This table would be equally at home in a farmhouse kitchen or an industrial urban loft.


Anything with chippy goldenrod paint makes me giddy, but add a zinc top and I am in love.


If you can't find just the right vintage piece for your space, SDS Designs builds custom zinc topped tables!

You can even use zinc for you countertop material. The zinc countertops in this kitchen, from Country Living, are simply gorgeous.


Zinc countertops and tables may not be within your budget, and that's okay. You can add just a touch of zinc, with this boot tray, from Crate and Barrel.


You can organize your desk in style, with this zinc wire basket.


Keep track of incoming papers with this beautiful zinc-finished tray. I love that it has a surface on top to put a pen holder and a few office supplies. I'm pretty sure I NEED this!


I am a big fan of mail sorting baskets, and these are no exception. This first sorter would be perfect in the mudroom for school papers.


craigslist

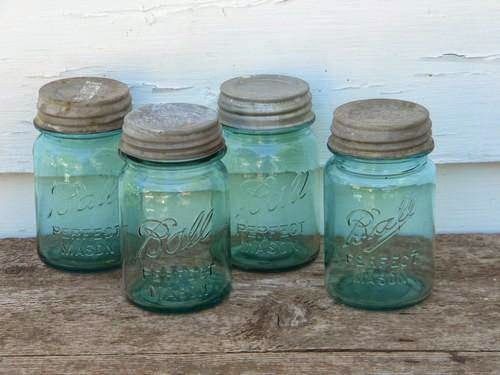
For an even smaller budget, I found these vintage Ball jars on Craigslist yesterday. I LOVE Craigslist. You can find vintage ball jars and Mason jars, with their original zinc lids in antique stores, on EBay, on Craigslist, and even at garage sales. They are a wonderful way to add storage to a kitchen or craft room.

Do you love zinc? Zinc lends such a warm patina to a space. I would seriously LOVE to have that chippy yellow table as my kitchen island, with lots of blue Ball jars for storage.

If you enjoyed this post, please subscribe to House Revivals. We have lots of projects and tutorials planned for 2015.

Thanks for stopping by!


Thursday, February 26, 2015

Cool Stuff You Find When You Clean Out the Attic

Cleaning out the attic, as it turns out, is kind of fun. You find all this awesome stuff you forgot you had! You get all the happy brain chemicals you might get from shopping, without any of the remorse you get from spending money and bringing home more stuff. It's a win win!


It's kind of hard to go wrong! When I left off last week, we'd just spent one weekend unboxing and getting rid of stuff, and two weekends building and placing shelves and caulking all the places where the wind came in.

Tuesday, February 24, 2015

How to Make Pretty Jewelry From Paper Scraps

The other day I had a bunch of tiny paper scraps strewn around my dining table. The paper was left over from the Chinese New Year wreath project, and from the Chinese Paper Lantern project.


The paper scraps consisted of handmade papers, colorful deli papers, and Chinese red envelopes. The colors looks so pretty all jumbled up together, that I didn't have the heart to toss them in the waste bin. Does this happens to you? My husband suggested I may have a special kind of crazy, but I told him seeing beauty in mayhem is part of my charm. I'm not sure he was buying it....


In spite of the fact that it was already way past my bedtime, I snapped a quick cellphone shot of the papers, then grabbed a bottle of glue. I envisioned turning the pile of tiny scraps into pretty multi-media pendants.


Also sitting on my table was a pack of index cards, that I shared about in my $1.50 store post.


I grabbed two of the cards, and proceeded to glue the tiny scraps all over them. I just kept layering the papers on, occasionally dry brushing a bit of gold craft paint between layers. When all the papers were used up, I glued the two cards together, back to back, and brayed them down really well, so they would be nice and flat.


Then I grabbed a pair of old scissors and cut the card into rectangles. I wasn't worried about making them perfect. I rounded the corners a bit, then brushed some more gold paint around the edges.


The rectangles still needed "something", so I wrapped them all with strips of handmade paper.


Next, I hardened the rectangles by brushing several generous coats of wood petrifier over them (affilliate link: PC Products PC-Petrifier Water-Based Wood Hardener, 16 oz Bottle, Milky White).

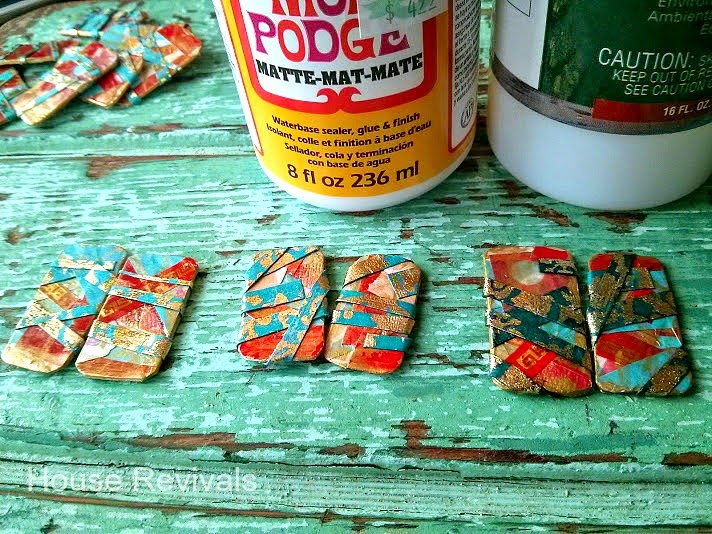
This is where I ran into a little problem. Do you see how the strips of handmade paper, above right, are really dark? That's from the wood petrifier. The rectangles in the middle were only coated with Mod Podge, and they darkened a little, but not too much. The rectangles on the left have not been treated at all. After some thought, I decided to petrify all the rectangles, then go back and wrap another layer of handmade paper strips right on top of the previous wraps. Then I sealed the whole thing with Mod Podge. It all worked out in the end -- in fact, I love the extra dimension the little rectangles have now!

I definitely love how the wood petrifier soaks into the paper and hardens it -- living in the pacific Northwest, you never know when you're going to get caught in the rain -- but you will always want to test it to see if it darkens your paper too much.


To turn the rectangles into jewelry, I grabbed some thin craft wire and some beads from a couple of broken vintage necklaces.  I simply wrapped the wire around the rectangles, and occasionally threaded a bead through the wire.


I LOVE how the paper and wire and beads look together! I made several pendants, and even made a set of earrings.


For the earrings, I gently bent the paper rectangles while they were still a bit damp from the wood petrifier.


I could not have been more thrilled with how these pieces turned out! You do not need any special tools to do this --just an old pair of cheap scissors. I cut the wire with the old cheap scissors (don't use your good fabric scissors), and wrapped and twisted it with my fingers. On a scale of one to five, this projects requires a skill level of one!


If you enjoyed this tutorial, please subscribe to House Revivals, so you won't miss any of the fun projects we have planned. Be sure to "like" and subscribe to us on Facebook, so you won't miss any of the in between stuff that happens. House Revivals is also on Pinterest -- see the links in the sidebar.

Thanks for stopping by!

This post is being shared at the following lovely places:

Saturday, February 21, 2015

Getting Shelves In the Studio Attic!

We've been hard at work on the Attic of Shame. My husband and I spent an entire weekend assembling shelves, then we did it again last weekend.


For each shelving unit, I had to go into the attic and clear the space for that unit, so all the heavy things were lifted and moved from the taller side of the room to the short side of the room, a bit at a time. Then, when it was time to put up shelves on the short side of the room, all the heavy things were moved back to the taller side of the room.

Thursday, February 19, 2015

Adventures in Cleaning out the Attic and Creating a Studio

This post is about my attic of shame. Most people have a closet of shame, or a drawer of shame, but I have an entire attic of shame. Plus some closets and drawers.


When we finally moved our boxes out of storage and into our beach house THREE years ago, we were in a huge hurry and still doing major remodel work, so all of the things that we didn't know what to do with, and didn't want to deal with, got shoved into a tiny attic space adjacent to the sleeping loft. Along with all the random stuff, all my studio supplies got shoved into the attic as well.


And there it sat. For THREE years! Sometimes, in frenzied bursts of creative energy, I would tear into some boxes to find a certain supply I was sure I had. Sometimes I found what I was looking for, but mostly not. We had THE WORST movers, and nothing was properly labeled. The attic was a huge mess that made me want to cry. On top of that, since we must spend the work week in the city, and only get to go to our beach house on weekends, we found ourselves not wanting to spend precious beach time hanging out in an attic. Basically, when faced with a choice between a bonfire and an unboxing session, we tended to choose the bonfire. Which is great. Except when you choose the bonfire for THREE years.


Well, my Word of the Year is Intention, and one of the ways I want to be intentional is to spend more time at the beach creating. I had a long talk with my husband about "going down to the sea" intentionally to create for several days out of each month. Not too many days. My husband and I love each other, and like to be together, so I won't be deserting him; but I can often work from the beach house as easily as from the city condo.


So, I have been cleaning out the attic. Believe it or not, the pictures here were taken AFTER I spent a Saturday unboxing and getting rid of stuff!  The attic is going to become a "studio-attic". Of course, it also happens to be the only windowless room in the entire house, and contains only one light bulb and one outlet. But mostly, it contains NO VIEW. So, while this space will house studio storage, machines, and a large worktable for bigger projects, smaller projects will still be carried to the dining table, or my drafting table, where there is a view of crashing surf. Because, you just don't go down to the sea to hang out all day in an attic.


The first time we saw the beach house, I knew the loft above the living room would be a perfect studio. It was one of the reasons I chose this house (plus, there was the VIEW).  Sigh... Changing job commitments have changed the way we use the house. Now, we use the house for business entertaining about one weekend in four, and the loft has to function as a secondary seating area for games and socializing. I have a small drafting table against that far wall, next to the door, but my dreams for a huge loft studio have been dashed. Le sigh....


Okay, seriously, folks, don't feel sorry for me. I'm a pragmatist, and I understand the house has to earn it's keep. Plus, I still get an ENTIRE ATTIC! Which is more than I've ever had before. And did I mention that this attic is at the beach? After three years (four since we bought the house and started renovations), I'm still pinching myself.


As I was unboxing all that STUFF, that first Saturday, I realized my actions would be futile until I actually had a place to put everything, so I stopped working and curled up in front of the fireplace with my husband and put "buy lots of cheap pine shelving" on my mental to do list. Then, a couple of weeks ago, I went every Fred Meyer within thirty miles of our condo buying ALL THE SHELVES. The sixty inch high units are perfect for the "tall" side of the attic, and the thirty inch high units are perfect for the "short" side.

Do you have a dedicated studio? I could lose myself in Pinterest pictures of gorgeous studios. Mine won't be beautiful right away -- I will feel like I've won the lottery just to have it functional for now! Beauty will come in time.


If you enjoyed this post, be sure to subscribe to House Revivals, so you won't miss any of the fun projects we have planned. Please "like" and subscribe to us on Facebook, so you won't miss any of the stuff that happens between blog posts.., like this cow picture. Who doesn't love a great cow picture?


To find out how we met and  fell in love with our beach house, read this post.

As always, thanks for stopping by!


Tuesday, February 17, 2015

Make Chinese New Year Lanterns!

Chinese New Year is just a couple of days away! When you live in a city like Seattle, it's kind of a big deal. With all of the excitement leading up to the BIG DAY, the parades, and the parties, it's hard not to catch the fever.


I picked up some red envelopes to bring to a party we will be attending this weekend. While researching the red envelope tradition, I discovered that making lanterns with the envelopes has become a popular craft. What?!!! How did I not know this?!!!


Look at those gorgeous envelopes -- who wouldn't want to create beautiful things with them?


After reading and watching several tutorials, I adapted the idea to use materials I had on hand. I have no silk tassels, but I have paper and string and glue.


If you want to make your own Chinese New Year lanterns, you will need:


If you are using traditional red envelopes, you will need to seal the flaps before you begin.


Begin by stacking three or four envelopes together and gently folding in half in each direction. Do not crease the entire envelope -- just crease the edge slightly to mark the halfway points on all four sides.


Next, you will want to fold the corners up, as shown.


I found it easiest to fold against a straight-edge, to get a nice sharp crease.


For this lantern, I folded five envelopes and stapled them together at the top creases, as shown below. One staple per side was sufficient.


Next, I stapled the bottom creases of the envelopes to form the lantern.


For a special touch, gently bend the triangle flaps toward each other, as shown above, and staple.


Isn't that pretty? You don't have to staple the triangles together -- instead, you may want to try gently curling the triangle around a pencil or thin dowel to create the look of the hexagon shaped lantern, center-top, below.


The last thing I did was add fringe and baker's twine hangers.


I simply cut long rectangles of pretty deli paper, and fringed both sides. Then I gathered the fringed strips into bundles and secured them with twist ties (from the junk drawer). The twist ties can then be coated with glue and inserted into the lantern, wherever you think they should go.


Have fun making these lanterns, and make the project your own! I experimented with different numbers of sides, stapling the triangles, curling the triangles, and leaving the triangles alone. Hang your lanterns in different orientations for completely different looks -- or invent an entirely new way to create pretty lantern ornaments.


To see how I cut my fringe for projects, check out this post.

To see another Chinese New Year project, click here.

If you enjoyed this post, be sure to subscribe to House Revivals, so you won't miss any of the great projects we have planned!  Like and subscribe to us on Facebook, so you won't miss out on any of the fun between posts, and add us on Google+.  Check out the sidebar for links to lots more popular posts. Thanks so much for stopping by!