Google+ House Revivals: crafting. vintage book pages
Showing posts with label crafting. vintage book pages. Show all posts

Tuesday, July 15, 2014

10 Pretty Seashell Projects!

I adore seashells. As a little girl, my mother taught me the joy of wandering quietly on the beach in search of the perfect shell or sand dollar. That love of beachcombing followed me into adulthood. I now have bowls and baskets of shells -- keepsakes from the many beaches my family has visited. For years, I was able to keep the collection in check, but then we bought the beach house, and things got out. of. control.


My husband has suggested we don't actually need three ginormous baskets of shells in our living room (please, nobody tell him about the ones stashed in various closets).

Tuesday, July 8, 2014

Best Painted Mason Jar Projects!

All the cute canning jar projects, that are so popular right now, remind me of summers at my grandmother's house.


When I was growing up, every summer we would take a road trip to see my grandparents on their little 40 acre farm in Oklahoma. We would show up around canning time, so my mom could help my grandmother put up vegetables from the summer garden.

My grandparents had an old summer kitchen, and under that kitchen was a dirt cellar. The walls were lined with shelves and the shelves were filled with jars of vegetables and pickles and relishes and jams and jellies fruits and my absolute favorite: pickled peaches!


Canning was serious business at my grandmother's house and canning jars were well cared for. Although, it's popular to use old mason jars for iced tea now days, my grandmother's generation would never have risked damaging the top edge of a good canning jar through daily use. Every year, Grandma would send Grandpa down to the cellar to bring up boxes of empty jars. New boxes of seals were purchased, but jars and rings would be reused. My mother and grandmother would carefully examine the top edges of all the jars and set aside for other purposes any jars that might have gotten damaged in storage.

If they had only known about the CUTE things you can do with old canning jars!  Most of my grandmother's less than perfect canning jars ended up in Grandpa's garage, storing nails and screws and nuts and bolts and leftover paint. I suppose you could say my Grandpa was ahead of his time -- he was "painting" jars long before it was popular!  In honor of my late grandmother and grandfather, here are some of my favorite decorative painted Mason jar projects.


Your Home Based Mom managed to make the humble canning jar so elegant with gold paint!


At Real Coake you can find these adorable striped mason jar vases.


The Happy Housie painted this charming trio of coral colored vases!


At Mason Jar Crafts Love, you can find these adorable back to school themed mason jars.


Check out these silver painted Ball jars from It All Started With Paint.


Darling Darleen has a tutorial for drip painted Mason jars, inspired by these jars in an Anthropologie display!


Michaela Noelle created a tutorial for these sweet lace painted jars.

I hope you were inspired to look at your old jars differently -- you can recycle all sorts of jars for all sorts of uses, both decorative and practical!


Thursday, July 3, 2014

10 Awesome Driftwood Decorations!

Last week a good friend from Colorado came to visit at our beach house.  I love when she come to visit, because she is content to wonder on the beach for hours, looking for a certain kind of shell, or size of driftwood.


Needless to say, we always end up hiking back to the house with bags of heavy wet driftwood!

Tuesday, June 24, 2014

10 Fun Crafts to Make With Twigs

When the kids were little we spent many summer days at the park. Sticks and twigs were gathered and used as inspiration for games of fantasy (and, at one point, a child ran with a stick -- straight into a tree, resulting in the inevitable summer trip to the ER). Occasionally, little twigs found their way into craft projects, typical stuff, like snowman arms, stars, and wreaths.


Spring windstorms have brought down lots of twigs in our neighborhood this year, and I thought it would be fun to see what other creatives have been doing with twigs. Here are a few of my favorite twig projects:

Monday, May 26, 2014

Never Forgotten: A Story of Sacrifice and a Remembrance Poppy Tutorial

I have loved the little Remembrance Poppies, sold by our veterans, as long as I can remember.  As a little girl, shopping with my mother, I was always given a bit of change to donate for my own little poppy to wear.


Each year, when I get my poppy, I am reminded of my mother, and how she taught me about the sacrifices made by so many.


A few years ago, the reality of this great sacrifice was driven home, when I received a phone call saying that the son of a friend had been killed while serving in Iraq. Our sons had enlisted at the same time, and I still remember sitting with the other young man's father, a veteran himself, during a parent orientation evening.

Thursday, May 8, 2014

How to Make Your Own Paper Bead Roller

If you love rolling paper beads -- or you just want to give it a try, here is a quick and easy way to make your own bead rolling tool using items you have around the house.


I was rolling my beads using the old school method, and it was seriously cramping my hands. I thought there had to be a better way, but didn't have the willpower to wait two days for a bead roller to come in the mail.

Thursday, May 1, 2014

Rolled Paper Beads

I just spent the most amazing vacation in Alabama visiting my daughter's sweet little family! My daughter's husband is a drill sergeant at Fort Benning, and they moved to Alabama with their toddler last year. You may remember that my daughter and her baby lived with us while her husband was in Afghanistan a couple of years ago.


Joy of joys, I discovered that two and one-half year old Summer Rose likes to make things! We spent a lovely morning stringing wooden beads into bracelets (and rainbows and ponies)! She also spent an evening"helping" me roll paper beads.

I was having craft withdrawals one day, so I grabbed one of my daughter's old magazines and started cutting it up. The cover of an old HGTV magazine was a tri-fold, with lots of pretty yellows and pinks that I thought would make great beads.


I didn't have anything to coat the beads with, so my daughter loaned me her clear nail polish -- I think it worked great, even though it doesn't smooth the surface of the bead or add dimension and depth the way some products do. Anyway, my crafting philosophy has always been to make do with what you have available.


We used a technique that incorporates gold sharpies, to make the beads look like glass lampwork beads.

Alas, these beautiful beads met with disaster, when we put the necklace on Summer Rose, and kind of forgot about it until later, when she leaned over the tub to swish the water around when her bath was filling!

The lesson learned here is: Stay out of the tub when you're wearing paper jewelry.

Do you make paper beads? Do you have a favorite technique or tool that you use?


Wednesday, April 23, 2014

Fishing Basket Table

Some of you were curious about the basket table in the picture with our beautiful horseshoe backed chair that I posted about earlier.

(This post is participating in the Blogging A to Z Challenge, T is For Table. See link in sidebar. )


This table was adapted from traditional Southeast Asia fishing baskets.  My in-laws picked it up during an overseas tour during the Vietnam War.

Wednesday, April 16, 2014

Awesome Projects to Make With Recycled Newspapers

Continuing the Earth Day theme, here at House Revivals, I thought it would fun to share some ways to use recycled newspapers in our homes and our gardens.


Even if you subscribe to all your papers electronically, you probably have friends and neighbors who would be more than willing to donate their old papers to your recycling projects.

(This post is participating in the Blogging A to Z Challenge. N is for Newspaper. See the link in my sidebar.)

Tuesday, April 15, 2014

Cool Stuff Made From Reclaimed and Recycled Materials

Just for fun, I've been going through the archives here at House Revivals.  Here are a few fun projects made from reclaimed and re-purposed materials, in honor of our upcoming Earth Day!


(This post is participating in the Blogging from A to Z Challenge. M is for Made. See the link in my sidebar.)

This burnt edge peony is perfect for spring!  It was one of my first tutorials, and has been especially popular with readers who are planning weddings.  It was created using recycled textiles.


This oval wreath made from vintage book pages, jute webbing, and felt roses was made as a gift for a friend. The wreath form was cut from cardboard in the  recycling bin, the book was rescued from the Goodwill Outlet (often the last stop for Goodwill merchandise before the landfill). The roses were made from an old felted wool sweater.


This decoupaged Union Jack with these faux tin letters -- made from recycled newspapers -- spelling LOVE, is one of the most popular projects on House Revivals. The Union Jack was cut from old shirts.


This square wreath is one of my very favorite projects -- in fact, it still hangs on my front door.  Although I glittered the leaves and made it specifically to hang over the holidays, I think it looks great all year long. and it makes me happy. Learn how to make your own wreath using all reclaimed and vintage materials!


Another "early blog" project was this Wild Pants Lamp! It was a little crazy, and I'm pretty sure my husband hated it, but I loved it. It was made using..................... wait for it............................ Wild Pants!


The lamp didn't last too long, however, after our daughter's sweet pup, Dexter, arrived in our home!


His mommy tried to fix it.... with duct tape. We actually used it like this for several more months, while our household goods were in storage!  Lately, it has been stashed in a closet awaiting a proper repair.


Who can stay mad at a face like that?


Do you like to make things?  Do you enjoy working with reclaimed materials?  Be sure to leave a comment, so I know you stopped by!

Saturday, April 12, 2014

{10} Knock Off Tutorials You Will Love!

Do you adore a great knock-off? Now, when I say knock-off, what I really mean is a new creation inspired by something, well.... inspirational!


Here are ten favorite knock-offs from House Revivals!

Tuesday, April 8, 2014

Garlands and Buntings for Spring

Garlands and buntings are a really strong decorating trend right now-- they are great for parties, seasonal decor, and mantels.


They are easy to DIY and give you a lot of bang for your buck.  Here are ten especially pretty garlands and buntings perfect for your spring decor!

Friday, January 24, 2014

17 Pretty Ways to Decorate With a Brown Sofa

Now don't gasp when I say this, because I know brown sofas are so five years ago, but I have a brown sofa and I love it!  Mine is actually a giant sectional out at our beach house, and I never worry about it looking dirty. In the Pacific Northwest, our sand is kind of grayish brown.  Also, dirt is brown.... and so is chocolate...  and those are the three things most likely to get on my upholstery.


Another reason I bought a brown sofa? I knew it would be easy to convince my husband to buy that color, and I wanted a new sofa. Plus, it's super neutral, so I have lots of options for the rest of the space, and I can change up the look of the room with a thirty dollar can of paint and a couple of throw pillows!

Sunday, January 12, 2014

How to Decorate and Organize with Vintage Trunks

I think I will never get tired of dusty old trunks and chests. They all have stories hidden away inside. As a kid, I loved looking at the old newspapers that had been used to line some old trunks that my mother had. I used to have a hump-backed trunk that was lined with lovely old wallpaper.  I used it to store vintage linens. Another trunk was used as a bedside table. We no longer have the hump-backed trunk -- it was a victim of a cross-country move years ago, but the other trunk still serves as storage. These days we use it to store Christmas ornaments.

That's the wonderful thing about trunks. They can live so many lives.  They start out going on grand adventures, and later retire to life as an end table or are tucked away in an attic, storing treasured items.

Thursday, December 12, 2013

Friday, October 18, 2013

7 Pretty Ways to Re-Use Vintage Books

I adore crafting and decorating with vintage books.  Vintage Book pages are probably my all-time favorite crafting medium.  


Here is a collection of seven projects made from vintage book pages from around the web:


This darling apple from Cheeky Magpie  would be a perfect edition to a fall mantel.


This garland was a Valentine's project, but it is totally adaptable to other holidays.


Etsy seller BookBW,  makes these beautiful folded book page ornaments.  I love how they are displayed on vintage candlesticks.


Joan, at Anything Goes Here, used almost an entire paperback to create this lovely wreath.


This garland was inspired by spring flowers, but again, the idea can be adapted to any season.  How about creating a similar garland of fall mums?


This bedroom wall is to. die. for.  LOVE.  Find the tutorial at A Well Dressed Home.


This rolled book page star looks great on a Christmas mantel.  


So, how about you? Do you love creating new things from old?

P.S.  I know I've been absent for a while.  Our family just needed a little time to grieve and re-adjust.  We're doing well. Thank you all for your kind words.  Lots has happened since my last post that I can't wait to share.

Monday, January 28, 2013

Antique Woven Star Tutorial

Thank you all so much for sharing your Scandinavian stars with me over the last weeks!  I am collecting of portfolio of images and stories of these lovely woven stars.  I think the best part of this process has been the new friendships that have been forged.  I love you gals!  As a thank you, I have created a new tutorial inspired by one of your stars.


Readers have shared family heirlooms, antique store finds, Girl Scout craft memories, and stories of weaving stars from paper or straw or wood in the "old country" as children.  Please keep your stories and pictures coming!
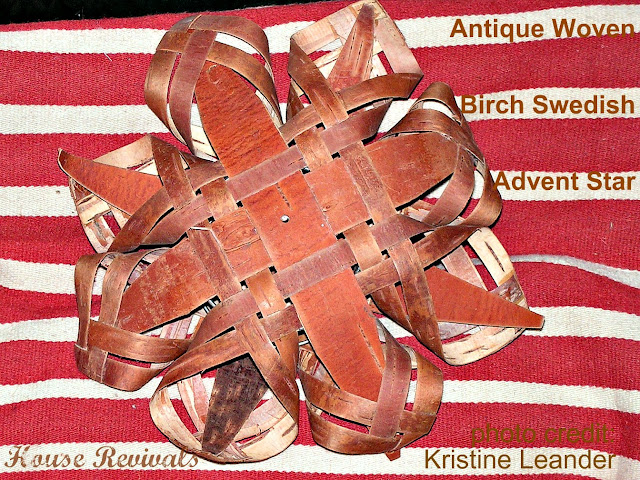
Antique Woven Swedish Advent Star

Today I want to share a star from the private collection of Kristine Leander, executive director of our Swedish Cultural Center.  Kristine lived in Norway in the eighties and early nineties.  On weekends, she would travel to Sweden, haunting the antique shops there.  On one of her trips, she found this lovely antique birch star.  You can tell, simply by looking at this picture, that her woven star has seen many winters!  I adore the woven details on the star tips -- so very pretty. The fact that it has become a bit warped over the years just adds to its charm.  Kristine's star was woven from birch, and held a little light inside.  It would have been hung in a window at Christmastime, to welcome family and friends to the warmth and comfort of home.  This star held an electric bulb, but earlier Advent stars often held a small oil lamp!
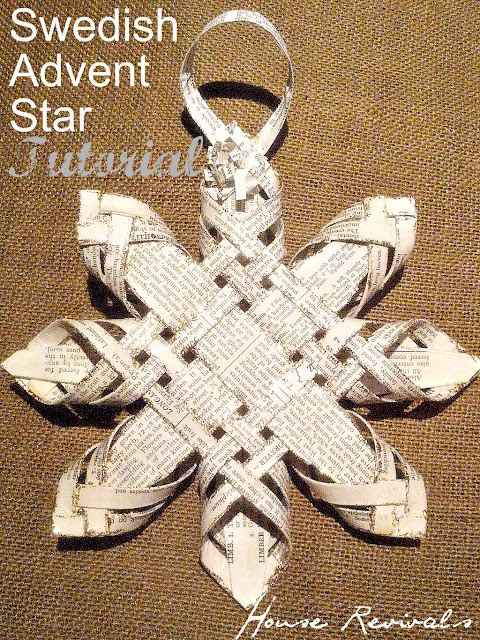

I created a tutorial for making this paper star, inspired by Kristine's antique star.  As you all know, I love to work these stars from folded strips of vintage book pages; but you can make them from just about any material you'd like to use.  Most of my readers prefer to use heavy scrapbooking paper, cut into strips. Use whatever you like -- and pretty please, share your star with me!  I love to see your projects!


You will need twenty strips of your chosen material to make your star.  To see how I fold my paper strips, see this post.   In this case, Kristine's center strips are very wide, so I made sixteen strips that are approximately one-quarter inch wide by six inches long; and I made four strips that were three-quarter inches long by six inches.

Kristine's star had center veneer strips with tapered ends -- probably because the center strips were so wide, it would have been impossible to form the star tips without narrowing the strips on the end.  I tapered mine by folding the corners in and securing with glue, but I would recommend simply trimming the strips with scissors and securing the edges with glue (if you are working with multiple folded layers).


Next,  find the center of each fat strip, and glue two pairs together, as shown.


Now, take your skinny strips, and weave together with the fat strips.  You will be creating two sides, that will be joined later. Secure each intersection with a dot of glue. (note:  I am not sure it is necessary to glue the intersections, but I don't seem to have enough hands to make these without doing so. Plus, by gluing the intersections, I can control the spacing of the strips)


The next step is to glue your star tips together.  Begin by taking the adjacent strips and twisting them toward each other and gluing the tips together at right angles, as shown.


Kristine's star had that lovely woven detail on the tips.  To get this look, simply take the next adjacent strips and twist them in and weave across before securing.


If the written instructions seem confusing here, simply recreate the pattern shown in the detail picture above.


Next, take one of the sides and join it to the other side.  You will need to turn one side by forty-five degrees, so that each star tip joins with a fat center strip.


Glue to secure.


Embellish as desired, or leave your star plain -- whatever you do, I promise your result will be beautiful!


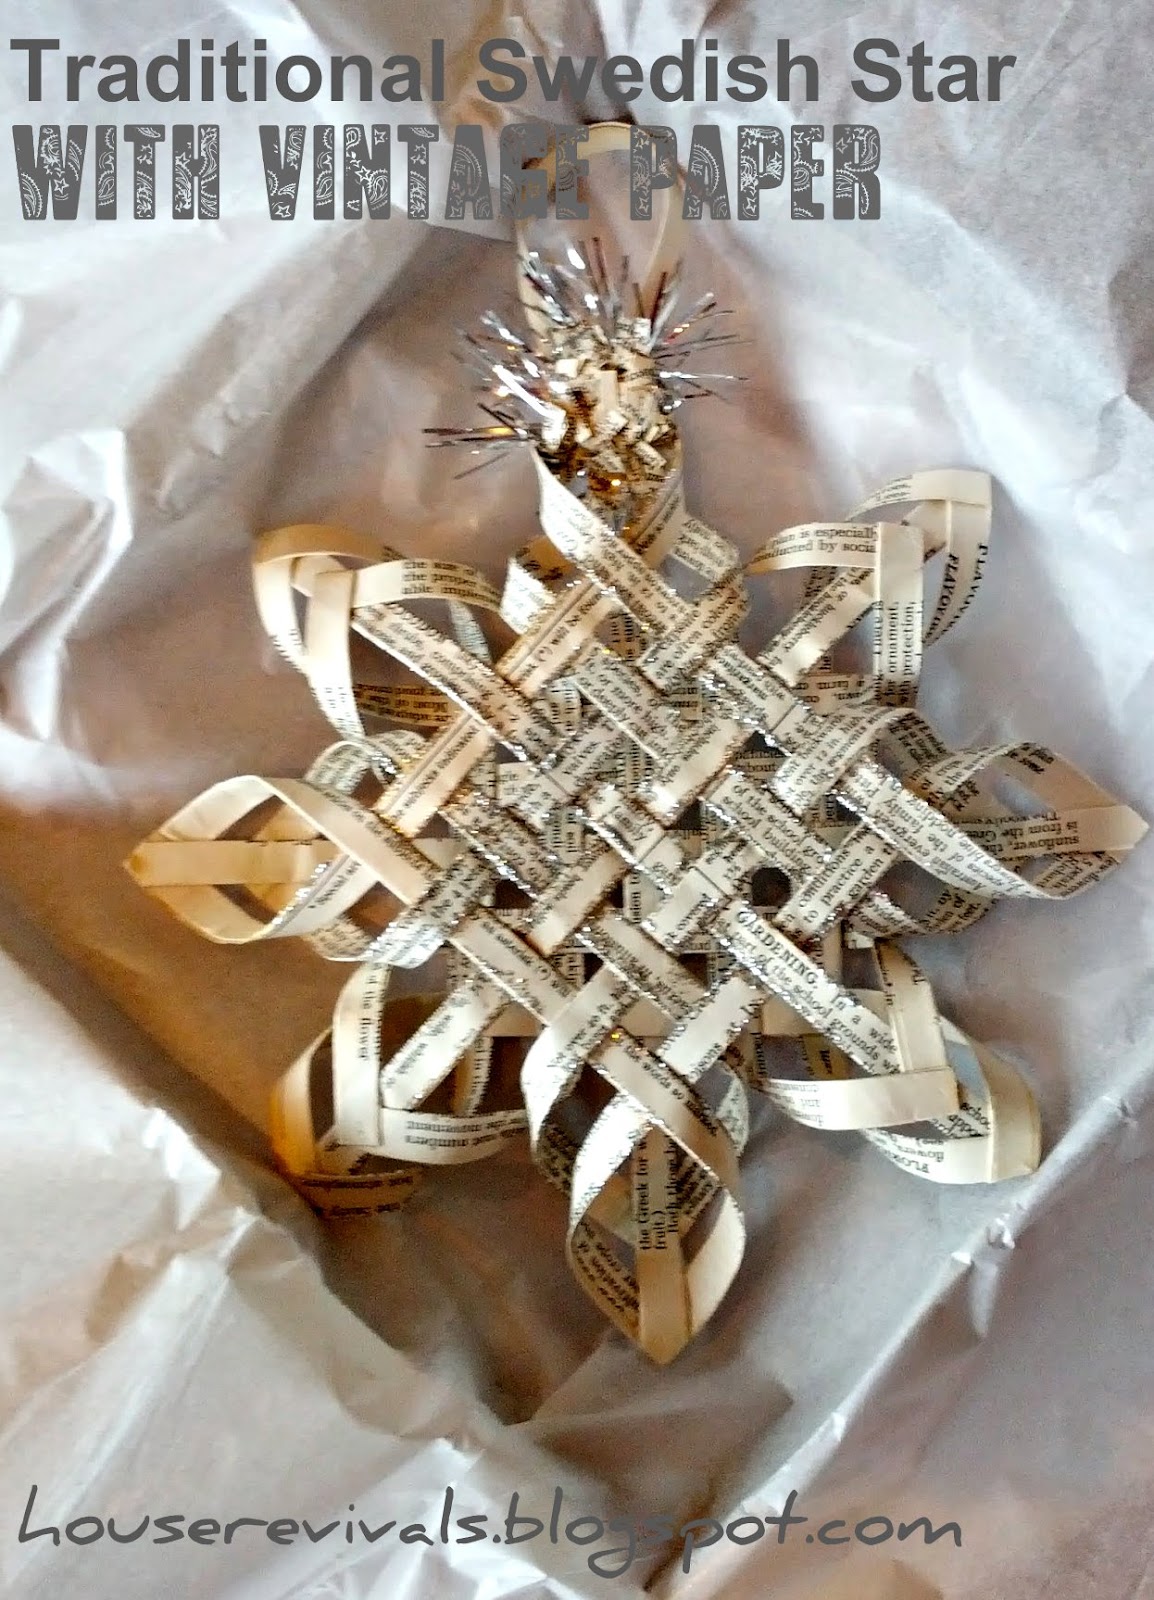
I like to add glitter and a hanger made from a strip of paper, but ribbon or twine would work just as well (and it will fit into those little square gift boxes much better without the stiff paper hanger)!   Just for fun, I wove some one-eighth inch wide strips through the center.  These strips are about four inches long and are secured with dots of glue in a couple of places.

These woven stars are an old traditional craft, and lots of variations exist, but the concept is the same for all of them.  If you choose not to make your center strips wider, you will end up with a star that looks something like the star shown below. See that tutorial here.

Notice the tips on this star are not woven like they are on Kristine's star?  This technique is easier to do than the woven star tips, but I must admit I'm kind of in love with the idea of weaving the tips from now on :)

Happy star weaving!  Maybe, if we all get started in January, we will have lots of lovely handcrafted items for Christmas gift giving this year :)

To see more star tutorials inspired by an antique woven star, go here, and here.