Are you ready for the 2015 House Revivals craft room reveal? Okay, maybe not "the big reveal", but the "this is where we are now, and where we'll probably stay until my schedule frees up in, ohhhhhh, I don't know, January 2016 maybe?"

At the beginning of the year, this attic was a big overwhelming mess.
It was a windowless storage attic, and it was full of my studio supplies, chotchkies, books, and random stuff. I could never find anything I needed, and was constantly frustrated. This room tugged at my conscience, always in the back of my mind.

I hated digging through boxes in this dark and dismal attic. This January I vowed to deal with it once and for all. The attic needed cleaning out and I needed a craft studio. Win, win!

After many weekends spent unpacking boxes, organizing, donating items, and throwing things away, I am thrilled that the space is now a (mostly) organized, bright and colorful studio.

It's still an attic, and it still has no windows, and I'm still addressing the lighting issue, but for now I'm thrilled! We used pine shelving systems from Fred Meyer, and storage containers from Walmart and from the Dollar Tree.

The storage tubs fit perfectly in the shelves -- up to three tubs high in some, and two tubs deep in all the lower shelves. There are four "hutch style" configurations on the main wall, and each of those four "hutches" can hold thirteen 28 quart containers (or an equivalent configuration of different size containers).

I still need to "fine tune" some of the organizing, but for now, I can see everything, and everything will stay clean and organized in the tubs.

A few things are organized in baskets. My vintage and new chenille stems are stored in a basket, and most of my jewelry making supplies are in picnic baskets. At some point, I would like to move all of the jewelry supplies into small tubs, and move the picnic baskets down to the kitchen.

I found these Bento style lunch boxes at Dollar Tree, and they are working great to organize beads.

I shared earlier about how I use these small clear containers, also from Dollar Tree, for organizing smaller items.

The smaller containers tuck neatly up under the eaves in graduated stacks.

I've decided to leave the serger sitting out all the time -- half the work in using a serger or sewing machine is having to unpack and set it up each time you use it. I think I will sew more if I keep my machines out.

My center work table is still a work in progress. I need to have a top cut for it. For now we are getting by with a piece of plywood my husband found in the garage.

I have a huge cutting mat that has been rolled up and stored for years. I won't lay flat, so I've been keeping heavy things on the edges of the mat to keep it from curling up. I think I need to bring a space heater into the room and see if that will make the material relax. Any ideas?

I don't really mind that the work table isn't quite ready yet -- this attic space has come so far already! The work table was made from two inexpensive work tables from Home Depot. We added wheels to the bottom, so I can roll it back out of the way when I'm not using it.
On top of the table, I have bins containing tools I reach for everyday. On the lower shelf are consumable supplies, such as adhesives and glues sticks, that I use often.and tools that I use less often, but still want to have handy. I also have a bin full of punches, and a basket of stencils. Not visible in this picture are more of those flat rectangular tubs from Dollar Tree that have stamps stored in them.

Someday it might be fun to paint the table and the shelves, but I'm pretty happy with the way it is for now. Function first. The rest will follow in good time. I see lots and lots of simply gorgeous "craft studios" on Pinterest that only seem to contain a few wall mounted rolls of pretty gift wrap and some storage jars full of colorful washi tape. The picture are beautiful, but where do those people keep their real supplies?

I picked up this stack of basket trays from Dollar Tree. A couple of years ago I discovered the concept of "project trays". This is where you keep all the components for an in-progress project in its own tray -- this way the project can be portable (I still prefer to sit near an ocean facing window to work) and easy to keep organized. Since we go back and forth between two homes, I often need to stop working on a project mid-way through. And since I seem to have the attention span of a gnat, I like to jump around between several different projects. Project trays are also great for craft parties. At a dollar a tray, you can even afford to send them home with your guests if you need to!

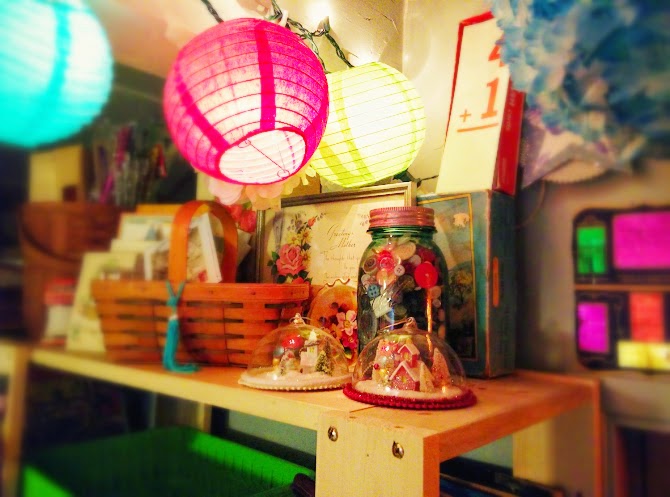
While going through the various items stored in the attic, I ran across an assortment of lanterns. Some are from staging our Colorado home for sale (I used the smaller paper lanterns from the light set as "decor spheres" and filled a giant ironstone bowl with them to brighten a dark January corner). The house sold in six days for top dollar, in the bottom of the recession, so I guess the staging worked! Some of the lanterns are from my daughter's wedding reception, and some are from her baby shower the next year. I'm kind of a sentimental sap, and could not bring myself to get rid of them. Lucky thing, since they turned out to be the perfect thing to hang from the ceiling beam. They sure do brighten up the space!

I even managed to eek out a space to display a few more sentimental items, such as this vintage needle card, and my grandmother's buttons.

I hope you've enjoyed this reveal. To read more about this attic project, click here.
If you enjoyed this post, please subscribe to House Revivals so you won't miss any of the great posts and projects we have planned. Like and subscribe to us on Facebook, and find us on Instagram, too.
Thanks so much for stopping by!


At the beginning of the year, this attic was a big overwhelming mess.
It was a windowless storage attic, and it was full of my studio supplies, chotchkies, books, and random stuff. I could never find anything I needed, and was constantly frustrated. This room tugged at my conscience, always in the back of my mind.

I hated digging through boxes in this dark and dismal attic. This January I vowed to deal with it once and for all. The attic needed cleaning out and I needed a craft studio. Win, win!

After many weekends spent unpacking boxes, organizing, donating items, and throwing things away, I am thrilled that the space is now a (mostly) organized, bright and colorful studio.

It's still an attic, and it still has no windows, and I'm still addressing the lighting issue, but for now I'm thrilled! We used pine shelving systems from Fred Meyer, and storage containers from Walmart and from the Dollar Tree.

The storage tubs fit perfectly in the shelves -- up to three tubs high in some, and two tubs deep in all the lower shelves. There are four "hutch style" configurations on the main wall, and each of those four "hutches" can hold thirteen 28 quart containers (or an equivalent configuration of different size containers).

I still need to "fine tune" some of the organizing, but for now, I can see everything, and everything will stay clean and organized in the tubs.

A few things are organized in baskets. My vintage and new chenille stems are stored in a basket, and most of my jewelry making supplies are in picnic baskets. At some point, I would like to move all of the jewelry supplies into small tubs, and move the picnic baskets down to the kitchen.

I found these Bento style lunch boxes at Dollar Tree, and they are working great to organize beads.

I shared earlier about how I use these small clear containers, also from Dollar Tree, for organizing smaller items.

The smaller containers tuck neatly up under the eaves in graduated stacks.

I've decided to leave the serger sitting out all the time -- half the work in using a serger or sewing machine is having to unpack and set it up each time you use it. I think I will sew more if I keep my machines out.

My center work table is still a work in progress. I need to have a top cut for it. For now we are getting by with a piece of plywood my husband found in the garage.

I have a huge cutting mat that has been rolled up and stored for years. I won't lay flat, so I've been keeping heavy things on the edges of the mat to keep it from curling up. I think I need to bring a space heater into the room and see if that will make the material relax. Any ideas?

I don't really mind that the work table isn't quite ready yet -- this attic space has come so far already! The work table was made from two inexpensive work tables from Home Depot. We added wheels to the bottom, so I can roll it back out of the way when I'm not using it.
On top of the table, I have bins containing tools I reach for everyday. On the lower shelf are consumable supplies, such as adhesives and glues sticks, that I use often.and tools that I use less often, but still want to have handy. I also have a bin full of punches, and a basket of stencils. Not visible in this picture are more of those flat rectangular tubs from Dollar Tree that have stamps stored in them.

Someday it might be fun to paint the table and the shelves, but I'm pretty happy with the way it is for now. Function first. The rest will follow in good time. I see lots and lots of simply gorgeous "craft studios" on Pinterest that only seem to contain a few wall mounted rolls of pretty gift wrap and some storage jars full of colorful washi tape. The picture are beautiful, but where do those people keep their real supplies?

I picked up this stack of basket trays from Dollar Tree. A couple of years ago I discovered the concept of "project trays". This is where you keep all the components for an in-progress project in its own tray -- this way the project can be portable (I still prefer to sit near an ocean facing window to work) and easy to keep organized. Since we go back and forth between two homes, I often need to stop working on a project mid-way through. And since I seem to have the attention span of a gnat, I like to jump around between several different projects. Project trays are also great for craft parties. At a dollar a tray, you can even afford to send them home with your guests if you need to!

While going through the various items stored in the attic, I ran across an assortment of lanterns. Some are from staging our Colorado home for sale (I used the smaller paper lanterns from the light set as "decor spheres" and filled a giant ironstone bowl with them to brighten a dark January corner). The house sold in six days for top dollar, in the bottom of the recession, so I guess the staging worked! Some of the lanterns are from my daughter's wedding reception, and some are from her baby shower the next year. I'm kind of a sentimental sap, and could not bring myself to get rid of them. Lucky thing, since they turned out to be the perfect thing to hang from the ceiling beam. They sure do brighten up the space!

I even managed to eek out a space to display a few more sentimental items, such as this vintage needle card, and my grandmother's buttons.
I hope you've enjoyed this reveal. To read more about this attic project, click here.
If you enjoyed this post, please subscribe to House Revivals so you won't miss any of the great posts and projects we have planned. Like and subscribe to us on Facebook, and find us on Instagram, too.
Thanks so much for stopping by!