Google+ House Revivals

Tuesday, November 20, 2018

Easy Thanksgiving Greeting Card

Sometimes, it's a good idea to pull out old craft supplies, and look at them with new eyes. For this card, I used a decades old Stampin' Up Thanksgiving stamp.


The rubber was still in perfect condition, and it stamped perfectly. I paired the stamp with this adorable fox paper. The paper is from a couple of years ago, but the colors are still a fresh take on Fall.

Thursday, November 15, 2018

Get Your House Holiday Ready -- For FREE!

The holidays are upon us, and if you are like me, you are looking around your house and starting to freak out just a little bit.


If your household decorating needs are bigger than your budget, here a a few items I've found recently for FREE on Craigslist, along with some inspiration to help you see how an ugly duckling can be transform into a beautiful swan.

Tuesday, November 13, 2018

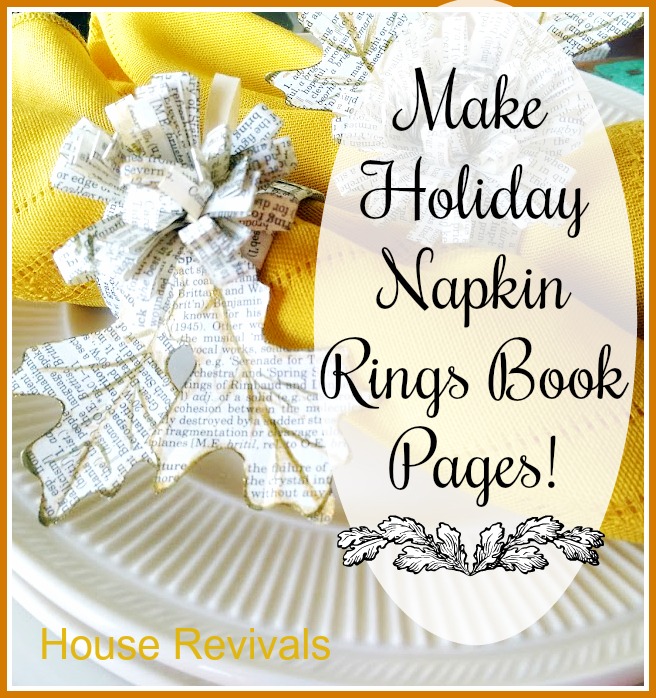
Make These Book Page Napkin Rings!

Whether you are hosting a large crowd, or just having an intimate dinner, this easy Fall napkin ring DIY is the perfect way to add a finishing touch to your Thanksgiving table.


You can even write guest's names on the leaves and use them as place cards!

Thursday, November 8, 2018

Library Card FREE Printable Template

I love the library.  I have great memories of pouring through the Nancy Drew titles as a girl, making my selections, and checking out. My friends and I liked to read the names on the library cards to see if we knew anyone who had checked out our books before us. Usually, we found each other's names.


Library cards are becoming a thing of the past, but nostalgia keeps me coming back to them. On our trip to India this year, we visited some beautiful places that I wanted to commemorate with some new designs. A series of library cards came out of this. This library card set is named after Kerala -- one of the loveliest places on this earth.

Tuesday, November 6, 2018

Make Special Ornaments From Greeting Cards

My son and his new wife had a sad assortment of Christmas ornaments -- a couple of hand print ornaments from a little niece, and a half dozen plastic spheres. It hurt my heart.


Both my son and his bride are busy software engineers, with a forty-five minute commute to and from work, so they don't have a lot of time to shop for Christmas decorations. After their wedding last September, they brought me all their leftover invitations, thinking I could "do something" with them. I could. I did. I combined them with some of the greeting cards our family had received over the years, and some scraps of card stock to create these pretty paper ornaments for their tree. They were delighted.


These are made using the same "triangle-within-a-square" technique that our grandmothers used to made paper spheres from old greeting cards to decorate their Christmas trees, except these are two sided, instead of spherical. My beautiful daughter-in-law is from India, so I wanted to create something colorful and elegant that had an Asian feel.


To make these ornaments, you need a circle template and a triangle template. Normally, I would have drafted the templates in CAD, and printed them out, but my printer was out of ink, and I am impatient. I decided to use a two inch hole punch that I had in my stash (here's an affiliate link to a two inch punch), and then hand draft an equilateral triangle to fit perfectly inside it. Except, I didn't have access to my drafting tools.

I tried holding a piece of paper to my computer screen and tracing a 60 degree angle, but that was less than perfect. Then, I looked around the house for a triangle. I also began looking around for a flat piece of plastic to cut a sturdy template from. When I found the plastic lid to my dishwasher pod container, I also found my equilateral triangle! As is turns out, that little recycling symbol is an equilateral triangle, so I was able to get my sixty degree angle. I drew two legs of the triangle the exact same length, then connected them.

I made my triangle slightly small -- the points don't quite reach the edge of the two inch circle. This was because I wanted to account for the thickness of the plastic.


Side note: this technique will also work with your scalloped punch. Just make sure the number of scallops is divisible by three. My scallop punch, from Fiskars, has fifteen scallops, so it works perfectly. (Fiskars scallop punch affiliate link)


For each ornament, you will need to punch ten circles. Place your sturdy triangle template on top of the pretty side of your card stock (or upcycled greeting card), centering it. Carefully fold the card stock up, using the edge of the triangle as a guide. Some folks use the triangle as a guide to carefully score a fold line, but I like my method better, because it's so fast.


 Do this on all three sides, being careful to keep the triangle centered.


Fold the sides completely over, to get a nice crease. You will now have a triangle with three rounded tabs. Each tab will be glued to a tab on an adjacent triangle to create your ornament.


Glue five of the triangles together, radiating out from a central point, for the first side. Repeat, for the second side. Glue the front and back together. You can glue a ribbon hanger into the top of the ornament at this time. If desired, punch a hole in the bottom of the ornament and hang some fibers to create a pretty tassel.


I must warn you, these ornaments are addictive. You will find yourself scouring your house for old greeting cards and card stock to make more and more and more!


My son and his beautiful bride love the fact that pieces of my son's past Christmases were used, as well as mementos from their wedding.

While I was digging, I found a lovely old Christmas card from some dear family friends. The card had pictures of their kids when they were little, as well as a letter talking about the family's interests at the time -- all printed on lovely card stock! I was able to make an ornament for them using their old card. They were thrilled to receive the memento. There was nothing this couple needed, as a gift -- they have had successful careers and can buy anything they want, so giving them something sentimental and handmade was perfect.


I hope this post encourages you to dig out those old greeting cards and create your own special mementos.


For another easy ornament DIY, you may want to check out this tutorial.


If you enjoyed this tutorial, please subscribe to House Revivals in the sidebar, so you won't miss any of the fun projects we have scheduled. Find us on Facebook, too, so you can catch all the "in between" stuff, and see what I'm working on daily on Instagram. Feel free to link today's post to your favorite social media sites.

Thanks so much for stopping by!
Amanda

Thursday, November 1, 2018

Free Furniture and Decor for Holiday Entertaining

It's November, and you know what that means. It's the time of year, when we look around our house and panic, because are house isn't ready for holiday entertaining.


We're counting our chairs, and making sure we have enough tables. This beautiful drop leaf table, as well as everything else in this post, is offered up for free on our local Craigslist.

Tuesday, October 30, 2018

FREE Sugar Skull Embellishment Printable!

Wow! Can this really be the last of the sugar skull printable series?


Throughout October, we've been publishing sugar skull coloring sheet printables. We've introduced Rose and Daisy and Hibiscus and Zinnia and Frida. These printables are perfect for your Day of the Dead decor!


Each coloring sheet came with a skull and several embellishments. Today, we're offering a FREE extra embellishment printable sheet.


All of the skulls and embellishments are coordinated, so you can mix and match embellishments to customize your sugar skulls.


For another (not so) spooky project, try this lace applique owl!


If you enjoyed this tutorial, please subscribe to House Revivals in the sidebar, so you won't miss the fun projects we have scheduled. Find us on Facebook, too, so you can catch all the "in between" stuff, and see what I'm working on daily on Instagram. Feel free to link today's post to your favorite social media sites.

Thanks so much for stopping by!
Amanda


Thursday, October 25, 2018

FREE Zinnia Sugar Skull Coloring Sheet!

Hello Friends! Today we're sharing the last of five FREE sugar skull printables, with a sugar skull embellishment printable still to come.


These printables were designed just for you, and are available to print for FREE throughout the month of October. Keep checking back, because I will be posting a full page of floral sugar skull embellishments in a couple of days -- also FREE!


So far, we've met Daisy and Rose and Frida and Mr Hibiscus. Today, we're meeting Zinnia. Zinnia is the olive green smiling friend shown below. Well, mine is olive green.


Yours can be colored any way you prefer, of course. I just thought the olive green made him look moldy and creepy.


Each sugar skull printable coloring template comes with lots of extra embellishments, so you can customize your decorations.


All the embellishments on the different coloring sheets can be mixed and matched, as the floral motifs are coordinated in this series.


I hope you enjoy coloring and assembling your sugar skull friends as much as I did!  Thanks you for following along, and be sure to check back for the extra embellishment printable.

Get your Zinnia Sugar Skull printable here.

You may also enjoy this post about how to make Christmas ornaments from dollar store supplies.


If you enjoyed this post, please subscribe to House Revivals in the sidebar, so you won't miss the fun projects we have planned. Find us on Facebook, too, so you can catch all the "in between" stuff, and see what I'm working on throughout week on Instagram. Feel free to link today's project to your favorite social media sites.

Thanks so much for stopping by!
~Amanda


Tuesday, October 23, 2018

FREE Frida Sugar Skull Printable!

Can you believe it? Today is the fourth installment of our sugar skull printable series -- only two more printable to go! This is such a fun project.


We've met Rose and Daisy and Mr Hibiscus. Today, we're meeting Frida. 


Frida is in her element with all these floral embellishments. Below, is her selfie with her good friend, Rose.


The Frida printable coloring sheet comes with lots of extra roses and leaves to create her iconic floral headdress.


She's happy hanging out with her floral friends. Here's another selfie she took with Mr. Hibiscus.

To create your own Frida sugar skull, click on the link below and print the template. Color the page as desired, using whatever coloring medium you like. I like to use alcohol markers. Cut out the skull and the embellishments and assemble as desired.


For another (not so) spooky project, try this lace applique owl!


If you enjoyed this tutorial, please subscribe to House Revivals in the sidebar, so you won't miss the fun projects we have scheduled. Find us on Facebook, too, so you can catch all the "in between" stuff, and see what I'm working on daily on Instagram. Feel free to link today's post to your favorite social media sites.

Thanks so much for stopping by!

Thursday, October 18, 2018

Fabulous Free Stuff for Your Home (REALLY)!

Continuing with our Fabulous Free Stuff posts, I've found a few more things on my local Craigslist that would be totally worth grabbing for your home. We all want to have beautiful and functional homes, but furnishing and decorating a home is expensive. Here are some fun ideas for using free stuff to transform your home.


The desk shown below is huge and solid and made by Hooker, but most importantly -- it's FREE! Personally, I think it's beautiful as it is, but if were painted in a chippy farmhouse finish it would look amazing.


Check out those TWO huge framed mirrors! Someone put these items in their driveway for folks to take for free.


A similarly sized mirror from Restoration Hardware would cost over one thousand dollars!


Leaning against the wall in your entry or bedroom, a gorgeous standing mirror would be functional and have great visual impact.


Never underestimate the power of paint! The FREE bed shown above looks a little dated and tired, but a couple of coats of light blue paint, like on the Maine Cottage bed below,  will make you think you're sleeping at the beach.


I'm not usually a fan of free sofas, because they are often dirty or broken, but every now and then, you find a sofa that is clean and in perfect condition. This sofa is a nice neutral color, so it will work in just about any decor.


I love trays!  They are great for corralling books and remote controls and newspapers, etc. Use them on coffee tables or ottomans, hang them on the wall, or keep toiletries organized with them.


The inlaid bone tray shown below is gorgeous, but it's also $598 from Serena and Lily. The red tray, show above, is free. A stencil and some craft paint applied to the free tray could yield the same effect as the Serena and Lily tray, and you would still be able to pay the rent afterward.
Authentic mid century furniture is usually very well made, from good quality woods. Can you believe someone was giving this piece away?


Mid century shelf and desk units are all the rage right now. West Elm makes a retro version that sells for over a thousand dollars.


This old teacher's desk has already been given a set a sturdy industrial wheels.


A good cleaning and some paint is all it needs to be converted into a beautiful and functional kitchen island, like this one from This Old House.


The wing chair below is tired and looking a little ragged, but the lines are amazing.


Betty, over at Oh Everything Handmade, shares how she transformed a dated, but classic, wing chair into a modern farmhouse focal point.


Good dressers are some of the most functional storage pieces you can own. Vintage dressers are almost always better made than newer ones. Check for signs of a quality piece by looking for dovetailed drawers and dust panels between the drawers. The piece should not "wobble" at all, and the drawers should close nicely (unless you are handy, and comfortable making repairs). Avoid anything made from particle board. The waterfall style dresser below has great lines, and lovely hardware.


Use your dresser to create a welcoming entry, or at the end of a hallway, to create a moment of beauty in your home. I use dressers to store everything from vintage silverware to extra sheets. The dresser below was found online for free, and given a quick coat of paint. After some light distressing, it was ready to display a painting found at a German flea market, a woven ball my father-in-law picked up when he was in Vietnam, a carved Polish trinket box, a Polish pottery bowl, and a carved box from Thailand. Dressers are a great way to display family mementos.


This wood filing cabinet only needs a coat of chippy farmhouse paint to give you extra storage in a bathroom or kitchen (they're not just for files, anymore). Use one next to a pedestal sink to store extra toiletries.


I hope this post inspires you to look a little more closely at the "free" stuff being offered up online. Most of this stuff is headed for the landfill, if no one claims it, so it's great it we can divert it by giving it a new lease on life.


If you enjoyed this post, please subscribe to House Revivals in the sidebar, so you won't miss the fun projects we have planned. Find us on Facebook, too, so you can catch all the "in between" stuff, and see what I'm working on throughout week on Instagram. Feel free to link today's project to your favorite social media sites.

For another FREE template, click here.
Thanks so much for stopping by!
Amanda