Google+ House Revivals

Sunday, July 22, 2012

Make a Starburst Mirror from Recycled Magazines

I'm still loving all the gorgeous starburst mirrors out there! I liked the mid-century inspired mirror so much I decided I needed another.  It's such a classic form, I'm glad it's been seeing a revival in the last few years.  I especially like carved reeded mirrors, like this one from Layla Grayce.


At six hundred dollars, it is a little out of my reach, so I decided to make my own.   I wasn't quite sure how I would make it until I was bundling up a stack of old magazines to recycle.  Then the light bulb came on, and I created my own version of a carved and gilded mirror. I love how it turned out!


To make your own starburst mirror, start by tearing magazine pages into strips.  I used magazines with really good heavy paper.  Next, I just rolled the strips around a chopstick to create little narrow cones. Although I only used one thickness of paper at a time, if I were to do it again, I would double the paper strips before rolling to make the cones extra strong.  I wrapped a little painter's tape around the chopstick to keep the paper from slipping while I rolled it.  Secure each cone with glue.


Repeat the first step about two million times, then, using the wide end of your chopstick, push the wide open end of your little paper cones closed.  I pushed some a little more than others, so I would have about three different finished sizes to work with.


Keep pushing and folding the wide end in on itself until you get to the really strong part of the cone.


Glue groups of five to seven cones together to form the starburst rays.


 Glue a piece of recycled cardboard to the back of each group of cones.


Decide how you want to place the rays and glue them to a piece of cardboard. For my starburst, I stacked one group of cones on top of another to give the finished starburst greater depth.


Next, I took shorter single cones and glued them in the spaces between the rays.  I honestly think you could have a fantastic mirror at this point, if you just glued on a mirror.  The graphics on the magazine pages look really colorful and pretty.  I was on a mission, however, to create a gilded knock-off.


Prime, and paint your starburst as desired.  I used gesso as a primer, to give the project more strength and texture.  Glue your mirror to the cardboard and add a "frame" around the mirror if desired.  I used a thrifted woven belt, weaving the ends together to form a continuous circle.  I then filled in the gaps between the belt and the rays with joint compound, gessoed it and painted everything.


The back of the starburst was reinforced with additional cardboard and a hanger was added.


I REALLY like how it turned out!


This project is being linked to the following lovely places:


Tip Junkie handmade projects
Photobucket

Tuesday, July 17, 2012

Eco Natural Soap Review and Giveaway!

Recently Eco Natural Soap contacted me about doing a product review and a giveaway.  Let me start by saying they do a lot more than soap.  They do balms and shampoos, mineral makeup, and natural pet products!

This couldn't have come at a better time for me because I'd been doing lots of projects, causing my wrists and elbows and shoulders to feel a bit achy.  I was wearing a wrist support and slathered in stinky analgesic cream. So, not only did I look stylish, I smelled great, too. Yeah. It was embarrassing.

The folks at Eco Natural Soap sent me a tub of their Joint Pain Relief. I found it to be very soothing.  It has a pleasant scent.  It is a strong scent, but not overpowering. like the analgesic creams I had been using.  I really like this product and keep it next to my work desk to apply as I need it.


My favorite product is their Exotic Butters Luxury Skin Balm in Citrus Sunrise.  It smells divine.  I find that not only does it soothe dry skin, the citrus herbal scent is extremely refreshing.  I loved using this product to soften my cuticles.  DIYers and crafters tend to abuse their hands, so this product was very much a welcome luxury.

The Lip Balm was another favorite. This is not one of those waxy sticks -- it goes on smooth and almost liquid.  We live on the water, and an afternoon of canoeing can leave your lips feeling a bit parched.  The Organic Lip Balm felt very healing.  I got the lip balm in the delicious smelling Citrus Sunrise, so it felt very refreshing when I put it on.

Does anyone else feel weird posting a pic of themselves?  
I wanted to show how my hair looked after shampooing 
with the Eco Natural bar.  Unfortunately, it 
didn't help with the gray peeking in at my roots!

The Facial Hydration bar left my skin soft and clean.  It didn't dry my skin like many soaps do.  It has a faint pleasant scent. I was a little concerned about the shampoo bar.  It says on the wrapper: Builds Volume and Shine.  I don't need volume, my hair is thick and curly and tends to be a little out of control.  I was surprised to discover that I did not need to use a conditioner with this shampoo bar.  My hair was soft and shiny, BUT in my PNW climate I still occasionally used a glossing cream or other product to tame the wildness if it was rainy or humid. Overall, I was pleasantly surprised by the shampoo bar.  I have a girlfriend with thin straight hair and I'm dying to have her try it.

Now, for the giveaway details!  

The giveaway includes any two soaps and one balm.  
It is open to persons with a U.S. address.
  • To enter go to the Eco Natural website and look at their products.  Come back and leave me a comment telling me which product you would choose if you won.  
  • For an additional chance to win follow House Revivals via GFF or by email or RSS feed and leave me a separate comment telling me you follow this blog. 
  • "Like" House Revivals and Eco Natural Soap on Facebook and leave a comment saying you liked us for a third chance to win.

So, you have up to three chances to win!  For each chance, leave a separate comment.   The winner will be chosen via random drawing on Monday the 23rd of July.  Be sure I can contact you, so you can claim your prize!  If I cannot contact you, or do not get a reply from the winner within one week of notification, we will draw a new winner.

** this giveaway is now closed.


Linking to: 

disclaimer:  Eco Natural Soap sent me free samples of their products for this review.  However, the photos and opinions expressed here are entirely my own.

Thursday, July 12, 2012

How to Use Reclaimed Wood in Your Home

Are you loving all the reclaimed wood we are seeing lately?   I am!  What a fun way to create a focal point, add texture and variety, or give a space a sense of history.

 via Design Sponge

One of my all time favorite reclaimed wood projects is this one.  Sarah, the homeowner describes how they found salvaged wood and fitted it all together to create this knock-out!  Quite a few of the pieces are reclaimed gym flooring.


Kim Lewis designed this nursery for Jewel's baby son.  The reclaimed wood wall is the perfect backdrop for the rustic and whimsical decor.


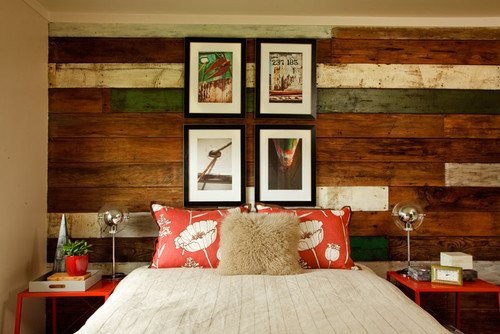
Who needs a headboard, when you have a this gorgeous reclaimed wood wall?


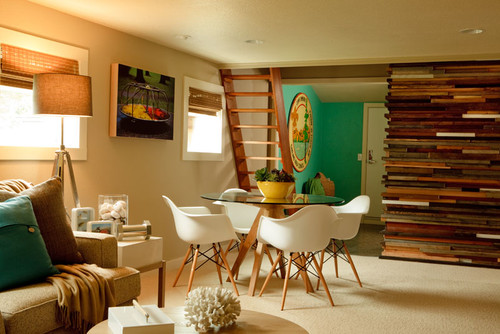
You can use reclaimed wood to create lots of texture, as shown with this divider wall by interior designer Garrison Hullinger.

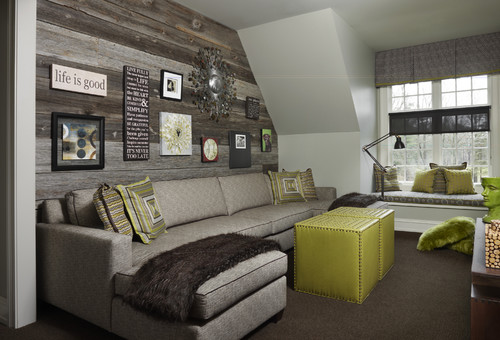
If painted surfaces and eclectically mixed finishes are not your thing, you might still love this weathered wood wall.  It feels warm and welcoming and casual.


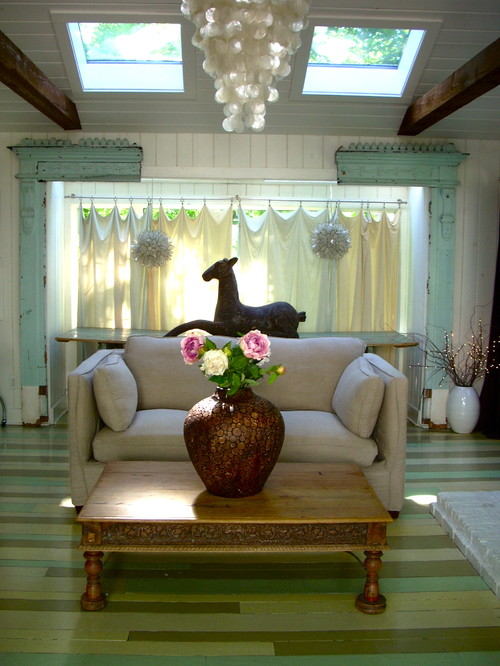
You don't have to limit your use of reclaimed wood to walls, as interior designer Maureen Rivard shows with this gorgeous and simple floor!


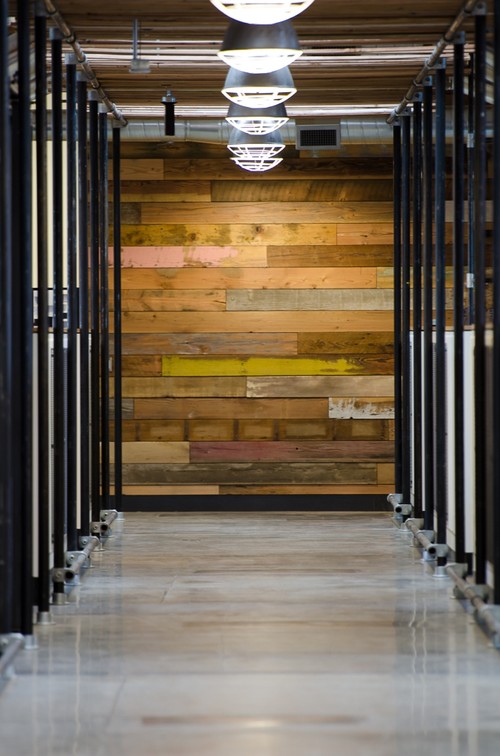
Reclaimed wood installations are just as at home in a commercial setting as in a residential setting.

Of course, no review of reclaimed wood would be complete without this image of Sarah Richardson kitchen island.....

... which brings to mind another kitchen.....


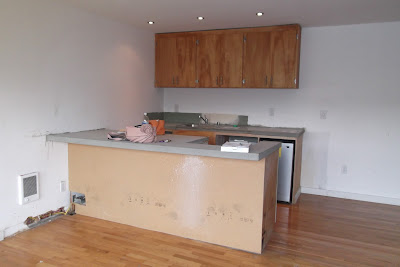
Progress on our little marina condo has been inching along.   I have some skim coating and painting projects to wrap up, and then work can begin on this dreadful kitchen.  We have already ditched the beer fridges in favor of a regular fridge, and built a small wall to define where the kitchen ends and the entryway begins.


The wall has a coat nook on the entry side, and a message center/ charging station on the kitchen side.

The next step is to address the kitchen peninsula. We need to cover the hole in the left lower corner, create a wider landing area next to the stove, and add a bit more storage.  The back of our peninsula will be a patched up mess.  Wouldn't it be fun to do a reclaimed wood installation on the back of the peninsula, instead of buying new sheet goods?


The previous owner of the condo left piles and piles of old salvaged lumber behind, so our materials cost would be next to nothing.  What do you think?  Salvaged lumber for the kitchen island or an installation of all new product?

Monday, July 2, 2012

Featured at Knock-Off Decor!


Hey folks!  Come see me over at Beckie's blog, Knock Off Decor.  Beckie is featuring the starburst mirror I first showed you here.


See you there!

Sunday, July 1, 2012

Working on the Little Marina Condo in the City


Lots of work has been going on at the little marina condo, lately!  Here is a glimpse into our life when we are in the city.


Tiling the bathroom...

Framing and paneling the new message center and entryway wall....


Okay, this looks like play, but it was work. Honest, it was. We were measuring the distance from the marina to a nearby bridge.


Aaaaaaaaaaand, to keep things complicated, we looked at another condo today that needs improvement.  It's in our building, but has a nicer view..... and who wouldn't want that turquoise bathroom suite, right?


Sunday, June 24, 2012

How to Make a Paper Mache Star Burst Mirror

Thank you all for being patient while I put together a 
tutorial on how to make the paper mache starburst mirror that I  

 This project was inspired by some lovely Horchow mirrors, some mid-century clocks, and a mountain of moving boxes!

As with any paper mache project, the hardest part will be waiting for the piece to dry before moving on to the next step!  I live in the Pacific Northwest, so I sometimes have to wait days between steps, but if you live in dryer climes the first side of a piece may be dry before you finish the other side.
...................................................................
To make a paper mache star burst mirror, begin by creating a cardboard base.  I had lots and lots of flattened moving boxes, so I simply drafted some long triangles onto the cardboard and cut them out with a utility knife and a straight edge to create the starburst points.  My star was made to fit a specific place, so your dimensions may be different than mine if you customize the size or proportions of your starburst mirror.


Begin by cutting:
  • two long isosceles triangles for the top (front) sides of the vertical points
  • two long isosceles triangles for the bottom (back) side of the vertical points
  • two medium length isosceles triangles for the top (front) sides of the horizontal points
  • two medium length isosceles triangles for the bottom (back) side of the horizontal points
  • four shorter length isosceles triangles for the top (front) sides of the diagonal points
  • four shorter length isosceles triangles for the bottom (back) side of the diagonal points
Notes on the "front side" of the points:
  • My "long" points are each sixteen inches along the "ridge", and about seven inches wide at the base of the triangle, or about three and one-half inches at the widest point on each side of the "ridge".
  • My "medium" length points are each thirteen inches along the "ridge", and about six and one-half inches wide.
  • The "shorter" length points are each ten inches along the "ridge" and about five and one-half inches wide.
Notes on the "back side" of the points:
  • The backs of the points should be cut about an inch longer than the fronts to give you a small overhang and provide a little extra "gluing surface" later on when you are assembling the star.
  • My long and medium length backs were about four and one-half inches at the widest point.
  • The backs for the four shorter length points were about three and on-half inches at the widest place (in other words, three and one-half inches at the "base" or "short side" of the isosceles triangle).
It's really important not to kill any brain cells by thinking too hard about the geometry.  
If your math is a little off, you can always cut up a cereal box and patch things up a bit. I promise! 
Here, the long and medium length top pieces have been glued to their corresponding 
back pieces, but the shorter points have not yet been glued together.

Begin gluing your points together:
  • Once you have all your triangles cut, you will need to take a straight edge and score a crease down the center of each top (front) piece.  
  • Now, take the two long top pieces and fold along the score line to create a ridge, and glue the pieces to their corresponding bottom (back) pieces.  You can hold the pieces together with masking tape while the glue dries.
  • Repeat the process with the medium length sides.
  • Do not glue the four shorter points together yet.
To create the round central core of the star:
  • Cut some long strips, about three inches wide, from cardboard cereal boxes. Tape them together to make an even longer strip, and wrap them around something about five and one-half inches in diameter (I used one of those huge Nestle Quick canisters).  Wrap the cardboard strip three or four times around your form. Secure the end of your strip with masking tape and gently slip the cardboard ring from your form.  Glue and tape the cardboard ring together.
  • Use the base of the form (mine was the Nestle Quick canister), as a template, and trace three or four circles onto corrugated cardboard. Cut out the cardboard circles, and glue them inside your ring to make it very rigid.  I like to use wood glue when working with cardboard, because it is extremely strong.
Now you can begin assembling your star: 
  • Begin by securing the vertical points to the round central core, using glue and tape.  The extra length you gave yourself on the back sides of the points will come in handy for gluing the points securely. 
  • Next, secure the horizontal points to the round central core.
  • At this point, you will want to "play around" with the diagonal pieces, trimming them to fit as flush as possible against the sides of the other points. (remember the thing about not killing brain cells? that applies here)
  • Tape and patch as necessary to make everything fit together :)

Now, you should have something that resembles a starburst!  At this point, I decided to reinforce the back with another layer of cardboard -- you may or may not want to do that. Creating the cardboard form is the most difficult part (well, except for waiting for the paper mache layers to dry).

this is how your cardboard base will look after a first thin coat of paper mache pulp

It's time to start the paper mache process!
  • You may use traditional torn paper strips, and cover the whole thing with three or four layers. OR, you may spread a couple of layers of paper mache pulp over your base.  OR, you may combine a couple of layer of strips with a couple of layers of pulp.  The choice is yours, there is no wrong way to do this. Here is the recipe for paper mache pulp.
  • You may choose to sand between layers, or you may choose to sand after the final layer only, or you may choose not to sand at all -- do what pleases you. 
  • A tip for getting paper mache pulp layers smooth is to use a butter knife or a spatula to smooth it.  If clumps of pulp keep wanting to fall off as you work, spread a piece a cling wrap over the surface and smooth over it (like rolling out a pastry using Saran wrap between the dough and the rolling pin) with your spatula.

 this is how your star should look after after a base coat of red has been 
applied and a first coat of gold has been randomly dabbed on


After all your paper mache layers are dry and you are happy with the finish, it is time to paint.
  • A tip for painting anything with a gold or gilded finish is to first paint a layer with RED paint -- you will end up with a deep rich gold tone.
  • Use two or three different metallic gold colors and dab the layers on using an old brush or a foam brush -- dabbing helps give it a gold leafed look.
  • Use an antiquing medium to give the piece some patina, if desired.
 this is how your star will look after about three light coats of 
gold have been dabbed on -- keep going until you are happy with the coverage

Now you can glue on your mirror.
  • Craft mirrors can be ordered online from most craft supply retailers.
  • I ordered a couple of different sizes to play around with -- did I want to put the mirror inside the circle or on top of the circle?
  • I decided to use the slightly larger mirror and glued it on top of the circle (I used Gorilla glue for this)

To frame the mirror (optional), I took a length of bead garland and glued it around the outside of the mirror using a small amount of Gorilla glue -- be careful, Gorilla glue grows!  When the glue was cured, I took some joint compound and filled in all the gaps to make it look like it was all carved from one piece. Then I touched up the paint.

The starburst mirror was finished!


I photographed it and blogged about it.


And then I moved on to the next project :)

I hope you've enjoyed this tutorial!


This post is being linked to the following lovely places:
Tip Junkie handmade projects
My Uncommon Slice of Suburbia