What do you do with all your creative paper scraps? Those bits left over after punching or die cutting or trimming your paper? Those intricate die cuts that didn't quite work out? Embossed papers that cracked or tore? Stuff that really isn't useful, but it's still really pretty?
I keep layering collaged items, paint, and ink until I'm happy with the finished piece. I do not seal the top of the piece.
Every so often, I will gather up a collection of bits and pieces that I've been hoarding, and use it to create a masterboard. A masterboard is simply a decorated sheet that can be cut apart and used in other projects. To create a masterboard, you need a substrate. Your choice of substrate will depend on the finished purpose of your masterboard.
For instance, if you are creating a masterboard for scrapbooking, you may want to keep your materials archival. If you are making cards or crafts, archival qualities might not be important. My favorite substrates include cereal box sides, ugly scrapbook paper, packaging, mailing cardboard, and junk mail.
I've even used those heavy card stock weight handwriting strips that teachers use.
How you decorate your sheets will also depend on how you want to use the piece. You can layer materials, paint, stamp, or doodle. I usually do a little of all those things.
This is also a great way to use up small amounts of leftover paint. My favorite way to add paint is by spreading it with an old gift card or a stiff piece of cardboard.
Since I like to layer scraps on my masterboard, I use all-purpose white glue. It's inexpensive and can be purchased by the gallon. I have a smaller glue bottle that I refill from my gallon jug. The glue can be spread with an old gift card. Your choice of adhesive may depend on your finished application.
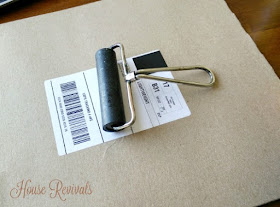
Glue all your layers down really well, then use a brayer, if you have one, to flatten it out and get good adhesion. To protect my brayer and to get good contact, I sometimes use an old sheet of fun foam over my masterboard while using the brayer.
I keep layering collaged items, paint, and ink until I'm happy with the finished piece. I do not seal the top of the piece.
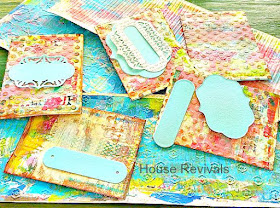
I've used heavier masterboards to cut up and use for business cards. If you cut them out after the glue is mostly dry, but the paper is still cool to the touch, you can run the pieces through your embossing machine for beautiful results that are very sturdy. Or run them through the machine between your shimmed plates to flatten them out perfectly. Embossed pieces can be lightly inked on the raised areas for very pretty effects.
Lighter weight masterboard is perfect for cards or tags. The possibilities are limitless. I know of an artist who creates his own masterboard from found ephemera, presses it perfectly flat, then screen prints over it! His pieces are beautiful.
Lighter weight masterboard is perfect for cards or tags. The possibilities are limitless. I know of an artist who creates his own masterboard from found ephemera, presses it perfectly flat, then screen prints over it! His pieces are beautiful.
You might enjoy this post about weaving stars from vintage book pages.
You might also like this post on how to use up and upcycle old notecards.
If you enjoyed this post, please subscribe to House Revivals in the sidebar, so you won't miss the fun projects we have planned. Find us on Facebook, too, so you can catch all the "in between" stuff, and see what I'm working on throughout week on Instagram. Feel free to link today's project to your favorite social media sites.
Thanks so much for stopping by!
Thanks so much for stopping by!
~Amanda


