Friday, April 27, 2012

How We Met Our Beach House: A Peek Inside!

A couple of weeks ago I shared the first installment of "how we met our beach house".  We peeked inside the windows of the neglected and abandoned old house, and found ourselves intrigued by the possibilities.


Today, I will share a little about our first glimpse inside the house with our realtor....


At first glance, the interior didn't seem completely horrible.


The kitchen cabinets needed to be replaced, and the grasscloth wallpaper that covered every surface was in poor condition.  Light fixtures and trim work looked pretty dated.


On closer inspection, we found evidence of mold ...


... and rot and rats....


... and we discovered that most of the bedrooms and bathrooms had been gutted -- with a sledge hammer, apparently.


Although there was duct work for the HVAC system, the actual heat pump had been ripped out.


The master bath sported a dangerous "step-up" tub -- against code in most areas, and to add insult to injury, the tub and tile were pink.  Not a pretty pink, mind  you, but a kind of putrid pink.... and it was filthy.


The laundry room had been gutted.


Years earlier, the garage had been converted (badly) to bedrooms, but they were in rough shape.


The second story bathroom was covered in red floral wallpaper, had a broken light fixture, and a two foot tall vanity.


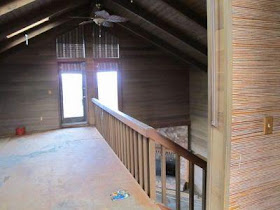
The loft was actually in good condition, compared to the rest of the house, only needing a few cosmetic changes.... or so we thought.


We loved the space, but weren't in love with the finishes.


We kept thinking that it was such a shame that this was a beach front property, but the house had very little view of the ocean. Then we stepped onto the second story deck.


It was foggy that day, but we still got a pretty good idea of the potential for a spectacular view.... and a plan began to form....

Tuesday, April 24, 2012

How to Make Cheery Paper Garlands


Here is another "oldie", perfect for spring and Mayday celebrations.  This project was created late last winter, while staying up late with a sick pooch.

Do the last few weeks of wintry weather always have you yearning for cheery color?  Last night I was keeping vigil by a sick pet, and needed something to occupy my hands in the wee hours, so I decided to create a bright colorful garland to bring some of that cheery color into our home.
I pulled out my stash of vintage crepe paper and a needle and thread and some glue and started to play.

Before I knew it, it was dawn, the pup was feeling a bit better, and I had a little stack of vintage paper florets!

They were strung together with cord created by finger crocheting a length of turquoise crochet thread.

And then the pup and I napped! Finally.

I don't have pictures of the process for these, but they were fairly easy.  Simply take strips of crepe paper (vintage or good quality new paper gives the best results) and gather one long edge using your needle and thread.  Form into circles and glue to secure.  Next, stretch the outside of each circle to ruffle it a bit.  Create several layers, as desired, add a layer or two of book paper for interest, glue it together, and you're done!  No rules, no measurements, just play around till you find a combination you like.

Drape it across your mantle, over a mirror, or across a bit of weathered old fencing.

Layer textures, like an Anthropologie necklace, if you like.  Or keep the styling simple and clean.


Enjoy your bit of cheery color and dreams of springtime and Maypoles!


Friday, April 20, 2012

How to Make a Fabric Peony


Here  is another "oldie, but goody".  The peonies in our neighborhood are starting to bloom, so I thought I would share this tutorial for creating a handmade burnt edge peony that will last forever.  Enjoy! 
....................................................
 
 I've seen lots of gorgeous burnt edge flowers floating around in blog land lately, and felt inspired to create my own version recently.  

We were invited to a double birthday party for a couple of women we know, and I wanted to bring them something small, but special.

You know how it is when you don't want to bring the same old bottle of wine, but a larger gift isn't really appropriate?   

I thought of all the burnt edge flowers I'd been seeing, and I thought of spring, and so (of course), I thought of peonies!
I love the simple, stylized flowers made from circles (like the ones on Kudzu's blog, here), but I wanted to take advantage of the melting characteristics of the fibers to create something a little more realistically inspired for this project.

To start, I chose three different fabrics for the flower, and two for the foliage.  One of the three fabrics used for the body of the flower is a lot like buckram, but it's polyester.  I used it to give the flowers some "body".  You could also use tulle or regular buckram, but I wouldn't recommend burning the edges on those pieces.  Try to match your thread to your project fabrics.  Since all of our goods are in storage until we find a new house, I needed to buy thread and needles.  We have a fun little Japanese $1.50 store across the street where I was able to find these.

In the spirit of "revival", I used thrifted, repurposed, and vintage fabrics, but you could easily use new fabrics -- you can make two large flowers with three one-third yard pieces plus a few small scraps for the throat of the flower and for the foliage.  While we're discussing fabric, it's important to choose a poly fabric, to get the nicest edge.    

*It's very important not to use acetate or acrylic fabrics (or use them with great care).  These fabrics are very combustible. (This is why you would never choose untreated acetates or acrylics for something like a window treatment-- imagine a candle (or a heater) placed a little too close to the curtain, the flame is drawn toward the fiber or a slight breeze moves the fabric into the flame, and WHOOSH, there is oxygen moving freely around the fabric to feed the flames, fire climbs.... bad news.)

Once you have your poly fabrics, you can decide how big you want your flower to be.
Begin cutting circles out of your fabric (you can freehand this), making each circle progressively smaller.  I used eight circles for each flower, but fewer would have been fine.

Now, light a candle.  Carefully (hot, melted poly can stick to your skin and really burn) pass the edge of the fabric circles through or near the flame.

By passing the fabric near the flame, you have a lot of control over  how much the edge of the fabric will curl.  By passing the fabric through the flame, you can get more of a "burnt" look.
When you have the edge of your circle entirely done, fold the circle in half, and then into thirds.
Then cut "petals" into the fabric.
Quickly pass the "crotches" between the petals back through the flame to seal and shape them.  I found that by doing the petals in this order, I had better control over the fabric, as it was less "floppy".  Repeat the process with all of the circles.


Because some peonies are a little bit "shaggy", I clipped the outside edges on some of the petals and quickly passed them back through the flame.

For the centers of the peonies, cut some small rectangles of your choice of fabrics and snip a "fringe" into one side.  Then pass the fringe over the flame to curl and seal it.  I used five different fabrics for my centers, beginning with a couple of tiny pieces of pink and yellow, then a piece of green, then two of the fabrics that were used on the body of the flower.

For the foliage, I layered two pieces of fabric together and freehanded the shapes.  I then "burnt" the edges of each leaf, and stitched the two layers together with a simple running stitch down the center of each leaf.

Now for the fun part!  You will start from the center of the flower and build out.  First, create your "center".
My first two pieces were only about an inch wide, each.  I rolled the center most piece, then wrapped the next piece around it and stitched them together.
Keep adding to your center, by wrapping the next layer and stitching until you are happy with how it looks.
At this point, trim off the excess fabric that you have been using as a "handle".

Grab the smallest flower petal layer and stitch it to the center, using your needle and thread to manipulate it till you are satisfied with how it looks.

Now, set the center aside, and grab the next two layers from the stack.

Stitch those two layers together, gathering the center slightly, to add dimension.  Now, stitch them to the center of the flower.

Continue in this way until you use up your flower layers, or have the desired flower fullness.
Depending on how much you gather and manipulate during the sewing process, you will have a more compact or more open flower-- the choice is yours.


Next, stitch the foliage to the back of the flower, add a backing if you like, and add pin or a clip.

Wear it on a scarf, or on your t-shirt, or to a formal, or a wedding, or just use it to dress up a handbag!  Smaller versions could dress up a pair of flats. Pin or stitch your flower to a pillow -- or to your curtain tie-backs.  Have fun, adapt the concept, and pass on your ideas!