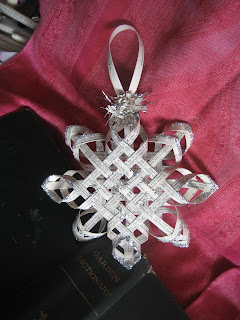
We've already learned to make the first and second stars.
To make the third star, you must first follow the tutorial to make the first star, here.
Get the first star assembled and glued, as shown in that first tutorial.
Trim the points to tidy them up and give them a nice "finished" look. At this point, you won't add little "dots" at the points, as suggested in the first tutorial, though you may decide to come back and add them later. Also, don't add a hanger or any embellishments yet.
See the little "dots" (these could be cute little punches, medallions, buttons, etc.)? Don't add them yet, if you are planning to use them.
For the next step, you will need to gather up a few of the strips you used to create your other stars...
... and cut them in half.
Glue the ends together to form little loops, as shown. You will need eight of these for each star.
Now, glue the little loops to the points of your star, alternating the direction they face, as pictured here.
Continue, until all eight points are finished. Remove clips when your glue is set.
Now, you can glue the middle of the star "sides" together, as shown, so your star won't be so fat. You don't have to, but I think this particular star looks better this way.
Add some embellishment to the center for a finished look. Continue embellishing using glitter, tinsel, paint, dots, or anything else you desire. Here, I added a little fan rosette to the center, as well as glitter and tinsel.
You will make your hanger just as you did for the first star, but when you adhere it to the piece, you will glue it at the intersection of the original point, and the added loop. You may wish to cover the intersections with some sort of "dot" or embellishment.
I left most of the point intersections plain (okay, I used a little glitter...), only adding a fringed rosette to the base of the hanger.
And there you have it. Three stars, three tutorials. See the first tutorial here.
You can find the second tutorial here.
Here is a sneak preview of some other tutorials I have in the works, including making sweet little ornaments and garlands from a recycled sweater....
Adding Jimmy Choo inspired leather embellishments to a plain Jane handbag....
Making miniature crown ornaments fit for a king....
... and of course, I haven't forgotten about the little car and airplane ornaments. These are just a few of the projects that are in the works at House Revivals!
Be sure to click "follow", in my sidebar, so you're sure not to miss any fun projects and tutorials!
Happy Crafting!
This post is being linked to:
Tickled Pink at 504 Main
Saturday Nite Special at Funky Junk Interiors
Saturday Mornings
Remodelaholics Anonymous
Tatertots and Jello Weekend Wrap Up
White Wednesday at Faded Charm
Blue Cricket Design
Crazy Cute at Between You and Me
Strut Your Stuff at Somewhat Simple
Time Travel Thursday at Brambleberry Cottage
DIY Holiday Highlights Project Party
Crafty Soiree at Yesterday on Tuesday
Transformation Thursday at Shabby Chic Cottage
Hooking Up with HoH at House of Hepworths
Paisley Passions Thrilling Thursday
Handmade Tuesdays at Ladybug Blessings
All Things Merry and Bright at All Things Heart and Home
Whatever Goes Wednesday at Someday Crafts
The Thrifty Home Penny Pinching Party
I Made It Without My Hubby at Shanty 2 Chic
Talent Tuesday at Vintage Wanna Bee
Nifty Thrifty Tuesday at Coastal Charm
Just Something I Whipped Up at The Girl Creative
Met Monday at Between Naps on the Porch
Market Yourself Monday at Sumo's Sweet Stuff


